Sunday Rider
Site Supporter
Any of the veteran alternator swappers able to assist here?

Yes that one will work, you will need the adapter plate and an electrical harness. I'd like to know if the DB electric alternator is this one
Kiltman, sorry for my poor english!Yes that one will work, you will need the adapter plate and an electrical harness
Thank you very much!For the adapter plate I'd check with John Clark @ citygear@aol.com
https://www.st-owners.com/forums/conversations/add?to=FZ750
75.00 each PayPal citygear@aol.com
With free shipping
Thanks
John Clark
Can also check out this thread on the For Sale page... https://www.st-owners.com/forums/threads/40-amp-new-adapter-plates-for-sale-p-n-11202-maj-g20.181778/
Good luck with the project. If interested here's a link to my recent alt upgrade this past April. Some of the pics may be helpful.
Alternator upgrade on '92 ST1100- SUCCESS! | ST1100-Alternator
Hi ST community, I’ve been contemplating this upgrade for a couple years, acquiring all the parts, but moreover, dealing with my fear of tacking a job this big and tearing apart the bike in ways that usually trigger cold sweats & nightmares. But with the support of the forum, including the...www.st-owners.com

Thank you very much!
I didn't know that there are other items required for the alternator swap!
I will contact John Clark to buy the adapter plate.
So, I will need to buy the alternator + adapter plate + the harness (that I don't know) all at once so that my friend will bring these parts at once, to avoid missing time having to order other needed items in USA...
Thanks a lot!
Thanks for all!You're welcome. Just incase you've not seen, here's a link to pretty much everything needed (tools, parts, etc):
And here is a link to one of many pages that detail step-by-step directions/tips/tricks to successfully completing this job.
Again, good luck!
I thank you very much for your kind attention!Any of the veteran alternator swappers able to assist here?
I knew the great folks on this site would give you good guidance. I think your post just got buried under newer ones.I thank you very much for your kind attention!
Yes, I thank so much all of you guys!I knew the great folks on this site would give you good guidance. I think your post just got buried under newer ones.
Good luck with the upgrade. Please come back here to update how it went.

")
Ok, I know everyone is going to the 40amp alternators for the early ST1100's which 1) are not available from Honda any more and 2) leaves those with thought of the conversion to either install a used alternator or an aftermarket one. The question I have, has any one attempted to use an alternator out of a ST 1300 which are 52 - 60 amp alternators and are available from Honda? Looking at in schematics it looks identical other than the driven gear assembly is considerably different which is not purchased with alternator.Jim, I’m on this site too. This link is in the upgrade kit loan article:
The sixth paragraph down has a link to Mark Hosier’s step-by-step for the procedure. No substitute for a service manual on hand. If you don’t have the Honda and are using the Clymer, IINM there is a glitch or two in it.40 Amp Alternator Upgrade - A Two Part Series ! Now With VIDEO !! *
40 Amp Alternator Upgrade - A Two Part Series ! Now With VIDEO !! *www.st-riders.net
Edit: the documentation package in the tool kit has two copies of the step-by, one for the garage with moly smears on it and another in the binder for home study.
John
Thank's Andy I Will try this on a monte with st1100 1995.St1100 40 amp Alternator Conversion Completed!
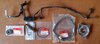
The following are observations that may help others attempting this project:
My motorcycle is a 1993 ST1100 ABS with 101,000 miles on it. The alternator was working properly but was leaking oil. Not just a dribble but enough that I didn't want to test drive the bike before I bought it. At 70,000 mi. the rectifier had been replaced by the previous owner but I wanted to use electrically heated clothing, so rather than replace about $5 worth of seals to fix the oil leak, I elected to replace the 28 amp alternator with a 40 amp model.
I have done a lot of rebuild jobs on cars, airplanes, and motorcycles and still I have yet to learn to take pictures before disassembly. There is always something you can't remember, in spite of how obvious you think at the time, the re-assembly will be. I had several memory lapses on this job. I couldn't figure out where one of the two wires on the back of the engine case went. The wire was only so long and had to go somewhere within its reach. I finally figured it out; it was the transmission neutral light switch which plugs in on the side of the transmission case which was hidden by a hose!
The three sets of instructions I worked from most likely will be self-evident to most people but I had trouble seeing into some things for whatever reason. I have outlined the things that I had trouble with in case others have the same issues and my comments are supplementary to the instructions others have put together.
To remove the gas tank on my bike I had to remove the top of the air filter housing. No big deal...but none of the directions mentioned that. My tank was an especially tight fit and required a lot of trial and error to get it out and back in. I kept thinking something was hooked or jammed somewhere.
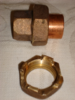
I made my own swing arm lock ring bolt removal tool out of a ? inch copper compression fitting. The brass fitting is easier to work with and there is a large hole in the middle to put the 18mm Allen wrench through (see pictures). Actually I used a 1-1/16th inch socket over the compression fitting to loosen the lock ring. The right hand picture shows how I re-tightened the swing arm bolt lock ring after I torqued it. My helper held the breaker bar while I tightened the lock ring. The lock ring is supposed to be torqued I think but without the Honda tool I couldn't do that.
I had a terrible time removing the swing arm because none of the directions said you could remove the drive shaft by reaching up inside and pulling it out before trying to remove the swing arm. I thought the drive shaft was mounted in the swing arm. As soon as the drive shaft was out, the swing arm was easy to remove.
The swing arm bearing on one side was hard to remove from the pivot bolt. I figured out a way to lever out the bolt without damaging the threads on the pivot bolt.
I thought the grease seal on the swing arm bearing was removable and tried to remove it so I could clean the bearing. Wrong! It is glued in place and should not be tampered with. I was able to salvage it with some super glue.
One set of directions suggested holding the alternator drive shaft flywheel in a vice and another said to use an oil filter wrench around the flywheel to hold it so the shaft nut could be removed. The oil filter wrench wouldn't work and I was afraid to use a vice. I used a Vice-Grip chain wrench with a rag wrapped around the flywheel, which worked well. The nut was on very tight and I had to use a long breaker bar to loosen it. I forgot to put Locktite on the shaft threads before assembly and had to take it apart again and do it right.
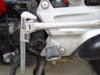
My alternator wouldn't go in without moving the electrical cables on the left side. The alternator drive and its mounting plate go in first and are not joined with the alternator until the drive is already in the engine block. That was not mentioned in the directions! At first I thought there was no way that the alternator was going to clear the frame member and then it just fell in. Yes, I read all the directions from several sources and watched the two videos.
The alternator cover can not be put on after the alternator is installed and must go on before installing the alternator I had trouble correctly trimming the alternator cover and must have passed the alternator back and forth through the frame six or eight times. I finally put the alternator in place as best I could and then passed a long strip of sand paper between the frame and the cover with the abrasive side toward the cover. I pulled it back and forth a few times and removed the cover. The sandpaper marks showed me exactly where to trim.
The wires and hoses that go by the rear of the alternator cover should be routed to either side of the alternator cover or they might rub on the swing arm. Even if they do rub, I don't think it would be a big deal as there is not a whole lot movement there! However, better safe than sorry.
My swing arm only had light corrosion on it so I cleaned it up and painted it. In addition to that I painted it with “Plow Share†protective coating. Any farmer should know what this is. When it dries, it is like a thin, hard tar coating. Only time will tell if it helps any.
When re-installing the swing arm, put the drive shaft boot on the swing arm first, before you install it. I put it on the transmission case first and had to remove the swing arm again to get it right. My boot was not worn but it had hardened with age so I replaced it. That item was not in the suggested parts list!
I ordered all the “O†rings for the rear end that are called for in the directions. Only one actually needed replacing and that one was the large outer one on the drive flange. This is the one that is exposed to a lot of dirt and mine was worn in half. However, knowing my luck, if I hadn't ordered all of them, more than one would have needed replacement.
The propeller shaft end cap on mine was worn so I turned it over as it was suggested in one of the directions. The directions said to tap it out with a drift. Well, mine had to be pushed out with a press. It was a very tight interference fit!
The instructions said not to tighten the four nuts on the final gear case until the rear axel is installed and I didn't, but I wondered why! There is enough play in that mounting that the rear axel would be difficult to install if the gear case were tightened up without being in alignment.
I removed the transmission shift linkage as outlined in the directions, even though it looked like the alternator parts would go in and out without removing the linkage. I assume those before me obviously know better.
On my installation I did not have to remove the two left side transmission bolts that one of the directions mentioned. There was plenty of clearance on mine and it was not an issue.
One owner suggested running the engine on just the fuel that was left in the carburetor bowls before installing the swing arm to make sure the alternator was putting out the correct voltage. My engine would only run on full choke and not very well so I elected to continue with the reassembly. Looking back, I probably should have re-installed the fuel tank and gotten it running properly so that I would know for sure that the alternator was charging before I put it all back together, but this time, I got lucky and it worked out in the end.
I shopped around for the best price on parts including shipping and Zanotti Motors had the winning bid (www.Zanottimotor.com). They don't have a parts fiche like some sights and you have to send them a list. The total cost for the parts was $510.29 from them.
To finish it up I applied a home version of “Torque Seal†by stealing some of my wife's nail polish and drew a line across the swing arm pivot bolt, lock ring and frame so I will know if anything moves.
I must share one last little fiasco that occurred during this job: I strapped the center stand down while doing the job but removed it to drain the oil and forgot to put it back on. When I pulled my Lewis Pin out, I pulled so hard that the bike came off its center stand and crashed to the floor. A wooden dolly I had underneath it softened the landing a little and I ended up with only a broken windshield when it fell against something near by.
The alternator replacement job was not as labor intensive as the engine overhauls I've done but it was right up there in time. One experienced installer claimed four hours from start to finish but that has to be only if you have done it before, don't have problems and have some help. My hat goes off to Alan Barbic who ventured into “no mans land†and did the first alternator upgrade. I would have given up many times, thinking that it couldn't be done. The “Lewis Pin†idea by Jonathan Lewis was a stroke of genius. That alone probably saved many hours of unnecessary labor and frustration removing the exhaust system and oil pan (“exhaust†is an acronym for frozen bolts, broken mounting studs and lots of aggravation). Even following along with three sets of directions from different sources I thought that there was no way it could be done and posted a question on the bulletin board several times during the process. Thanks for the help guys!
If anyone has a question on the alternator swap don't hesitate to contact me.
Andy Bittinger