ST1100 coolant replacement odd procedure

ChriSTian_64

Site Supporter
Joined
Feb 5, 2020
Messages
872
Age
59
Location
Deux-Montagnes, Quebec, Canada
Bike
2000 ST1100Y
STOC #
9063
I'm geting ready to flush my coolant in my ST1100 and replace it. I have watched a couple videos on youtube, just to have a general idea.
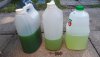
I bought a few quarters of replacement coolant, and... just opened the "big book" (clymer maintenance manual) to get the real, good, recommended procedure.

Geee ! I can't believe it !

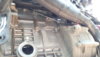
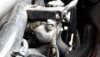
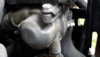
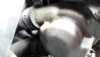
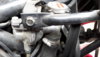
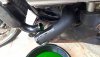
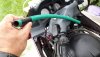
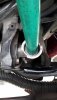
Chapter 3, for the coolant change, they say after you have drained the radiator (radiator drain bolt), you have to drain the coolant from the cylinders (yeah, that make sense).
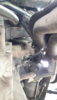
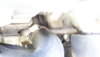
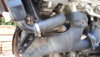
But then... they explain that the 2 cylinder block drain bolts (one on each side of the bike) are very difficult to access with the exhaust pipe installed... and that it is easier to remove the exhaust pipe first.
OK... If I have to do it.... let's go.
I then looked on chapter four to see how to remove the left and right exhaust pipes, and... (have to remove the engine crash guards, the exhaust guards, then the pipes) and for each exhaust guards and pipes you have exhaust gaskets that needs to be replaced before you put the pipes back on.

What ?

Geee, that is getting a bit complicated just to change the coolant.

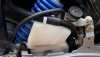
And then, of course, you have to purge the "reservoir" but that is not complicated.

I think I will just rinse the old coolant left in the cylinder blocks by pouring a gallon of distilled water, before repurging it, and refill it with new coolant.

How do you purge your cylinders block on your ST1100 ? Do you really remove your exhaust pipes at each coolant replacement ?

There must be a way, or a tool, to access those cylinder drain bolts, without removing the exhaust pipes and all.
 
Last edited:

John OoSTerhuis

Life Is Good!
Joined
May 10, 2005
Messages
5,224
Location
Bettendorf, Iowa
Bike
1991 SSMST1100
STOC #
1058
Use the Ron Major (R.I.P.) “blow job” method. BTDTx6


Edit: I did remove the block plugs once. That was in the last century, before joining The LiST and learning of Ron’s take on the job. It was a royal PITA, but I did it without removing anything beyond the tupperware. Only a couple of ounces came out though... hardly worth it.

John
 
Last edited:
OP
OP
ChriSTian_64

ChriSTian_64

Site Supporter
Joined
Feb 5, 2020
Messages
872
Age
59
Location
Deux-Montagnes, Quebec, Canada
Bike
2000 ST1100Y
STOC #
9063
Hey ! Thanks John.
I will print and keep that procedure in my maintenance manual.

When it will be completed, I'll have a cold one and a good tought for Ron Major.
That's right : Honda placed those block drains bolts so "inconveniently" behind the manifolds.

Ron also wrote that this is his annual procedure, to change his coolant : Ah-ha !
The previous owner never changed the coolant, cause... it was still looking good.
Another good thing that is overdue on my ST will be done.

Thanks again John. :hat4:
 
Last edited:
OP
OP
ChriSTian_64

ChriSTian_64

Site Supporter
Joined
Feb 5, 2020
Messages
872
Age
59
Location
Deux-Montagnes, Quebec, Canada
Bike
2000 ST1100Y
STOC #
9063
Just a little follow up : I just had a quick look at those cylinder block drain bolt, underneat the manifolds, on both sides of the engine.
The left hand side (when sitted on the bike) is not really accessible. You can put a wrench on the screw head, but you don't have enough play to unscrew it. On this side, you also have the rubber hose that goes from the left cylinder head to the bottom of the radiator. That is the hose we can unplug to drain the cylinder block. That hose connect to the cylinder slightly above the level of the drain plug. Maybe I could put the bike on the side, a little, to help drain everything. I'll see.
On the right side, about 8 inch above the engine oil sight glass, that cylinder coolant drain bolt is much more accessible : no problem to reach it, under the manifold, with a wrench. And there is enough play to unscrew it.
I'll try Ron Major's procedure, of blowing thru the radiator cap to push the coolant from the cylinder block thru the hose going to the base of radiator. And I'll then unscrew the right cylindre drain bolt, just to see if I can get some more from there.

This is the right side. Plenty of place to reach the drain bolt.20200624_132721.jpg

Now, here is the left side. Different story.
20200624_131927.jpg

Here is the hose going from the left cylinder block to the bottom of the radiator. The drain bolt is a bit visible, between the hose and the manifold.
20200624_131013.jpg

Another view.
20200624_130904.jpg

Finally, the Clymer maintenance manual recommend to check for any powdery
residue near hose connection, thermostat, etc, that could indicate the presence of a small leak.
hum... that could be suspect. Unless it is only sand. I'll keep an eye on this.

20200624_133808.jpg

20200624_133824.jpg

20200624_133736.jpg

20200624_133959.jpg

20200624_133647.jpg
 
Last edited:
Joined
Feb 25, 2016
Messages
4,779
Location
Northumberland UK
Bike
VStrom 650
Just a little follow up : I just had a quick look at those cylinder block drain bolt, underneat the manifolds, on both sides of the engine.
The left hand side (when sitted on the bike) is not really accessible. You can put a wrench on the screw head, but you don't have enough play to unscrew it. On this side, you also have the rubber hose that goes from the left cylinder head to the bottom of the radiator. That is the hose we can unplug to drain the cylinder block. That hose connect to the cylinder slightly above the level of the drain plug. Maybe I could put the bike on the side, a little, to help drain everything. I'll see.
On the right side, about 8 inch above the engine oil sight glass, that cylinder coolant drain bolt is much more accessible : no problem to reach it, under the manifold, with a wrench. And there is enough play to unscrew it.
I'll try Ron Major's procedure, of blowing thru the radiator cap to push the coolant from the cylinder block thru the hose going to the base of radiator. And I'll then unscrew the right cylindre drain bolt, just to see if I can get some more from there.

This is the right side. Plenty of place to reach the drain bolt.20200624_132721.jpg

Now, here is the left side. Different story.
20200624_131927.jpg

Here is the hose going from the left cylinder block to the bottom of the radiator. The drain bolt is a bit visible, between the hose and the manifold.
20200624_131013.jpg

Another view.
20200624_130904.jpg

Finally, the Clymer maintenance manual recommend to check for any powdery
residue near hose connection, thermostat, etc, that could indicate the presence of a small leak.
hum... that could be suspect. Unless it is only sand. I'll keep an eye on this.

20200624_133808.jpg

20200624_133824.jpg

20200624_133736.jpg

20200624_133959.jpg

20200624_133647.jpg
If there are no visible leaks once it's warm and up to pressure all is good, for now, that furring looks very minimal to me. The cylinder drains should be ignored but maybe flush your system if it hasn't been done in that long. You could always change it now and then again this winter, that way most of the old stuff will be gone.
The radiator sides look in good order they can corrode badly.
Upt'North.
 
Joined
Sep 10, 2011
Messages
2,210
Location
West Michigan
Bike
'98 ST1100
STOC #
8470
I would drain & refill 3 times to get as much as the old antifreeze out. Not expensive - it doesn't hold that much. Use distilled water only to dilute the antifreeze. For the final fill, add some Water Wetter.

If the system needs a cleaning, drain, add the cleaning solution ( in proportion to the capacity - won't take a full bottle of flush ) add distilled water, run and then drain and refill with distilled water. Repeat x 2. Then drain and add 50/50 antifreeze with some Water Wetter.
 
OP
OP
ChriSTian_64

ChriSTian_64

Site Supporter
Joined
Feb 5, 2020
Messages
872
Age
59
Location
Deux-Montagnes, Quebec, Canada
Bike
2000 ST1100Y
STOC #
9063
I would drain & refill 3 times to get as much as the old antifreeze out. Not expensive -
Good Idea Jim. You are right : distilled water cost nothing. It will only takes a bit of patience to do.
And since it is best not to mix two different coolant, lets make sure the old one is really gone.
 
OP
OP
ChriSTian_64

ChriSTian_64

Site Supporter
Joined
Feb 5, 2020
Messages
872
Age
59
Location
Deux-Montagnes, Quebec, Canada
Bike
2000 ST1100Y
STOC #
9063
If there are no visible leaks once it's warm and up to pressure all is good, for now, that furring looks very minimal to me.
Since I don't have my motorcycle driving license yet (should had complete that step in 3 weeks) I only tried my bike once, for abour 15 minutes. I had the impression that there was a light prestone (coolant) smell when I arrived home. We'll see. The engine just had enough time to start to get warm, not even hot.
 

ReSTored

Site Supporter
Joined
Nov 6, 2005
Messages
1,482
Location
Mississauga, Ontario
Bike
2019 Tracer GT
STOC #
4463
I wouldn't worry about the volume left if the block drains are not opened. Huge hassle for minimal gain. When I do a drain and fill I estimate that about 80% of the capacity is changed. I then start the engine, bring to operating temp and then repeat the drain and fill process again, with special attention to the extensive "blow job" process to wrest that final few cc out of the engine and give you something slightly risque to talk about with close friends and perhaps your in-laws in an unguarded moment.

By my calc you have 80% the first time and then 80% the second time and that means you've changed about 96% of the coolant and are still within the volume of coolant in a gallon/4L jug of type 2 Honda coolant.

I'm a strong believer in the balance between resources expended vs. value received. Since your ST is not likely to be flying the moon and back that 96% is a pretty good outcome and I'd be satisfied to leave it at that, but that's just me.
 
OP
OP
ChriSTian_64

ChriSTian_64

Site Supporter
Joined
Feb 5, 2020
Messages
872
Age
59
Location
Deux-Montagnes, Quebec, Canada
Bike
2000 ST1100Y
STOC #
9063
[.. ] and since your ST is not likely to be flying the moon and back [...]
My goal is to reach the moon. No coming back.

Thanks ReSTored. I'm reasured now that really not much is left, and that the blowing process get rid of it.

So, that's what I'll do. Drain, Blow, refill with distilled water, drain, blow, refill with cleaning solution (water and vinegar) to clean mineral deposit if any, drain, refill, etc.
 

ReSTored

Site Supporter
Joined
Nov 6, 2005
Messages
1,482
Location
Mississauga, Ontario
Bike
2019 Tracer GT
STOC #
4463
So, that's what I'll do. Drain, Blow, refill with distilled water, drain, blow, refill with cleaning solution (water and vinegar) to clean mineral deposit if any, drain, refill, etc.
Honestly, IMHO I really don't think you need to do this. Based on the pictures of the bike and the hoses etc.... I don't see any evidence of leaks or corrosion etc..... Just drain the coolant, refill with Type 2 coolant, and bring the bike to operating temp so the fan runs for a few minutes, drain again, refill with Type 2 and purge air as per the process in the manual and you should be done. Clean and refill reservoir as well.

I used to change my coolant every 2 years along with all other fluids, but I think this wasteful and the coolant now gets done every second fluid change meaning every 4 years instead of every 2. Honda indicates Type 2 coolant should be changed every 5 years. So, for me every 4 years is good.

The other thing, which you may have covered off in another post is that all hoses, elbows should be changed every 10 years. I did mine (2002 model) in 2012 and they're due again in 2022. If you don't know the history of the bike then maybe they've never been done or they are going to be due shortly anyway. so you may want to hold off on that drain for now.
 
Joined
May 8, 2018
Messages
1,963
Location
illinois
Bike
2000 ST1100
Yeah kinda like changing the oil or transmission fluid in your car. You do know there is always some left in your engine block or tranny right? Only way to get it all out is a complete dissasemby. Was also thinking what the Honda dealer does when he does a coolant change job. Does he drain and flush or just drain and refill?
 
OP
OP
ChriSTian_64

ChriSTian_64

Site Supporter
Joined
Feb 5, 2020
Messages
872
Age
59
Location
Deux-Montagnes, Quebec, Canada
Bike
2000 ST1100Y
STOC #
9063
Use the Ron Major (R.I.P.) “blow job” method.
Hey John, it worked !

And I'm currently having a cold one (as a reward for the hard work) to the memory of Ron Major.

I say "the hard work" cause it was kind of warm here today. With the humidex factor, it felted like 100 F.

That hose gave me a bit of hard time to take it out from the radiator base. And I did it 3 times.

20200708_132038.jpg

This was my blowing hose.

20200708_133144.jpg

20200708_133243.jpg

Every time I blew in the hose, I had maybe a cup, or half a cup of coolant that went out. And I could repeat it 10, 15 times... every time I was still getting a little more.

I then refill with distilled water, let the engine run 2-3 minutes, and flush it again. Yep ! The water that goes out was still a bit green,
And I did it again.

Kool-Aid (or Gatorade) anyone ?
Left to right : first juice, secound and third.
20200708_162832.jpg

After the third time, I had no more strength in my hand to try to remove that hose again. And the color of the water was clearly showing that not much of the old coolant was left.

I took the opportunity to clean my "reservoir", as suggested in Ron's procedure.

20200708_172833.jpg

Tadam ! It now look like a new one.

Another maintenance item done on my list. ;-)
 
Last edited:
Joined
Oct 17, 2021
Messages
274
Age
81
Location
Hoylake UK
Bike
ST 1100 year 2002.
ChriSTian 64 , I was surprised to see the coolant hose disconnected in the photo. It is not necessary to undo that hose. I found that out the hard way today. I have seen a number of pictures with that hose undone. But today I wanted to replace that metal strap with a tiny 6mm nut and a defective cross head screw. I should have realised the white plastic release valve does the draining .It was a struggle to get it off the radiator nozzle . I used a mole grip to stop the rubber sliding back .That was my mistake. After the hose was off I noticed the nozzle shape was oval instead of circular. The radiator nozzle metal was really soft (aluminium) and I might need another radiator now .I could not stop it leaking . I have to take it off for a proper inspection .
 
Last edited:
Joined
Sep 4, 2013
Messages
8,211
Location
Cleveland
Bike
2010 ST1300
ChriSTian 64 , I was surprised to see the coolant hose disconnected in the photo. It is not necessary to undo that hose. I found that out the hard way today. I have seen a number of pictures with that hose undone. But today I wanted to replace that metal strap with a tiny 6mm nut and a defective cross head screw. I should have realised the white plastic release valve does the draining .It was a struggle to get it off the radiator nozzle . I used a mole grip to stop the rubber sliding back .That was my mistake. After the hose was off I noticed the nozzle shape was oval instead of circular. The radiator nozzle metal was really soft and I might need another radiator now .I could not stop it leaking . I have to take it off for a proper inspection .
Sorry to hear about your oval spigot on the radiator. Are you aware this thread is a year old?
 
Joined
Oct 17, 2021
Messages
274
Age
81
Location
Hoylake UK
Bike
ST 1100 year 2002.
Well the ST 1100 s are not going to evaporate ,even after a year . My question might help ChriSTian 64 as his rubber pipes harden and become too tough to move. I forgot the word spigot . It`s a long time since I heard that word .
The amount of coolant shown by Haynes book says between 3.0 and 3.5 litres. The Honda service manual says 2.5 litres.
The users on this forum say some of the coolant just stays inside (about 30% )when the coolant is renewed . I was trying too hard to get it all out . Apart from the overflow bottle amount all I could get in was 1.5 litres. Once the battery is replaced I can maybe add a little more when it`s started up and warmed . Air bubbles wi;ll be displaced .Quite a messy process all round .
Today I checked the shape of the spigot. It still had some out of round so I corrected that . The under surface of the spigot had a roughness due to corrosion and flaky paint so I cleaned that off with a strip of abrasive mesh. Then wire wool .It has a nice smooth surface all round now. I wiped it all with white spirit and added a layer of Sikaflex EBT. That`s a polyurethane sealant and it will take 3 days to cure . But it will allow the rubber tube to make a good seal with the stronger jubilee clip and it`s built in wing nut . That was made for hosepipes .
 
Last edited:

Andrew Shadow

Site Supporter
Joined
Jan 28, 2012
Messages
5,125
Location
Montreal
Bike
2009 ST1300A9
I low pressure flush the system.

I stuff a water hose in to the radiator the same way as Christian shows in his third photo of post # 14 above. I coil up a rag and stuff it in to the filler neck around the hose. This holds the hose in place against the water pressure and allows a little higher pressure to build up in the system. Turn the tap on and pressure flush the system with clean tap water. Once finished, let the tap water drain out, fill the system with distilled/demineralized water and run the engine until the thermostat opens. Drain the tap water and fill with coolant.

You can do the blow job thing to get as much of the distilled/demineralized water that was used to flush out the tap water out as possible if you like. The small amount of tap water that was left in the system will have been further diluted by the distilled/demineralized water used as a flushing agent, so not mission critical if you don't do it I would think.
 
Joined
Oct 17, 2021
Messages
274
Age
81
Location
Hoylake UK
Bike
ST 1100 year 2002.
The very precise instructions in Haynes tells us all not to flush the old coolant down the drains but with all the flushing through does anyone deliver all the old coolant to the designated disposal site ? Hard to imagine that .
 
Joined
Oct 17, 2021
Messages
274
Age
81
Location
Hoylake UK
Bike
ST 1100 year 2002.
My thermostat did not look too good and testing it the only time it opened a crack was about 2mm. The new thermostats seem very expensive with £27 postage from USA added on top . Is there a better way to replace them ?
 
Top Bottom