ST1300 clutch push-rod/ lifter rod seal replacement

nt650hawk

Gino
Joined
Mar 24, 2017
Messages
96
Location
MA
Bike
2006 ST1300
for those with the knowledge. Please, before I attack this and find out the hard way. I can guess that i'm 90% sure it is form the outside but would like to be 100% sure. Is this seal installed from the outside of the engine or installed from inside the engine?

This is the seal that is behind the clutch slave assembly.

#14 on https://www.bikebandit.com/oem-parts...m2529sch414338


Joined
Oct 17, 2015
Messages
1,962
Location
near Harrow, Ontario, Canada
Bike
'83 BMW R100RS
STOC #
8870
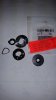
Hmmmm....well, I looked carefully at the schematic you attached Gino - and the seal to which you refer is (I am pretty sure...) part number 14, which costs the princely sum of $3.40:

14: OIL SEAL (8X25X8) 91204-MB0-013 1 0 Ships within 2 to 3 business days $3.40

The schematic certainly seems to show that it installs from the OUTside (i.e. the direction which is accessible). If it were installed from the INside (i.e. the direction which would require the engine to be completely disassembled) the assembly lines would originate on the INside of the rear case - as they do for the two parts numbered 19 (locating dowels), for example.

EDITORIAL COMMENT: only an idiot would design an engine with a seal installed from the INside unless there was a crucial reason. While they do not mind creating complex designs, in my experience, Honda hasn't employed too many idiots in recent times and I see no crucial reason for creating such a nasty situation on a cheap little seal which should be fairly easily replaced.

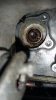
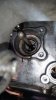
So....if I were you, I would buy about 3 of those seals - juuuussstttt to be sure - and then I would dig out the old one (gently) and pop in a new one.

Be sure to install it in the correct direction, lube it up well and seat it all the way into the pocket. It is a good ideal to take a photo of the old one in-place and then compare the thickness of the old seal to a new one. Then you will have a bit of a guide as to the proper installation direction and you'll know about when it is fully seated into its pocket.

Please keep us posted as you go. This is a challenging job, but you've already done the hardest part in getting access to the darned thing and I'm sure you can get the rest of it done.

Pete
 
Last edited:
Joined
Oct 17, 2015
Messages
1,962
Location
near Harrow, Ontario, Canada
Bike
'83 BMW R100RS
STOC #
8870
My thinking is the same thing...

from experience. the Honda Magna clutch seal is almost that close . This requires the ENTIRE rear to be remove to do it correctly for this $2.30 part.

http://v4musclebike.com/forums/showpost.php?p=27999&postcount=1


I just want to make sure i am not traveling down that rabbit hole again.
Ahhhh - well, the direction of installation and access to the part are two entirely different issues.

I am confident that the seal is installed from outside the engine and not inside - but getting at the seal while the engine is in the frame may be a challenge. The thing to do is get in there with a good light, a comfortable backrest and a bit of soft music on the shop stereo - and give it a try.

I just had a look at the musclebike linky you provided and it looks like an identical set-up to the ST1300 (and a whole raft of other Hondas according to the part listing in your first post above).
 
OP
OP
nt650hawk

nt650hawk

Gino
Joined
Mar 24, 2017
Messages
96
Location
MA
Bike
2006 ST1300
i must chuckle. no one has ever performed this in over 14 years..:nuts1:

where is my Unicorn. you must be out there..:bow1:
 
OP
OP
nt650hawk

nt650hawk

Gino
Joined
Mar 24, 2017
Messages
96
Location
MA
Bike
2006 ST1300
I can't even get the Honda services guy to give a confirmed answer. i'm getting the you should be able to do it... but not sure. But in the extreme chance it does not install from the outside you can grind away the lip to install the new one. and there is your specialized Honda mechanic. :rolleyes:
 
Joined
Oct 17, 2015
Messages
1,962
Location
near Harrow, Ontario, Canada
Bike
'83 BMW R100RS
STOC #
8870
I can't even get the Honda services guy to give a confirmed answer. i'm getting the you should be able to do it... but not sure. But in the extreme chance it does not install from the outside you can grind away the lip to install the new one. and there is your specialized Honda mechanic. :rolleyes:
Good grief - what a maroon.
 
OP
OP
nt650hawk

nt650hawk

Gino
Joined
Mar 24, 2017
Messages
96
Location
MA
Bike
2006 ST1300
Cliff Notes Pete,

Seal replaced.:hat1:


seal is installed from the outside of the engine:shout1:

no need to drop the engine :mw1::inpc1:


you have to be creative:fish1::think1:

patience is a virtue!:please1::tent6:


I'll follow up when I can find more time.
 
Joined
Oct 17, 2015
Messages
1,962
Location
near Harrow, Ontario, Canada
Bike
'83 BMW R100RS
STOC #
8870
Cliff Notes Pete,

Seal replaced.:hat1:


seal is installed from the outside of the engine:shout1:

no need to drop the engine :mw1::inpc1:


you have to be creative:fish1::think1:

patience is a virtue!:please1::tent6:


I'll follow up when I can find more time.
That is excellent news Gino - I am absolutely delighted to hear that you are back in business!

Cheers,

Pete
 
OP
OP
nt650hawk

nt650hawk

Gino
Joined
Mar 24, 2017
Messages
96
Location
MA
Bike
2006 ST1300
Where do I begin???
1st and probably the biggest question is that I can not believe anyone on the forum for a bike model that is over 10+ years could not answer this. Glad I could be a contribute!


Bike up on the homemade bike lift. A MUST for the time that you will be spending. This wold not have been fun on the ground. The lift provided the perfect height to sit in my comfortable rolling chair and attack this $3+ part at eye level.


  • In trying to figure out how this seal comes off I scrapped off the munged up rubber with dental picks to gauge how the the seal was installed. Once I scrapped the face off I probed the side rubber. Luckily the probe plunged in along the side some. It appears the seal is installed from outside of the engine. Fingers crossed, lets pop it out.
  • to gauge the effort of how tough the metal is on the seal I drilled a hole with my flex drill. I found the metal is very easy to drill and even better is that I was able to punch a sharp metal pick straight thru.
  • with a combination of a straight pick to punch holes in the seals metal, a 90 pick/hook to get in thru the holes and behind the metal to pry out, a screw to screw in the holes with a "long" needle nose to grip and pry the seal, a punch to fold the metal in and an adjustable flame torch (low heat) you will eventually find success.
    • dig out as much rubber (All) as you can including the portion around the seal. Don't loose the metal spring that puts tension on the clutch shaft!
    • punch holes in the 3,6,9 o'clock position
    • work on caving in the 6 o'clock position to release the tension on the seal perimeter. it is o.k. to punch the seal in as the seal bottoms on on the engine. Just don't go crazy and blow out the seals seat. (I and speculating here, some may not need to go thru the extreme)
    • LOW heat on the engine around the seal to expand the alu. and to soften the rubber.
    • (I and speculating here, some may not need to go thru the extreme with overworking the seals metal. I heated the seal up a few time for short amounts. Maybe if I was longer with the heat things might have been easier. I'll let you figure that one out!)
    • in time with patience and perseverance YOU WILL WIN!
  • Seal installation is easy/er.
    • dielectric grease around the seal and where the clutch rod contacts. A small amount came on the seal but I loaded it up more.
    • tire iron with the curve and a socket that fits inside of the seal hole. Position the socket with the square socket receiving end on the seal.
    • pull the tire iron with leverage to the front of the bike press the seal in till you can not go in any further. appeared to be flush with the alu. surface.

All the rubber off the face of the seal exposing the rubber on the sides of the seal.


Using a screw in the hole to try to pull the seal out


SUCCESS! shows the rear stop for the seal to bottom on.


Mangled seal. notice how worked over the metal on the seal is! Yup I have all the bits and pieces


new seal all pressed in.
 

Attachments

SupraSabre

48 Years of SoCal Lane Splitting/Commuting-Retired
Site Supporter
Joined
Nov 20, 2005
Messages
9,519
Location
Cedar City, Utah
Bike
12/04 ST 1300s
2024 Miles
000420
STOC #
5901
Excellent job! As one that just replace his clutch slave on my 2010, I didn't even think of replacing that seal, like I should have. But no fear, I shall do it to the 2004#1 when I replace it in a few weeks. (got to order some.)

These pictures are an excellent example of the older ST1300s that have not had the clutch slave replaced yet. It might be a PIA, but a necessary one!

Again, job well done! :hat3:
 
Last edited:

Trapperdog

R.I.P. - 2022/10/14
Rest In Peace
Joined
Oct 2, 2016
Messages
304
Location
Los altos Ca
Bike
09 ST1300 PA
Nice write up and pictorial, thanks.
Will not the push rod pull out on the ST? On other bikes when I’ve changed the seal the push rod pulled out allowing easy seal removal via the rod channel (hole)
 
OP
OP
nt650hawk

nt650hawk

Gino
Joined
Mar 24, 2017
Messages
96
Location
MA
Bike
2006 ST1300
Nice write up and pictorial, thanks.
Will not the push rod pull out on the ST? On other bikes when I’ve changed the seal the push rod pulled out allowing easy seal removal via the rod channel (hole)
it pulls out and bottoms on the frame.

thanks for the reminder:
as an extra measure while I had the rod extended, was to polish the shaft to remove any crud that may have embedded itself that could wear the new seal. I used the back side of 1" sandpaper roll with simichrome till i could see myself :)


I believe the failing rubber on the shaft seal was due to the DOT fluid being constantly involved on its surface.
 
Last edited:

SupraSabre

48 Years of SoCal Lane Splitting/Commuting-Retired
Site Supporter
Joined
Nov 20, 2005
Messages
9,519
Location
Cedar City, Utah
Bike
12/04 ST 1300s
2024 Miles
000420
STOC #
5901
Nice write up and pictorial, thanks.
Will not the push rod pull out on the ST? On other bikes when I’ve changed the seal the push rod pulled out allowing easy seal removal via the rod channel (hole)
I'm not sure you would have the clearance, the rear of the frame is right there, but when I replace the one on the 2004#1, I'll try it and let you guys know.
 
Joined
Oct 17, 2015
Messages
1,962
Location
near Harrow, Ontario, Canada
Bike
'83 BMW R100RS
STOC #
8870
Excellent write-up - thanks for the contribution!

Just like the CSC itself - not a fun job, but not too horrendous either. Waaaaayyy better than forking over $1-2 large to a dealer.

Pete
 
OP
OP
nt650hawk

nt650hawk

Gino
Joined
Mar 24, 2017
Messages
96
Location
MA
Bike
2006 ST1300
I felt the CSC was easy in retrospect. hardest part was keeping my wood chisel SUPER sharp to get the gasket off.
 
OP
OP
nt650hawk

nt650hawk

Gino
Joined
Mar 24, 2017
Messages
96
Location
MA
Bike
2006 ST1300
I'm not sure you would have the clearance, the rear of the frame is right there, but when I replace the one on the 2004#1, I'll try it and let you guys know.
i would say if you are planning to do a new clutch, that might be the time to remove the rod, out thru the front. The rear is a no go unless you bend it, then it is no good.
 

SupraSabre

48 Years of SoCal Lane Splitting/Commuting-Retired
Site Supporter
Joined
Nov 20, 2005
Messages
9,519
Location
Cedar City, Utah
Bike
12/04 ST 1300s
2024 Miles
000420
STOC #
5901
i would say if you are planning to do a new clutch, that might be the time to remove the rod, out thru the front. The rear is a no go unless you bend it, then it is no good.
Yeah, that's pretty much as I thought. Just replacing that clutch slave is a chore, because everything in there is so tight.

On the 2004#1, that has 68K miles on it, I'm replacing the clutch slave, just because I'm sure it is pretty ugly in there, but also the leaking waterpump. So while I have the front cover off, I plan on replacing the clutch with one with less miles, and that would be an excellent time to pull the clutch rod and replace the clutch slave and that seal!

I also have other maintenance to do to it, before it gets back on the road, so while it is all torn down, I'll replace all fluids, including the fork oil/seals, check the valves and etc. It's nice to have a place to tear a bike apart and not be rushed to get it back into service. Which has caused me to put off a lot of maintenance like these bikes really need!
 
Top Bottom