
- Joined
- Mar 18, 2006
- Messages
- 2,847
- Age
- 70
- Location
- Ilkley, W Yorkshire, UK
- Bike
- 2013 ST1300 A9
- 2024 Miles
- 000679
- STOC #
- 2570
Pictures and notes of the rear cowl, grab rail and how the seat release mechanism is fitted and secured. Nothing difficult here, but if you have never seen the release cable and don't know how it should be put back, the pictures may help.
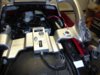
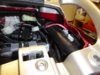
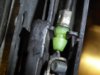
Here's the photo of what we are talking about - under the rear half of the seat.
Note how the cable emerges from the forward facing part of the grab rail - bottom centre, and loops back towards the rear of the bike. It then passes under the tubular seat frame and takes another 180 degree U bend turn to emerge where the latch is under the left hand side key cover of the grab rail.
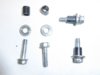
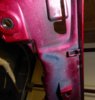
The grab rail is secured by four heavy duty bolts, washers and collars. The collars prevent the tightening torque from being applied to the alloy casting.
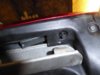
The cowl can be released with the various bolts, push rivets and JIS cross head shoulder screws. Note the plastic push pin rivet above the pannier support rail. It keeps the coloured top half firmly attached the the dark grey lower half. We will refer to that in a later photo.

Both ends of the cable have a barrel nipple and a peculiar green slotted moulding.
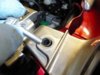
There is no need to remove the latch, but if you want to, this is the bolt to remove - bottom centre.
Here is the underside of the grab rail with the cable and barrel nipple correctly located.
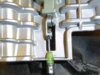
More pics - note how the groove in the green end of the outer cable fits into the narrow part of the hole. It needs to be pushed firmly into position. Don't leave it lying in the large diameter opening. The first photo is correct, the second one shows the end of the cable before it is pushed firmly into place. Both photos are of the part where the cable emerges from the cross beam of the grab rail - shown in the first photo.
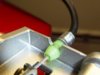
At the other end, - where the lever under the left hand key flap operates a mechanism to pull on the cable, a similar arrangement can be found for the housing of the cable can be found. This time the location slot for the green groove is in the grey plastic moulding under the coloured cover of the rear cowl.
Again, it is a push fit, but this time it is held in place by a moulding on the underside of the coloured cowl. Seen most clearly at the top of the right hand side photo, below.
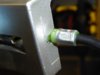
Note the rectangular protruding moulding with the hole at the bottom of both of the photos. This is the hole into which the plastic push rivet is secured, keeping the coloured top half and the dark grey bottom half firmly locked together.
Note also the round metal spacer inserted in the red cowl in the left hand photo. Don't let it drop out un-noticed.
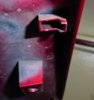
If the green ends of the cable drop out of their locating grooves, the cable release latch will not be able to pull on the latch. Getting the seat off then becomes a major operation. Make sure that it is secured in place at both ends, and in the case of the release lever end - make sure that the moulding under the cowl presses down on the end of the outer cable to stop it lifting. That push pin rivet and the hole into which it expands both need to be in good condition.
Here's the photo of what we are talking about - under the rear half of the seat.
Note how the cable emerges from the forward facing part of the grab rail - bottom centre, and loops back towards the rear of the bike. It then passes under the tubular seat frame and takes another 180 degree U bend turn to emerge where the latch is under the left hand side key cover of the grab rail.
The grab rail is secured by four heavy duty bolts, washers and collars. The collars prevent the tightening torque from being applied to the alloy casting.
The cowl can be released with the various bolts, push rivets and JIS cross head shoulder screws. Note the plastic push pin rivet above the pannier support rail. It keeps the coloured top half firmly attached the the dark grey lower half. We will refer to that in a later photo.
Both ends of the cable have a barrel nipple and a peculiar green slotted moulding.
There is no need to remove the latch, but if you want to, this is the bolt to remove - bottom centre.
Here is the underside of the grab rail with the cable and barrel nipple correctly located.
More pics - note how the groove in the green end of the outer cable fits into the narrow part of the hole. It needs to be pushed firmly into position. Don't leave it lying in the large diameter opening. The first photo is correct, the second one shows the end of the cable before it is pushed firmly into place. Both photos are of the part where the cable emerges from the cross beam of the grab rail - shown in the first photo.
At the other end, - where the lever under the left hand key flap operates a mechanism to pull on the cable, a similar arrangement can be found for the housing of the cable can be found. This time the location slot for the green groove is in the grey plastic moulding under the coloured cover of the rear cowl.
Again, it is a push fit, but this time it is held in place by a moulding on the underside of the coloured cowl. Seen most clearly at the top of the right hand side photo, below.
Note the rectangular protruding moulding with the hole at the bottom of both of the photos. This is the hole into which the plastic push rivet is secured, keeping the coloured top half and the dark grey bottom half firmly locked together.
Note also the round metal spacer inserted in the red cowl in the left hand photo. Don't let it drop out un-noticed.
If the green ends of the cable drop out of their locating grooves, the cable release latch will not be able to pull on the latch. Getting the seat off then becomes a major operation. Make sure that it is secured in place at both ends, and in the case of the release lever end - make sure that the moulding under the cowl presses down on the end of the outer cable to stop it lifting. That push pin rivet and the hole into which it expands both need to be in good condition.
Last edited: