Timing belt slack, tickover and other things

Joined
Aug 30, 2020
Messages
117
Location
LTU
Bike
2002 ST1300A
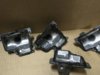
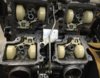
The winter has came, so time to get fingers dirty. I've started getting closer to the timing belt of my ST (I acquired it a month ago with 150.000 km), rode for almost 1.000 km and got into garage. Started opening it up, and got to the the timing belt side cover today.

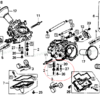
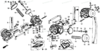
Question to those who touched/changed the belt yourself - is there any slack, which is assumed normal? You can see in the video - it moves really easily, with no force applied. I was also able to stick a finger and roll the top idle-roll (free-roll?) without issues, it slipped through the belt with ease (actually it had a dark spot on the bottom - i doubt the belt is able to spin it with the tension it has). What I saw on the timing belt videos - it should get really tense when you put a new one on, and release the tensioner for the spring to do its job.


I am almost sure belt was not changed through 150.000 km, so now it is time to open it up and do the maintenance anyways.

There is also a hollow knock when on low RPM (idle and a little bit over it), not sure yet whether it is coming from the engine block, or one of the spinning parts in the timing belt area. Anyways, I'll get to work, just want to understand what parts I need to order (except the belt of course).

A bonus question, if the belt jumps a tooth, would the engine still be able to work? Apologies if question sounds stupid, but I was taught there are no stupid questions (this especially applies to the off-season) :)
 
Joined
Sep 24, 2015
Messages
552
Location
East Anglia, England
Bike
ST1100X
STOC #
#1702
A slightly slack belt will affect tickover - I renewed mine at 60k miles and the tickover evened out a lot after the new one was fitted and tensioned. Of course, carb. set up and balance is another thing to check as well....
 
OP
OP
Capital
Joined
Aug 30, 2020
Messages
117
Location
LTU
Bike
2002 ST1300A
A slightly slack belt will affect tickover - I renewed mine at 60k miles and the tickover evened out a lot after the new one was fitted and tensioned. Of course, carb. set up and balance is another thing to check as well....
Thanks for reply. Yes, I may look into carb sync once I get a new belt on.

Also what I understand, after doing even more reading, is that many go with Gates T325 (which is way cheaper) and it works as it should. Also, it is not mandatory to change tensioner/idler if these ar rolling on their bearing without problem. It that right?
 

wjbertrand

Ventura Highway
Joined
Feb 8, 2005
Messages
4,418
Location
Ventura, CA
That belt seems taut enough to me. There's a procedure in the manual when installing a new one to loosen the tensioner pulley and then rotate the engine four teeth (can't recall if it is forward or backward direction) and then retighten the idler. The spring for that idler is not very large so it's obviously only intended to be able to position the pulley and not to apply tension to the belt. If that pulley isn't turning then it's got a bad bearing and needs replacement.

Someone years ago (I think the late Ron Major) traced the hollow knock sound at idle to slight forward and rearward movement of the cams in their holders. Idle sounds (knocks, rattles etc.) can be minimized getting the carb balance spot on but not eliminated entirely. Also try pulling in the clutch lever when listening. The transmission can make a fair bit of noise normally too.
 
Joined
Mar 13, 2012
Messages
5,071
Location
soCal
Bike
'97 ST1100
STOC #
687
Also what I understand, after doing even more reading, is that many go with Gates T325 (which is way cheaper) and it works as it should. Also, it is not mandatory to change tensioner/idler if these ar rolling on their bearing without problem. It that right?

IMO, the timing belt should be a once every 100k miles and forget it type of operation, so I changed the pulleys in mine when I did the belt. They are generally OK at 100k miles, but do you want to bet that they'll last another 100k miles without failing? If they fail, they will take the belt and the rest of the engine along with them, since the valves will meet the pistons and your engine will be trashed.

yes, many of us have used the Gates T325 with good results.

the tension on the belt looks OK to me as well, but I can't recall exactly how taut mine was after doing the change. I thought it was maybe just a bit tighter than yours, but can't remember for sure, and yours certainly isn't loose.
 

John OoSTerhuis

Life Is Good!
Joined
May 10, 2005
Messages
5,221
Location
Bettendorf, Iowa
Bike
1991 SSMST1100
STOC #
1058
Hi Cap’,

Your belt looks OK. My idler and tensioner were fine at my first timing belt R&R at 90K so left them until my second belt replacement at 180K which also included the water pump. Even at 180K the bearings seemed fine, just like the replacements.

We’ve had folks install belts a tooth or two off and the bikes still run OK. Not recommended of course!

What manual are you using? Highly recommend the official Honda Service Manual. For a new belt install follow the procedure carefully, especially the last step before torquing down the tensioner bolt. This takes all the slack out of the driven portion of the belt. After that the belt doesn’t actually run under constant pressure/tension. HTH

John
 
OP
OP
Capital
Joined
Aug 30, 2020
Messages
117
Location
LTU
Bike
2002 ST1300A
Thanks all! I've already ordered the belt. Will inspect the idler and water pump once it is open and old belt is off. Will do the carb sync as suggested once everything is back in place.
 

John OoSTerhuis

Life Is Good!
Joined
May 10, 2005
Messages
5,221
Location
Bettendorf, Iowa
Bike
1991 SSMST1100
STOC #
1058
Cap’, there’s a lot of ST1100 timing belt info here on ST-Owners and over on ST-Riders.net (link).

I’ve posted this tip before - before you remove the old belt, rotate the crank until the index lines on the driven pulleys line up with the index marks on the reduction holders. Then count the belt teeth between the pulleys’ index lines. Duplicate this number of teeth when you install the new belt (in order-crank, water pump, left driven pulley). My count is 51 teeth:
7124C3B8-5006-4836-B4F3-A2EA0B08CFB6.jpeg
TruST me, you’ll be glad you did. FWIW, here’s my album with some timing belt pictures:

Good luck,

John
 
Last edited:
OP
OP
Capital
Joined
Aug 30, 2020
Messages
117
Location
LTU
Bike
2002 ST1300A
The 51-teeth hint helped a lot, as I couldn't align it otherwise (was one tooth off)!

I've managed to change the belt, but there is one "but". Doing the installation when the belt was off, I've managed to turn the left driven pulley (not the crank) clockwise ~10 teeth... turned it back, counted and measured everything to fit nicely, put on the belt, turned and tensioned as per Honda manual. I believe nothing could've gotten out of line because of that forward-backward turning of one driven pulleys (I am talking about camshaft alignment).

It is still a long way down the road till I am able to start it, as I am in the process of changing all coolant pipes and radiator, so it is all taken apart.
 

John OoSTerhuis

Life Is Good!
Joined
May 10, 2005
Messages
5,221
Location
Bettendorf, Iowa
Bike
1991 SSMST1100
STOC #
1058
I've managed to turn the left driven pulley (not the crank) clockwise ~10 teeth... turned it back, counted and measured everything to fit nicely, put on the belt, turned and tensioned as per Honda manual.
You’re fine. Glad you found the tip useful. Good luck with the ongoing maintenance.

John
 
OP
OP
Capital
Joined
Aug 30, 2020
Messages
117
Location
LTU
Bike
2002 ST1300A
Finally started it yesterday after putting it all back. A lot of new rubber (incl. timing belt) and cleaner carbs did a wonder for tickover - it sounded really nice! Next is to sync the carbs, hopefully on the weekend. Unfortunately no chance to go out and ride for next couple months, as we got a ton of snow...

I know everyone loves pictures, so a short sad story with a happy ending:

This bike is a box of surprises - the carb float bowls were sealed with silicone by the previous "mechanic"! And it is interesting, how it worked - it accumulated fuel like a sponge, becoming black goo.

IMG_0697.JPG

Luckily, that goo somehow managed to stay put, without contaminating all the fuel passages - everything else inside was super clean. I guess that "sponge" effect worked as a magnet for the dirt as well. What do you know, fool's luck :D

IMG_0698.JPG
(forgot to snap a pic before jets were taken out, but they were clean as well.

I had to leave it for the night, but next day when i returned - fuel evaporated from the bowls and it was only tiny silicone strings as you'd expect of silicone. Of course, a lot of cleaning was done to get rid of it.

Upon putting in new float bowl seals I could hear the carbs whispering "thank you man", as I was screwing in the last float bowl.
 
Joined
Aug 10, 2015
Messages
2,042
Location
Fort Worth, Texas
Bike
91 ST1100/06 ST1300
Finally started it yesterday after putting it all back. A lot of new rubber (incl. timing belt) and cleaner carbs did a wonder for tickover - it sounded really nice! Next is to sync the carbs, hopefully on the weekend. Unfortunately no chance to go out and ride for next couple months, as we got a ton of snow...

I know everyone loves pictures, so a short sad story with a happy ending:

This bike is a box of surprises - the carb float bowls were sealed with silicone by the previous "mechanic"! And it is interesting, how it worked - it accumulated fuel like a sponge, becoming black goo.

IMG_0697.JPG

Luckily, that goo somehow managed to stay put, without contaminating all the fuel passages - everything else inside was super clean. I guess that "sponge" effect worked as a magnet for the dirt as well. What do you know, fool's luck :D

IMG_0698.JPG
(forgot to snap a pic before jets were taken out, but they were clean as well.

I had to leave it for the night, but next day when i returned - fuel evaporated from the bowls and it was only tiny silicone strings as you'd expect of silicone. Of course, a lot of cleaning was done to get rid of it.

Upon putting in new float bowl seals I could hear the carbs whispering "thank you man", as I was screwing in the last float bowl.
Not trying to state something that may be obvious to you here. There are more jets missing from each carb between the float halves. One goes into each threaded hole (another jet and a plug?)....mine has three? total in that location. Parts 20, 26, 27 from this Partzilla IPB.

1610110195840.png
 

Attachments

Last edited:
OP
OP
Capital
Joined
Aug 30, 2020
Messages
117
Location
LTU
Bike
2002 ST1300A
Spot on! I love when people spot all the details. My jets were out for a swim in carb cleaner, that's when I snapped this picture :) Also one valve was taken off (together with float). It is placed there just for the looks. Everything was where it belongs.
 
Joined
Aug 10, 2015
Messages
2,042
Location
Fort Worth, Texas
Bike
91 ST1100/06 ST1300
Spot on! I love when people spot all the details. My jets were out for a swim in carb cleaner, that's when I snapped this picture :) Also one valve was taken off (together with float). It is placed there just for the looks. Everything was where it belongs.
I completed a refurbishment of my 1991 in November. Went into the garage to locate my spare carbs for a photo but...I suppose they are packed away somewhere other than where I remembered. I bought the bike six years back with around 16000 miles on it. It had been revived by a 'competent' shop after 20 years parked prior to the sale. Amazing what they missed, removed or plain fibbed about...and the bike still ran well with loose manifolds and half the jets plugged to some degree. I took it down to fix leaks, not performance issues. Good luck with yours.
 
Top Bottom