tlartist
Tom Laux
I just completed my first valve inspection and adjustment and had the pleasure of adjusting the right side as well as the left. I figured I would share some info in case it helps. This was for a 2006 ST 1300.
Valve Check Parts
If you just need to do the valve check, other than the normal tools, you will need:
Assuming you need to adjust the valves, some items that are common to both sides include:
If you need to shim the right side you will need the following additional parts because you need to remove the fuel tank and air box. Only needed for the right side:
Other recommendations, from a variety of sources:
Valve Check Parts
If you just need to do the valve check, other than the normal tools, you will need:
- Feeler Gauge (to check valve clearance) - $12 - http://www.amazon.com/K-D-Tools-Deluxe-Feeler-Gauge/dp/B0002SQXRY/ref=sr_1_2?ie=UTF8&qid=1228702354&sr=1-2
- Gasket Sealer (to seal cylinder head cover) - $10 - http://www.amazon.com/Permatex-82180-Hi-Temp-Gasket-Maker/dp/B000FW7VFU/ref=sr_1_5?ie=UTF8&s=automotive&qid=1228702016&sr=1-5
- One oring for the crank inspection view hole - 91303-377-000 and one oring for crankshaft bolt - 91356-425-005
Assuming you need to adjust the valves, some items that are common to both sides include:
- Hot Cams Shims - $80 - http://www.amazon.com/Cams-7-48-Valve-Shim-3-50mm/dp/B000WJWTM6/ref=sr_1_3?ie=UTF8&s=automotive&qid=1228701777&sr=8-3
- Caliper (to measure shims) - $13 - I used General 102 - http://www.amazon.com/gp/product/B00004T7UD
- Engine Assembly Lube (for valve lifter and new shims) - about $4 - http://www.amazon.com/CRC-SL3333-Extreme-Pressure-Assembly/dp/B000CPAWP6/ref=sr_1_3?ie=UTF8&qid=1228701928&sr=8-3
- Replacement Washers (sealing washer for cam shaft holder) - 8 total, 4 per side - part no 90463-ML7-000
- Magnet (to remove valve lifter and shim) - http://www.kjmagnetics.com/proddetail.asp?prod=R834DIA
If you need to shim the right side you will need the following additional parts because you need to remove the fuel tank and air box. Only needed for the right side:
- Joint Hose and 2 Clips (lower part of fuel tank, because you need to remove the fuel tank) - one joint hose part no 17545-MCS-G00, one clip part no 90661-SL0-A01, one clamp part no 91405-MCS-G00
- Air funnel retaining plates (in the air box, because you need to remove the air box) 4 total - one part no 17254-MCS-305 (order one, this is a pack of 4)
Other recommendations, from a variety of sources:
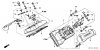
- Mark the cam sprocket and chain with a sharpie. If you are new to this it just provides a little more comfort that you put it together correctly, with correct chain tension, chain and sprocket lines matching.
- Hold the chain with wire. Keep tension on the chain. Only do one cam at a time.
- Put parts in baggies to keep them clean.
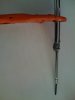
- Skip the stopper tool. Just make your own tool with JB Weld and a small screwdriver (see attached) and hold with vice grip. I tried the stopper tool with 22 gauge steel and it just twisted. Could not get 19 or 20 gauge sheet metal in local hardware stores.
- Save the Honda shims because they are in finer increments than the Hot Cams shims.
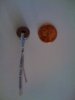
- Purchase a magnet and put a twist tie in it to pull the valve lifter and shim (see attached).
- For the right side cam chain tensioner screw, attach some string to the washer to help keep the washer from dropping into the abyss.
Attachments
-
 140.3 KB Views: 457
 -
 94.1 KB Views: 437
Last edited: