Weird Brake drag Issue

John OoSTerhuis

Life Is Good!
Joined
May 10, 2005
Messages
5,229
Location
Bettendorf, Iowa
Bike
1991 SSMST1100
STOC #
1058
Is there something at the bottom of the hole in the bracket ? A bit of an old torn rubber boot, perhaps ?
+1 This could explain it, yes.

Edit: the pad backing plate appears to be missing. In the “grasping at straws” category, are both distance collars (inside the final drive and wheel) installed, installed correctly, or missing? Wheel bearings fully seated?

John
 
Last edited:

jfheath

John Heath
Site Supporter
Joined
Mar 18, 2006
Messages
2,848
Age
70
Location
Ilkley, W Yorkshire, UK
Bike
2013 ST1300 A9
2024 Miles
000679
STOC #
2570
+1 This could explain it, yes.

Edit: the pad backing plate appears to be missing. In the “grasping at straws†category, are both distance collars (inside the final drive and wheel) installed, installed correctly, or missing? Wheel bearings fully seated?

John
That was one of my thoughts too, John - but my memory of the ST1100 is not good. I don't remember the face of the bearing seal being visible like that, for example.

It may be the angle of the camera, but I was trying to work out how a full OEM 9mm thick pad with heat shield and squeal plate had enough room to fit into the inside half of the caliper. There doesn't appear to be enough movement left on the visible slider to allow that. But as, I said, that may just be the angle of the camera. If that is the case, then the bracket is too far to the left - which suggests that maybe the wrong wheel bearing has been put in first, or the spacer is wrong. But probably better to establish first whether or not the caliper has its full range of movement and if not, why not.

And in reply to Robs comment about the slider pin photos. They look perfectly fine to me from the photos. But photos can be deceptive, so I chose not to comment.
 
OP
OP
Rob20111
Joined
Aug 17, 2018
Messages
296
Location
Victoria BC, Canada
Bike
2004 ST1300
[FONT=.SF UI Text][FONT=.SFUIText]JFHeath: I'm at work so I'll reply to your questions later when I'm at my computer[/FONT][/FONT]
[FONT=.SF UI Text][FONT=.SFUIText] [/FONT][/FONT]
[FONT=.SF UI Text][FONT=.SFUIText]A mention of the length of piston travel in the photo got me thinking, I wonder if the other one is seized.[/FONT][/FONT]
[FONT=.SF UI Text][FONT=.SFUIText]evidence of that on the brake pad with the black smudge on one end only.[/FONT][/FONT]
[FONT=.SF UI Text][FONT=.SFUIText]If one piston is stuck then the other is may be getting more pressure cocking the pad/s and causing drag?[/FONT][/FONT]
[FONT=.SF UI Text][FONT=.SFUIText]Or perhaps cocking the caliper slightly causing binding the slide pins?[/FONT][/FONT]
[FONT=.SF UI Text][FONT=.SFUIText][/FONT]
[/FONT]

[FONT=.SF UI Text][FONT=.SFUIText]When pads pushed back caliper slides freely until brake is pumped back up.[/FONT][/FONT]
[FONT=.SF UI Text][FONT=.SFUIText]Will investigate later.[/FONT][/FONT]
[FONT=.SFUIText]
[/FONT]
 
Joined
May 5, 2013
Messages
457
Location
Seattle
Bike
2016 FJR1300 ES
I had the very same problem on my ST1300. After having worn out two sets of pads very unevenly (you could clearly see the wear only on one end of the pad) I knew something wasn't right. It turned out that I cross threaded the bolt/slider pin when I installed it - and from your description it sounds like you did the same. It should not take a lot of effort to install the bolt...I was actually able to see this with the naked eye after I removed the bracket completely - the pin just didn't have the right 90 degree angle compared to the bracket. I removed it and this time forced it in keeping the 90 degree angle, and my problem was resolved! Never removing that bold/pin ever again! Try that.
 
OP
OP
Rob20111
Joined
Aug 17, 2018
Messages
296
Location
Victoria BC, Canada
Bike
2004 ST1300
Thanks to the info from Mortenk I am now able to spin the wheel almost 1 full turn now, way more than before, and the caliper moves slightly when applying brake, just not by hand. Maybe too much meat still on the new pads?
This time I installed the pin bolt into the bracket as per Motenks info, before mounting everything, and did the final torque (20 lb ft) before pumping the brake back up.
Anyway, I think it's time for a test ride to try and bed everything in a bit. I would like it to spin a little more freel yet, maybe 1.5-2 revolutions with a good hand spin.

Lastly, another pic to share. Does this pin look bent to you, or is it just the weird mounting angle or camera view?
I couldn't decide even after comparing it to pics online.
 

Attachments

Joined
Mar 13, 2012
Messages
5,055
Location
soCal
Bike
'97 ST1100
STOC #
687
Yeah, before I even read the rest of your post I thought, is that bent, or just the camera angle? If its bent that could explain your problem.
 
OP
OP
Rob20111
Joined
Aug 17, 2018
Messages
296
Location
Victoria BC, Canada
Bike
2004 ST1300
JFHeath: Yes with pads out everything slides freely, when mounted on the bike also slides well if pads pushed back.
With brake pads pumped back into contact with rotor I can move it by hand, probably cause the pads are new and thick still, but I can see the caliper move and the pads retract when my helper pumps the brake pedal. (thanx honey).
There was nothing at the bottom of the holes.

Quote: Does the caliper slide pin screw into the caliper thread reasonably easily when the caliper in not mounted ? - YES
When both slider pins are in place - one on the caliper, one on the bracket - does the caliper slide properly for its full distance - ie until it presses against and compresses both rubber boots ? - YES


BTW pulled the outboard pad first and both pistons were out equally.
So ruled out a seized piston.
 
OP
OP
Rob20111
Joined
Aug 17, 2018
Messages
296
Location
Victoria BC, Canada
Bike
2004 ST1300
John: Yes, both distance collars are in and when I had the back wheel off I pulled out the long internal one (tube) and it was the right way in (narrow end inside first).
The pads are not oem so no backing plate. Didn't check the wheel bearings for depth but dust seal is flush with outside of hub.
Is that normal? My first ST.
 

John OoSTerhuis

Life Is Good!
Joined
May 10, 2005
Messages
5,229
Location
Bettendorf, Iowa
Bike
1991 SSMST1100
STOC #
1058
John: Yes, both distance collars are in and when I had the back wheel off I pulled out the long internal one (tube) and it was the right way in (narrow end inside first).
The pads are not oem so no backing plate. Didn't check the wheel bearings for depth but dust seal is flush with outside of hub.
Is that normal? My first ST.
Yes, that is normal. And your picture in post #27 looks right too (swingarm, axle shoulder, bracket, spacer and bearing/wheel seal), but like I said I was throwing everything out there I could think of.

The OEM backer plate and heat shield should have been transferred to the replacement aftermarket pad if it didn't have them. I probably have a spare set of them I could dig up...

John
 
Last edited:

jfheath

John Heath
Site Supporter
Joined
Mar 18, 2006
Messages
2,848
Age
70
Location
Ilkley, W Yorkshire, UK
Bike
2013 ST1300 A9
2024 Miles
000679
STOC #
2570
Your picture - bent slider pin or not - Post #45

I'm not convinced that it is bent - it looks odd, but the boss into which it screws is set at an angle to the caliper bracket, and the grain of the wood underneath makes it difficult to tell. So I Paint- shopped some lines drawn on the obvious straight edges. Click to enlarge.

Bent Slider.jpg

Not conclusive, but it doesn't look as wrong now, does it ?

If you have a set square, you might be able to tell if that rear end of the boss is at right angles to the pin. It looks to be from my very non scientific drawing. Alternatively put the bracket on squared paper and align the rear of the screw thread boss with the lines on the paper and see how the pin lies in relation to the lines at right angles.

Or - as I have just done - put it into Paintshop, rotate the image 15 degrees and bring the edges of the window up to the pin and across to the rear of the thread boss. Perfect !

Bent Slider 2.jpg

But - you have confirmed that the caliper slides freely and smoothly on the bracket when it is not mounted. So perhaps the issue is with the caliper being skewed by something else as you suggest. (eg pistons).
 
Last edited:

John OoSTerhuis

Life Is Good!
Joined
May 10, 2005
Messages
5,229
Location
Bettendorf, Iowa
Bike
1991 SSMST1100
STOC #
1058
JAT after rereading some of the thread... if you had to use a C-clamp to reseat the pistons (should only take finger pressure) it may be time to replace the seals with OEM and insure their recesses are clean of all corrosion.

John
 
Joined
May 5, 2013
Messages
457
Location
Seattle
Bike
2016 FJR1300 ES
Tough to say with just one picture, but it surely looks like it's "leaning" a bit...that could stem from cross threading, which is what I did to mine. 1 full turn after releasing the brake might be OK initially. Take it for a spin and measure the temperature of the disc when you return from a few miles where you don't need to use the brakes at all. Finding a place the goes uphill so you can cruise to a stop works. Disc should be warm to the touch, but not hot. Be careful - if you have dragging pads, you may see temperature as high as 150 or 200 degF...I'm normally happy if I see disc temperature slightly above ambient when I return from work. If the pin bolt is still cross threaded I am sure you will see the pads wearing unevenly very quickly: nothing at one end, and a lot of wear at the other end...
 
OP
OP
Rob20111
Joined
Aug 17, 2018
Messages
296
Location
Victoria BC, Canada
Bike
2004 ST1300
I had another look at the pistons after reading John's last reply, and the after compressing both with a flat blade screwdriver I found that the forward piston was twice as hard to compress. I think it's time to pop out the pistons and see whats going on.
 
OP
OP
Rob20111
Joined
Aug 17, 2018
Messages
296
Location
Victoria BC, Canada
Bike
2004 ST1300
Ok, popped out the pistons and cleaned and polished everything.
Inner seals look great, outer seals starting to look a bit long in the tooth, but cleaned up well.
All back together and everything satisfactory for now.

Thank you everyone for all the input.
Until next time (and there will be one i'm sure).

Ride safe.
 
OP
OP
Rob20111
Joined
Aug 17, 2018
Messages
296
Location
Victoria BC, Canada
Bike
2004 ST1300
John: I think it was a combination of messing with the pin bolt and compressing the (not cleaned well enough) pistons back into the caliper.
Everything is now cleaned, polished and lubed front to back.
Brakes are and clutch now excellent.
Fresh oil and filter, and all controls lubed.
Slowly erasing the years of neglect and a very nice ride is emerging.
Still lot's to do.

R
 
OP
OP
Rob20111
Joined
Aug 17, 2018
Messages
296
Location
Victoria BC, Canada
Bike
2004 ST1300
UPDATE: Found the missing piece of the puzzle.
As you know I inadvertently removed the pin bolt then re installed it later, then the drag began.
I didn't know about this critical procedure. After having done this, all is good again.
Also took the time to align my front calipers and forks.
Watch the video.
https://www.youtube.com/watch?v=7nqGdIlZBxQ
 

Igofar

Site Supporter
Joined
Jan 8, 2011
Messages
7,114
Location
Arizona
Bike
2023 Honda CT125A
The correct procedure on our ST's is to make sure you tighten the stopper bolt BEFORE you tighten the axle nut.
The stopper bolt will then self center itself when torqued correctly, then the axle nut is torqued correctly, and your caliper will be true.
On our bikes, there is no need to have anyone apply the rear brake while doing this.
Thanks for posting the video though to explain the importance of doing things in the right sequence.
 

jfheath

John Heath
Site Supporter
Joined
Mar 18, 2006
Messages
2,848
Age
70
Location
Ilkley, W Yorkshire, UK
Bike
2013 ST1300 A9
2024 Miles
000679
STOC #
2570
Possibly what the chap is saying is something that worked for him, but I don't think that explanation is a very good one as far as the ST1300 goes.

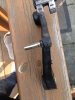
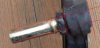
He is working on a single pot caliper. The ST1300 has 3 pots at the rear. I think that by pressing on the brake pedal he is ensuring that the face of the piston and the face of the disc rotor are clamped together - but if that peg has been taken out, the hole into which it fits is not then necessarily aligned properly and could result in the pin getting cross threaded (He did say don't take the pin out though).

On the ST1300 there could be all sorts of things that are preventing the caliper from being aligned with the disc rotor. One of which is the pistons not working properly (as you discovered). But others are bent slider pins, caliper spring incorrectly seated, disc pads incorrectly fitted at the forward end, grit behind the anti squeal plate, Damaged locating tab on the pad spring, ……

Applying brute force (like pressing hard on the brake pedal) to a situation which is not quite right is only going to make things worse. In your case, the caliper was not moving on its pins properly because the pistons were not retracting. It could easily have been because the pad had been fitted in front of the little tag on the pad spring, not behind it. Braking hard in that situation would have forced the pad to either bend the tag or break it off.

The best answer is to work out what was happening - which you did - then fix the problem - which you did - and your brakes end up working perfectly.

I still maintain that the pins should be fitted (if they have been removed !), then the caliper mounted on the bracket so that it can be checked for smooth movement, and go from there.

The stopper bolt will then self center itself when torqued correctly, then the axle nut is torqued correctly, and your caliper will be true.

Quite right - but I think the video and Rob's issue was to do with the slider pin rather than the stopper bolt. From what I can make out from fiches, the Harley Sportster bracket doesn't have a stopper bolt - the bracket is cast to fit around the swing arm top and bottom. So the part pointed to in the video appears to be the slider pin.
 
Last edited:
Top Bottom