It sounds like you're saying you tapped into both brake-light switches, which is unnecessary, as the share the same wire.I doubled up the wires going into the terminal for circuit downstream of the brakelight switch, so it's hot when either the front or rear brake is applied.

Wiring in additional lights
- Thread starter northwestparider
- Start date
STRider
Site Supporter
????It sounds like you're saying you tapped into both brake-light switches, which is unnecessary, as the share the same wire.
No, I didn't tap into both switches. I tapped into the circuit that is turned on by either switch. I just happened to do it by tapping into the connector close to the rear brake light switch. It's much easier to access that one than the the one near the front brake switch.
Got it. I misunderstood what you meant by "doubled up.".????
No, I didn't tap into both switches. I tapped into the circuit that is turned on by either switch. I just happened to do it by tapping into the connector close to the rear brake light switch. It's much easier to access that one than the the one near the front brake switch.
STRider
Site Supporter
Yes, you do have to remove the right middle cowl to access that connector. Though you can access that circuit via the connector on the back of one of the brake lamps (like that you show in message #6), those connectors and their terminals are much harder to source and more expensive than the ubiquitous Hitachi connectors I used. Plus, accessing those connectors in the taillight are a royal pain in the arse by comparison to removing the middle cowl. I can do that in my sleep at this point.This is the exact type of connection I want to make. I just wasn't thinking I was going to have to go so far up the bike to get to a connector. Thanks for the pictures and information. It looks like you have the right side fairing off. Do you have to take it off to get to this connector?
STRider
Site Supporter
Two wires crimped into a single terminal.Got it. I misunderstood what you meant by "doubled up.".
")
What do you call the "right middle cowl"? Are you talking about the one that is held on with three screws right below the drivers seat?Yes, you do have to remove the right middle cowl to access that connector. Though you can access that circuit via the connector on the back of one of the brake lamps (like that you show in message #6), those connectors and their terminals are much harder to source and more expensive than the ubiquitous Hitachi connectors I used. Plus, accessing those connectors in the taillight are a royal pain in the arse by comparison to removing the middle cowl. I can do that in my sleep at this point.
The same panel you have to remove to get to the battery, except on the other side of the bike.
STRider
Site Supporter
Negative. You're describing the right sidecover.What do you call the "right middle cowl"? Are you talking about the one that is held on with three screws right below the drivers seat?
Newbies, you'll find that many of us experienced hands use the formal Honda parts names from the parts lists.
You don't have to buy from them, but Revzilla has a very easy, accessible parts diagrams you can bookmark.
Here are the ones I use for my ST1300 and ST1100
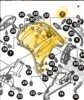
This is the right middle cowl you need to remove to get to the connector in question.

The right sidecover does need to be removed to allow routing the wire to the tailsection. That's where the battery is on the 1300. It's opposite of the 1100.
Last edited:
But you get to make that pigtail connection. I knew that cycleterminal only had one half of the needed pair didn't know the mod could be done farther upstream.I just wasn't thinking I was going to have to go so far up the bike to get to a connector.
I prefer not cutting into a wire in any way if at all possible though if that's what it takes I can handle it. I've bookmarked STRider's posts!
The brake-light wire is accessible at three basic points: the front switch, the back switch, and at the brake lights.
My bike is a 2008. Does this look like a factory connector? Under the rear seat, right side just forward of the turn signal bulb

I think I answered my own question. Once I could tell what the wire colors are it looks like it is the Data Link Connector?
Well, the other company I was working with on a mat for these connectors finally got back to me. She had checked with two suppliers and both came up empty. At this point in the game I think I will probably cut into the harness above the tail lights and install a connector from a kit like this. That way I can make a splitter that will fit right into it to do what I want. Then if I change the box out for something different I can do it easily enough.
rogo
Site Supporter
Amen brother! I've worked on too many butchered harnesses. It is a downward spiral.No wire cutting. NO Posi-taps or Scotch-lock wire taps. No OEM insulation was violated in this project. Should I sell the box I can revert to factory fresh configuration in minutes.
"Nowire hangersPosi-taps or Scotch-locks ever!"

I haven't finished exploring things. I put it on hold while I waited to hear back from the gal at the connector company. If I can find a clean way to pick up a feed to the taillights without cutting I'll do that.
- Joined
- Oct 26, 2020
- Messages
- 1,765
- Location
- Makefield Highlands PA
- Bike
- 2016 ST1300P
- 2024 Miles
- 003726
It just popped into my head, get a quartet harness and you can come right off the factory connectors, or just come off the connector for the quartet harness.
- Joined
- Oct 26, 2020
- Messages
- 1,765
- Location
- Makefield Highlands PA
- Bike
- 2016 ST1300P
- 2024 Miles
- 003726
There is a wiring diagram here, you can wire up all kinds of good stuff, all factory connectors.
 www.st-owners.com
Article [13] - ST1300 - Quartent Harness/Heated Grips Schematic | ST1300 Articles
Click the link for a bigger version. https://drive.google.com/file/d/0B5AgdjJdxahQM2UzYzFiOTktY2MxYy00YWI5LWFhNTgtNDE5YjNjMDI2MTYx/view?usp=sharing&resourcekey=0-GNOqTiMxhGqwnJYuDq9onw Link Updated: 7.Oct.2021
ThanksIt just popped into my head, get a quartet harness and you can come right off the factory connectors, or just come off the connector for the quartet harness.