I upgraded my headlight bulbs on my 2002 ST1100 yesterday. By the time I was done, I almost would rather have hit a deer due to the lower wattage bulbs than have gone through that hassle. I can be pretty handy with some mechanical stuff (see http://www.outsideconnection.com/gallant/hpv/powerAssist/powerAssist3.asp ), but for lack of explicit instructions on headlight replacement, I went as far as removing the wire spring retainer clips that hold the bulbs in place. Lost one of the screws that hold the spring, but found a decent replacement. Lots of use of a mirror, shorty screwdriver and light while working counterintuitively due to use of a mirror. My wife appeared in the garage more than once asking if everything was OK. So for anyone who's never replaced the headlight bulbs in their ST1100 and want explicit instructions, here they are:
Tools and parts needed:
- Metric allen wrenches
- Phillips screwdriver
- Two new, H4 headlight bulbs
- Shims for H4 bulbs (example: http://www.electricalconnection.com/non-electrical/h4_shim.htm )
1. The first time you replace a bulb, you'll most likely need to see the back of the bulb housing to know what to do. So, remove the main windscreen, the outer plastic panel just below the main windscreen (the one with the vent built in with "Honda" printed on it), and the plastic panel inside that. This will allow access to the back of the bulb housing.
2. Note the plug ends for the bulbs, one per bulb. Unplug them by wiggling them back and forth while pulling out, gently.
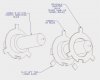
3. Peel the big round rubber boots off the back of the bulb housing. Note the labeling on them that indicates which side goes up when reinstalling.
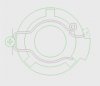
4. Using a mirror and light as necessary, look at the back of the bulb housing and note the wire spring retaining clips that press against the back of the bulbs, holding them in place. Note the end secured by the phillips head screw. Note the other end where the wire is hooked under a flange of sheet metal, press firmly on the end hooked under the flange, and move it sideways so it pops out free. The wire clip can then hinge backwards, freeing the bulb. WHATEVER YOU DO, DO NOT REMOVE THE PHILLIPS HEAD SCREW(S) ON THE RETAINING CLIPS.
5. Pull the old bulbs out.
6. Clip the two, smaller tabs off of the new H4 bulbs, as per the instructions in the shim package.
7. Slide a shim over the bulb end of the new headlight bulb, orienting it correctly with the tab locations. This'll be obvious.
8. CAREFULLY insert the bulb and shim back into the headlight housing, using a mirror and light as necessary. BEWARE of the possiblity of the shim falling off and getting lost in the myriad of nearly inaccessible nooks and crannys back there. Position the bulb and shim so the tabs line up correctly.
9. Swivel the wire retaining spring back into place and hook the loose end under the metal flange to secure the bulb.
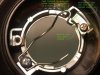
10. Replace the rubber boot, pushing the edges of the middle opening firmly around the bulb base.
11. Seat the plug back onto the new bulb.
12. Repeat steps 6 through 11 for the other bulb.
13. Turn the key on and test the headlights.
14. Assuming they work, reinstall the plastic panels and windshield.
Done. I'm guessing others have suggestions and/or corrections for this, so please add comments if you want.
Tools and parts needed:
- Metric allen wrenches
- Phillips screwdriver
- Two new, H4 headlight bulbs
- Shims for H4 bulbs (example: http://www.electricalconnection.com/non-electrical/h4_shim.htm )
1. The first time you replace a bulb, you'll most likely need to see the back of the bulb housing to know what to do. So, remove the main windscreen, the outer plastic panel just below the main windscreen (the one with the vent built in with "Honda" printed on it), and the plastic panel inside that. This will allow access to the back of the bulb housing.
2. Note the plug ends for the bulbs, one per bulb. Unplug them by wiggling them back and forth while pulling out, gently.
3. Peel the big round rubber boots off the back of the bulb housing. Note the labeling on them that indicates which side goes up when reinstalling.
4. Using a mirror and light as necessary, look at the back of the bulb housing and note the wire spring retaining clips that press against the back of the bulbs, holding them in place. Note the end secured by the phillips head screw. Note the other end where the wire is hooked under a flange of sheet metal, press firmly on the end hooked under the flange, and move it sideways so it pops out free. The wire clip can then hinge backwards, freeing the bulb. WHATEVER YOU DO, DO NOT REMOVE THE PHILLIPS HEAD SCREW(S) ON THE RETAINING CLIPS.
5. Pull the old bulbs out.
6. Clip the two, smaller tabs off of the new H4 bulbs, as per the instructions in the shim package.
7. Slide a shim over the bulb end of the new headlight bulb, orienting it correctly with the tab locations. This'll be obvious.
8. CAREFULLY insert the bulb and shim back into the headlight housing, using a mirror and light as necessary. BEWARE of the possiblity of the shim falling off and getting lost in the myriad of nearly inaccessible nooks and crannys back there. Position the bulb and shim so the tabs line up correctly.
9. Swivel the wire retaining spring back into place and hook the loose end under the metal flange to secure the bulb.
10. Replace the rubber boot, pushing the edges of the middle opening firmly around the bulb base.
11. Seat the plug back onto the new bulb.
12. Repeat steps 6 through 11 for the other bulb.
13. Turn the key on and test the headlights.
14. Assuming they work, reinstall the plastic panels and windshield.
Done. I'm guessing others have suggestions and/or corrections for this, so please add comments if you want.