
I really don't know if this has been done on here. Tried looking for something similar but found nothing. So I'm going to do an entire writeup including pictures of taking apart the bag locking mech along with the key mech and the paint work, before and after, etc etc.
I've really been wanting to contribute something substantial to this site and I think here is my chance. I already did one side pannier and results are phenomenal.
OK so here it goes...
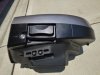
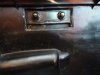
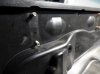
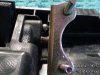
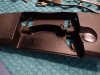
First off you want to start by taking the side panel (with paint) off by removing the 4 nuts that are holding it on. Notice that there is a metal bracket that secures the placement and stability of the outer lid. There is a rubber washer underneath these and you can easily remove both with an o-ring pick.
Next, you want to locate the screws and nuts that are holding the entire locking mech in place
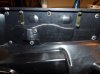
Remove the long screws up top (3) and the (4) shorter ones towards middle and bottom. Notice the 4 nuts that are holding the mech in place are the same ones that hold the bag together from step 1. Remove those 4 nuts along with metal bracket and washer.
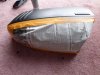
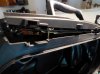
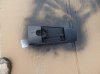
Once you've removed all the screws, nuts, and brackets holding the locking mech in place, you can now start to remove the ENTIRE top piece. Hopefully you can really see how badly my plastic had faded from being in the sun from the previous owner.
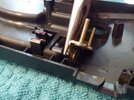
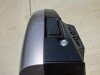
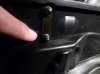
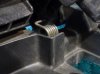
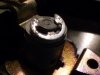
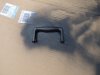
Now, go ahead and turn it over and look at the main locking mech that has the metal bar running through it in the middle. Take that off of the 4 bolts holding it in place.
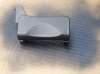
Once you have the locking mech out of the way, start by removing the two metal pieces that hold that locking mech in place. Be careful here because you are going to have to remove the ball bearing (which will pop out anyways) and the two springs that hold that ball bearing in.
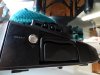
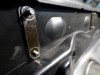
Take notice of the spring in the handle at this step. You will have to put that back in during reassembly.
Go ahead and make sure the handle is in the unlocked position to remove the key lock assembly. Now you can remove the two handles that make up the top part of the bag. Again, pay attention to how this spring is positioned and located.
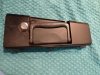
Next, lets take the key lock (barrel) assembly out. For this, remove the lock washer using a flat head screwdriver and force outwards.
Here is the order of the washers, etc. left to right=(top to bottom)

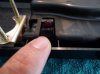
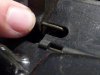
Now for the tricky part. The key barrel is locked in place by a thin piece of metal with flanges holding it in place. Get an o-ring pick to get in there and pry it so you can get the barrel out.
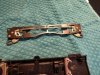
Once you get both sides away from the barrel, remove it from the plastic. In this picture i had already removed the screw that holds the key assembly in. Remove both metal pieces.
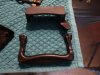
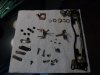
So you should be done with disassembly and have something that looks like this!
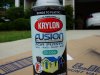
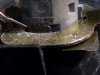
Now onto painting. I like to use the Krylon Fusion for plastic (gloss). I have used it in the past and have always had great experiences with it. When painting the different pieces i didnt hang them like a lot of people like to do. I just use a large piece of cardboard, lay it in my driveway and go to town. My best results have come from doing 5-6 coats, waiting about 15 mins between each coat in the hot sun.
I also decided to paint the bottom half of the lid. I taped it off using rustoleums new professional grade painters tape. Paint lines came out super sharp and the rest looks great after everything has had a chance to dry.
So now you've had a chance to get some nice coats on there, time for reassembly. It is pretty straightforward, referring to the previous pictures of disassembly. The trickiest parts are making sure you are getting those springs in there with the ball bearings and the spring holding the handle in place. Use needlenose pliers to put the ball bearing in place.
Also, be sure to grease key areas that were probably greased from the factory.
Well hopefully you have successfully put your side pannier back together and everything's looking great! Here are some of my results..
I've really been wanting to contribute something substantial to this site and I think here is my chance. I already did one side pannier and results are phenomenal.
OK so here it goes...
First off you want to start by taking the side panel (with paint) off by removing the 4 nuts that are holding it on. Notice that there is a metal bracket that secures the placement and stability of the outer lid. There is a rubber washer underneath these and you can easily remove both with an o-ring pick.
Next, you want to locate the screws and nuts that are holding the entire locking mech in place
Remove the long screws up top (3) and the (4) shorter ones towards middle and bottom. Notice the 4 nuts that are holding the mech in place are the same ones that hold the bag together from step 1. Remove those 4 nuts along with metal bracket and washer.
Once you've removed all the screws, nuts, and brackets holding the locking mech in place, you can now start to remove the ENTIRE top piece. Hopefully you can really see how badly my plastic had faded from being in the sun from the previous owner.
Now, go ahead and turn it over and look at the main locking mech that has the metal bar running through it in the middle. Take that off of the 4 bolts holding it in place.
Once you have the locking mech out of the way, start by removing the two metal pieces that hold that locking mech in place. Be careful here because you are going to have to remove the ball bearing (which will pop out anyways) and the two springs that hold that ball bearing in.
Take notice of the spring in the handle at this step. You will have to put that back in during reassembly.
Go ahead and make sure the handle is in the unlocked position to remove the key lock assembly. Now you can remove the two handles that make up the top part of the bag. Again, pay attention to how this spring is positioned and located.
Next, lets take the key lock (barrel) assembly out. For this, remove the lock washer using a flat head screwdriver and force outwards.
Here is the order of the washers, etc. left to right=(top to bottom)
Now for the tricky part. The key barrel is locked in place by a thin piece of metal with flanges holding it in place. Get an o-ring pick to get in there and pry it so you can get the barrel out.
Once you get both sides away from the barrel, remove it from the plastic. In this picture i had already removed the screw that holds the key assembly in. Remove both metal pieces.
So you should be done with disassembly and have something that looks like this!
Now onto painting. I like to use the Krylon Fusion for plastic (gloss). I have used it in the past and have always had great experiences with it. When painting the different pieces i didnt hang them like a lot of people like to do. I just use a large piece of cardboard, lay it in my driveway and go to town. My best results have come from doing 5-6 coats, waiting about 15 mins between each coat in the hot sun.
I also decided to paint the bottom half of the lid. I taped it off using rustoleums new professional grade painters tape. Paint lines came out super sharp and the rest looks great after everything has had a chance to dry.
So now you've had a chance to get some nice coats on there, time for reassembly. It is pretty straightforward, referring to the previous pictures of disassembly. The trickiest parts are making sure you are getting those springs in there with the ball bearings and the spring holding the handle in place. Use needlenose pliers to put the ball bearing in place.
Also, be sure to grease key areas that were probably greased from the factory.
Well hopefully you have successfully put your side pannier back together and everything's looking great! Here are some of my results..
Attachments
-
 P1000940.jpg131 KB · Views: 302
 -
 P1000943.jpg147.9 KB · Views: 324
 -
 P1000948.jpg141.3 KB · Views: 267
 -
 P1000950.jpg129.9 KB · Views: 252
 -
 P1000932.jpg144.4 KB · Views: 419
 -
 P1000944.jpg146.1 KB · Views: 316
 -
 P1000933.jpg143.5 KB · Views: 414
 -
 P1000951.jpg134.3 KB · Views: 379
 -
 P1000871.jpg137.4 KB · Views: 358
 -
 P1000875.jpg138.6 KB · Views: 309
 -
 P1000880.jpg103.5 KB · Views: 253
 -
 P1000881.jpg138 KB · Views: 231
 -
 P1000882.jpg131.3 KB · Views: 225
 -
 P1000883.jpg127.8 KB · Views: 277
 -
 P1000886.jpg151.6 KB · Views: 273
 -
 P1000891.jpg152.9 KB · Views: 255
 -
 P1000898.jpg142.1 KB · Views: 234
 -
 P1000904.jpg136.8 KB · Views: 223
 -
 P1000900.jpg143.2 KB · Views: 219
 -
 P1000910.jpg143 KB · Views: 204
 -
 P1000912.jpg147.7 KB · Views: 200
 -
 P1000913.jpg146.2 KB · Views: 200
 -
 P1000916.jpg134.6 KB · Views: 197
 -
 P1000920.jpg141 KB · Views: 211
 -
 P1000921.jpg135.5 KB · Views: 205
 -
 P1000924.jpg134.8 KB · Views: 260
 -
 P1000935.jpg148.6 KB · Views: 231
 -
 P1000936.jpg149.2 KB · Views: 207
 -
 P1000937.jpg147 KB · Views: 225
Last edited by a moderator:
