
You are using an out of date browser. It may not display this or other websites correctly.
You should upgrade or use an alternative browser.
You should upgrade or use an alternative browser.
New, 18 year old ST1300. letest : Fork bushes
- Thread starter jfheath
- Start date
OP
OP

Thank you @Dobby . Not quite on two wheels yet, but getting there.
a) Hobbling around for the best part of a year and my other leg muscles have deteriorated to the extent that sifftin on the bike I have did not have the strength to lift my feet off the footpegs. I'm working on that, but it is taking its time.
b) 18 years and only 6440 miles on the clock and off the road for the last 4. Certain things need to be checked out.
The last inspection said that the rear brake was dragging slightly. I am not stupid, Mr Salesman. I took that to mean that there is a serious problem with the SMC but we will make it look as though it is OK.
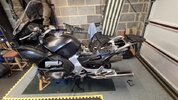
So this is how it has looked for the last two weeks. Left fork off and dismantled. It was only half full of oil. Both wheels off, T33's have been fitted. Bike on centre stand and platform scissor jack under the sump.
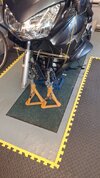 The yellow tent guys (I'm done with camping, apparently, everywhere but in my head) are attached to the mirror bracket and they are holding up a piece of tube - to which I have cable tied the solid hydraulic pipes that cross the mudguard.
The axle stands are supporting the caliper brackets and calipers. I've just noticed from the photo that the white cable tie has slid across to the centre, so went out to check. It's ok, there is no weight on the pipes, but I've tightened that tie and added another.
I've ordered the bits that I suspect that I need to fix the forks. I have assumed that I need to replace the SMC so I've ordered that as well. Along with all sorts of other bits that I used to have in stock, but which I gave to my brother along with the old ST1300. His bike is in better condition than my new one, but this one looks pristine.
I have not ordered piston seals, but today I decided to carry out an experiment. Can I push in the rear outer pistons ? Brake fluid looks clear, but it has been changed recently. It doesn't mean that the SMC has been exercised at all in that time. I assume that it hasn't.
So I attached a bleed tube to the front left centre piston bleed valve, put a weight on the brake pedal and opened the valve. The banjo union for the front left centre cylinder has two hoses attached to it - one is the feed from the rear master cylinder, the other is a very short length to the SMC inlet.
With that bleed valve open, if the SMC is clear, I should be able to push in the rear outer pistons relatively easily. I removed the weight from the brake pedal and pushed the outer pistons with both thumbs. Nothiing. I have a block of wood that I slip in the caliper so that I don't make the mistake of popping the pistons out by pressing the brake pedal or pulling the lever. I used that to get a bit more pressure onto the pistons. Nothing.
Just to make sure, I tried pushing the centre piston in. That went in relatively easily - so the compensation port in the rear master cylinder is clear.
So that proves it. I need a new SMC - the compensation port in the SMC is blocked, or the tiny port in the nylon filter is blocked or the SMC piston is jammed. It's not the latter because the SMC operated the rear brakes in the shop. And the brakes released afterward. But that test is clearly not conclusive.
I'll probably need new piston seals all round, but that can wait. I can get those next day delivery. I'll get the fork seals done and the forks back in place first.
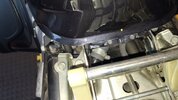
One other thing that confused me. This is the shot at the rear of the tank looking at the riders seat height adjuster.
Centre left is the large hose that joins the upper tank to the lower tank. It has a jubilee hose clamp on it.
That should have a specially made very strong clip on it that applies the correct pressure without distorting the pipe.
So for whatever reason, that tube has been removed. I cannot think why you would want to remove the top taank on a 6400 mile bike.
Hmm. There is no sign of fuel leakage. Doubtless we willl find out eventually.
Footnote: Because I'd got rid of the old Pan and had to make room in the garage for the Spyder, I also gave my ramp away to a friend. The spyder was going to my last bike / tryke and it required a two day frantic clear out of the garage, the removal of one of my Dexion shelf units, numerous trips to the tip to get rid of stuff that I should have got rid of years ago, and the ramp had to go. This was a serious commitment to the Spyder as our last bike. I wouldn't need the ramp any more. Now with the SPyder gone, I'm left with space to walk around the 'new' ST!300 without squeezing past things. It is really quite nice. I don't need a ramp - what I need is exercise getting from kneeling down to standing up - without using the back of the bike for support. I'm getting better at that, gradually. Goodness me, I thought when I sheared my calf muscle that it would be 6 weeks to repair and maybe another 6 to get back to strength. No one told me that it doesn't work like that when you get past 70. 19 months so far.... A little improvement every week. But it IS improvement and much better than the alternative....
a) Hobbling around for the best part of a year and my other leg muscles have deteriorated to the extent that sifftin on the bike I have did not have the strength to lift my feet off the footpegs. I'm working on that, but it is taking its time.
b) 18 years and only 6440 miles on the clock and off the road for the last 4. Certain things need to be checked out.
The last inspection said that the rear brake was dragging slightly. I am not stupid, Mr Salesman. I took that to mean that there is a serious problem with the SMC but we will make it look as though it is OK.
So this is how it has looked for the last two weeks. Left fork off and dismantled. It was only half full of oil. Both wheels off, T33's have been fitted. Bike on centre stand and platform scissor jack under the sump.
The yellow tent guys (I'm done with camping, apparently, everywhere but in my head) are attached to the mirror bracket and they are holding up a piece of tube - to which I have cable tied the solid hydraulic pipes that cross the mudguard.The axle stands are supporting the caliper brackets and calipers. I've just noticed from the photo that the white cable tie has slid across to the centre, so went out to check. It's ok, there is no weight on the pipes, but I've tightened that tie and added another.
I've ordered the bits that I suspect that I need to fix the forks. I have assumed that I need to replace the SMC so I've ordered that as well. Along with all sorts of other bits that I used to have in stock, but which I gave to my brother along with the old ST1300. His bike is in better condition than my new one, but this one looks pristine.
I have not ordered piston seals, but today I decided to carry out an experiment. Can I push in the rear outer pistons ? Brake fluid looks clear, but it has been changed recently. It doesn't mean that the SMC has been exercised at all in that time. I assume that it hasn't.
So I attached a bleed tube to the front left centre piston bleed valve, put a weight on the brake pedal and opened the valve. The banjo union for the front left centre cylinder has two hoses attached to it - one is the feed from the rear master cylinder, the other is a very short length to the SMC inlet.
With that bleed valve open, if the SMC is clear, I should be able to push in the rear outer pistons relatively easily. I removed the weight from the brake pedal and pushed the outer pistons with both thumbs. Nothiing. I have a block of wood that I slip in the caliper so that I don't make the mistake of popping the pistons out by pressing the brake pedal or pulling the lever. I used that to get a bit more pressure onto the pistons. Nothing.
Just to make sure, I tried pushing the centre piston in. That went in relatively easily - so the compensation port in the rear master cylinder is clear.
So that proves it. I need a new SMC - the compensation port in the SMC is blocked, or the tiny port in the nylon filter is blocked or the SMC piston is jammed. It's not the latter because the SMC operated the rear brakes in the shop. And the brakes released afterward. But that test is clearly not conclusive.
I'll probably need new piston seals all round, but that can wait. I can get those next day delivery. I'll get the fork seals done and the forks back in place first.
One other thing that confused me. This is the shot at the rear of the tank looking at the riders seat height adjuster.
Centre left is the large hose that joins the upper tank to the lower tank. It has a jubilee hose clamp on it.
That should have a specially made very strong clip on it that applies the correct pressure without distorting the pipe.
So for whatever reason, that tube has been removed. I cannot think why you would want to remove the top taank on a 6400 mile bike.
Hmm. There is no sign of fuel leakage. Doubtless we willl find out eventually.
Footnote: Because I'd got rid of the old Pan and had to make room in the garage for the Spyder, I also gave my ramp away to a friend. The spyder was going to my last bike / tryke and it required a two day frantic clear out of the garage, the removal of one of my Dexion shelf units, numerous trips to the tip to get rid of stuff that I should have got rid of years ago, and the ramp had to go. This was a serious commitment to the Spyder as our last bike. I wouldn't need the ramp any more. Now with the SPyder gone, I'm left with space to walk around the 'new' ST!300 without squeezing past things. It is really quite nice. I don't need a ramp - what I need is exercise getting from kneeling down to standing up - without using the back of the bike for support. I'm getting better at that, gradually. Goodness me, I thought when I sheared my calf muscle that it would be 6 weeks to repair and maybe another 6 to get back to strength. No one told me that it doesn't work like that when you get past 70. 19 months so far.... A little improvement every week. But it IS improvement and much better than the alternative....
Last edited:
Sorry for your loss John.Progress is slow. Mum died a couple of weeks ago, bless her. It was time, she was 96 and she’d had enough. It was a relief that it didn’t drag on for any longer. But then comes the solicitors, the house to clear, the re-discovered memories stowed away in boxes for the last 90 years, you will get the idea. The house is 2 hours away. The ST1300 was too good to miss, but I’d be a fool not to expect something drastic. Why would it have had 6 owners in 6,000 miles. For some owners there is only the digit 6 on the ‘log book’ and the change of address for the annual MOT as evidence that it must have changed hands. By the time I get it fully checked and forks fixed it’ll be winter. By the time my legs are back up to strength, it will be Spring. Hmm. I’m beginning to see a pattern. Why would anyone (me) buy a pristine ST1300 with only 6,000 miles on the clock, not ride it until Spring? Whatever - this will all be preparation for a long tour that has been on hold for a few years now.
Anyone on here in the UK know anything about the history of this bike. See photo. You will have owned it with less than 6,400 on the clock and sold it having added very little mileage.


Deepest condolences John.


Sorry for the loss of your Mum John.
It appears from your photo that someone has already replaced the fuel hose that goes between the two tanks, as that worm clamp is not the correct OEM spring clamp.
Keep an eye on both ends of the fuel hose now as those clamps will bite into the hose and cause a failure.
Nice job working on the bike.
I so miss wrenching on the ST’s.
Keep an eye on both ends of the fuel hose now as those clamps will bite into the hose and cause a failure.
Nice job working on the bike.
I so miss wrenching on the ST’s.
OP
OP
I lifted the tank - which oddly for a second hand bike , is brim full of fuel, and checked the other end. That has the original spring clip. So I guess that for whatever reason, they have removed the upper tank, and just disconnected it at the lower end. I’ve ordered 2 new clips and the hose. But I need to get under the airbox to find out why it was necessary to remove the fuel tank in the first place. Mice perhaps. It was sitting for 4 years with no MOT.
Last edited:
OP
OP
 OK - the various bits and pieces arrived yesterday, so I have the fork seals, so I ventured into the garage to get my fork leg, stanchion, damper rod etc etc and start to reassemble.
I was balked at the first hurdle - driving in the top bush.
Now - I have done these a few times before, and it has never been a problem. But - on this occasion it has left me perplexed. The existing bushes showed no signs of wear so I did not order new ones.
The stanchion fits into the lower fork leg, bottom bush first. The leg is then held upright, and the upper bush is slid down the stanchion to meet the top part of the fork leg. The bush then has to be driven in.
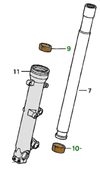
So in the diagram - The stanchion (7) has the lower bush (10) in the obvious recess. I never removed that.
The stanchion (7) is slid inside the lower fork leg (11).
The upper bush is slid down the stanchion, and it has to seat well down in the upper part of the fork leg so that the top of the bush sits below where the line '11' is pointing. It sits in that tapered bit.
To get there, it has to be driven in with a fork bush driver - which I have and have used before.
The problem:
It will not drive in ! It gets about half way, and nothing will make it go any further. Yet it came out without any issues.
My last attempt involved leaving the lower fork leg on top of the kitchen central heating radiator for a couple of hours. That made the first part of the getting the bush in rather easier, but the bush would not drive down any lower.
I'm going to order new bushes. The slot / gap was entirely closed, so it could not squeeze in any more. I cannot remember whether or not that is normal. I'm wondering whether a previous owner has fitted non-OEM bushes - that is unlikely, but not impossible - I know the seals had been done, but there was no evidence of bushes being replaced - although the documentation that I have is not complete. In any case the bike has only done 6,400 miles - but it has blown its oils seals - I guess from not being used for 4 years.
There are no obvious marking inside the top of the lower fork leg - although I didn't have anything gently enough to clean out the inside bore - so that is a possibility.
Does anyone have any other ideas ? I have Michael's (@CYYJ 's) brilliant photgraphic guide on doing this (Link Here) - but as I said I have done it before 4 times (twice on each leg) without such issues. I'm aware that if the bush is driven in un-evenly, then it will make it difficult for it to move down - so gentle tapes all the way round the driver - but the tool is one that slides up and down the fork leg - so it drives in evenly and square. Except it doesn't shift after about half way.
Any ideas ?
Fixed - two posts down.
Last edited:

ST1100Y
Site Supporter
Normally those top bushings sit quite firm...
Like wheel- or head-bearings...
Like wheel- or head-bearings...

If I understand correctly these are the same two bushings you removed without issue
could they be reversed at reassembly where you have the one you removed from the top on the bottom now?
I thought opening the left capliper bleed port would be the option of last resort if you found yourself stranded and overheating the pumpkin so to speak
for the two pistons not to be able to move back freely [I think I may have read that they move freely inversely] in unison could that be a problem with the proportioning valve?
Isn't there a bleed valve also between the two pistons and the proportioning valve
It seems the SMC may have more than one or two curses; the first being that boot that if you take your pick and peek under the seal you've compromised it, and the second being the compensation port which can't be "reverse flushed"
through any practical method short of removal and disassembly by which time might as well get a new one. Then maybe a third where any break off of hose material could eventually settle at the compensation port inlet; almost like a side stream filter.
I had a good one with my Jeep with the front hoses where if I turned the wheel lock to lock one of them would restrict / block flow back from the caliper and heat up. Park it for a few hours, pull straight away without cranking the wheel over too much and you'd never know.
edit - good in a way that you found the tank hose tampered with. Before I replaced mine I had to wonder how many times someone might have bent the thing back and forth instead of disassembling the bracket to disconnect or inspect without torquing it over
I'm sure you thought about all of the actual possibilities by now but might firm up my own [mis?] understandings
could they be reversed at reassembly where you have the one you removed from the top on the bottom now?
I thought opening the left capliper bleed port would be the option of last resort if you found yourself stranded and overheating the pumpkin so to speak
for the two pistons not to be able to move back freely [I think I may have read that they move freely inversely] in unison could that be a problem with the proportioning valve?
Isn't there a bleed valve also between the two pistons and the proportioning valve
It seems the SMC may have more than one or two curses; the first being that boot that if you take your pick and peek under the seal you've compromised it, and the second being the compensation port which can't be "reverse flushed"
through any practical method short of removal and disassembly by which time might as well get a new one. Then maybe a third where any break off of hose material could eventually settle at the compensation port inlet; almost like a side stream filter.
I had a good one with my Jeep with the front hoses where if I turned the wheel lock to lock one of them would restrict / block flow back from the caliper and heat up. Park it for a few hours, pull straight away without cranking the wheel over too much and you'd never know.
edit - good in a way that you found the tank hose tampered with. Before I replaced mine I had to wonder how many times someone might have bent the thing back and forth instead of disassembling the bracket to disconnect or inspect without torquing it over
I'm sure you thought about all of the actual possibilities by now but might firm up my own [mis?] understandings
Last edited:
OP
OP
Not quite as firm as that - they come out fairly easily simply by pulling up the stanchion smartly - 2 or 3 times. I'm having another go this afternoon - a thought suddenly occurred to me.......Normally those top bushings sit quite firm...
Like wheel- or head-bearings...
I thought opening the left capliper bleed port would be the option of last resort if you found yourself stranded and overheating the pumpkin so to speak
for the two pistons not to be able to move back freely [I think I may have read that they move freely inversely] in unison could that be a problem with the proportioning valve?
Isn't there a bleed valve also between the two pistons and the proportioning valve
It seems the SMC may have more than one or two curses; the first being that boot that if you take your pick and peek under the seal you've compromised it, and the second being the compensation port which can't be "reverse flushed"
through any practical method short of removal and disassembly by which time might as well get a new one. Then maybe a third where any break off of hose material could eventually settle at the compensation port inlet; almost like a side stream filter.
Not stranded - I haven't ridden it yet.
If the two rear pistons canot be pushed back - then there is a blockage in the rear line that goes from the rear master cylinder through to the front left caliper - where it branches to meet the front left centre piston port and then continues through the SMC. So there is a blockage somewhere in that lot. Question is - where ? It is not necessarily in the SMC - the evidence points to a few places.
First job is to try pushing in the rear centre piston - because if that is possible there is nothing blocking the compensation/relief/recuperation port in the rear master cylinder.
The next suspect is the compensation port in the SMC. Putting a bleed tube on the belled valve for the front left centre piston will test that. In order to get to that, fluid has to go through the compensation port in the SMC - which it failed to do.
The valve in the SMC prevents fluid passing through the inlet port. It should still get through the compensation port regardless of the valve (A rubber bung on a spring !). It doesn't - so that needs investigating, which I will do, but I bought a new one anyway.
But it is worth checking the PCV bleed valve . That is located between the rear outer pistons and the SMC.
I have had gunge stuck behind that once. It shot out when I unscrewed the bleed PCV bleed valve. If those solid pipes are blocked - the fluid isn't going to reach the SMC at all. If it cant reach the SMC that need sorting before the SMC compensation port can be blamed.
The rubber boot. People that remove this have to be certain that they can put it back so that it seals. Even with the SMC off the bike an on the bench, I cannot do this - So I take off the bracket at the front - the one that you must not take off - so I take measurements before removing that and check it is the same when I put it back. But if the inside is greased - which it is from the factory, that seal should not be disturbed. If it isn't properly seated then water will get in and your SMC will fail shortly afterwards.
I understand that you're not stranded; what I meant was that if I get stranded. I'm more of a me guy 
Trying to think of the movie with Michael Keaton ".. What about me? ... what about what I need?]
When I get off the bike now, I feel how much heat I've got at the rear, left then right caliper.
So the thinking goes, if I'm overheating I should be able to grab a container and rags, crack the front left center bleed port and with the rear brake pedal, pump out as much as possible and drive it home on the front hydraulic system.
I remember reading previously your finding gunge at the PVC wondering what that could be attributed to
At the same time that everything that gets down to the rear outer pistons can only [and very slightly] get back through the SMC compensation port via the PVC.
Still fishing for correction if I got it wrong
Trying to think of the movie with Michael Keaton ".. What about me? ... what about what I need?]
When I get off the bike now, I feel how much heat I've got at the rear, left then right caliper.
So the thinking goes, if I'm overheating I should be able to grab a container and rags, crack the front left center bleed port and with the rear brake pedal, pump out as much as possible and drive it home on the front hydraulic system.
I remember reading previously your finding gunge at the PVC wondering what that could be attributed to
At the same time that everything that gets down to the rear outer pistons can only [and very slightly] get back through the SMC compensation port via the PVC.
Still fishing for correction if I got it wrong
ST1100Y
Site Supporter
Well, removal always requires 4~5 firm pulls on the tube...Not quite as firm as that - they come out fairly easily simply by pulling up the stanchion smartly - 2 or 3 times. I'm having another go this afternoon - a thought suddenly occurred to me...
Ditto the installation, using the (heavy) fork seal driver (which has a protruding rim for that) as slide-hammer...
BTW: I always place the cut in those bushings facing sideways (in- or outboard), and never rear- or forward as in the graphic...
OP
OP
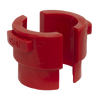
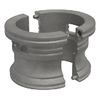 OK - I've solved the fork bearing issue. The answer seems to be to remove the self imposed problem !
I have a Sealey fork oil seal and bush bearing installation tool. It suits 2 diameters of fork - mine being one of them. It worked before, it didn't work this time.
I had a brainwave this morning - compare the diameter of the plastic tool with the diameter of the bush. The driver looks similar to the one on the left - a nylon / plastic insert which slides up and down the fork. A Metal case to hold the plastic insert to add weight to the hammering.
The case is an unweildly thing - which means that you cannot see what the plastic bit is doing - they actually assemble with the metal parts the other way up.
The inside of the red plastic part changes diameter - it has a ledge. Although I started driving it with the outside of the ledge, at some point the bush worked its way to the inside - which meant that once the bush was half way in, the outer lip was hitting the top of the bush seat inside the fork leg. Unseen by me.
And that was the problem. The solution was easy once I had realised what was happening.
Use the washer that separates the bush from the seal. Slide that down the stanchion and onto the bush and use the driver on that. That's what I must have done the last time I did this. The time before I used ordinary plastic plumbers tube.
So armed with this realisation - I tried again with success. And without anything else in place, 2-3 pulls on the stanchion is enought to get the satnchion out of the fork leg.
So I took the other fork apart - and yes - it takes a few more vigourous pulls to hammer out the bush, washer and oil seal.