Article [13] ST1300 - Getting to Throttle Bodies

Mellow

Joe
Admin
Joined
Dec 1, 2004
Messages
18,921
Age
60
Bike
'21 BMW R1250RT
2024 Miles
002956
Pat (1st1300)
is putting some great stuff in his album.
He's letting me post this for him based
on those items.


  • Step 1
    You also do this procedure to replace your FPR with Turbo Tom's FPR , also
    to install Audiovox CC and balance throttle body's. Hope this helps
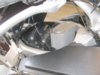
    attachment.php
  • Step 2
    Raise tank and prop up with rod provided
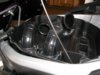
    attachment.php
  • Step 3
    This will allow you to remove the top of the air box. Be careful not to drop
    the front 2 screws into the space between the airbox and the tupperware.
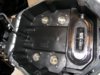
    attachment.php
  • Step 4
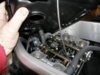
    Air intakes and air filter exposed.
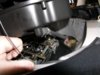
    attachment.php
  • Step 5
    Remove the air filter note the tangs you have to bend up to remove the
    screws holding the air intakes to the housing. You can use a small impact...

    attachment.php
  • Step 6
    Next remove the screws holding the bottom of the air box.

    attachment.php
  • Step 7
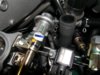
    Lift the air box base and remove the front hose.Note: The hose has to go
    back in the retainer when you reassemble.

    attachment.php
  • Step 8
    Next remove the hose at the rear of the airbox base.

    attachment.php
  • Step 9
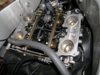
    Your throttle body's are now exposed.

    attachment.php
 

Attachments

  • 1980.jpg
    1980.jpg
    75.7 KB · Views: 114
  • 1981.jpg
    1981.jpg
    64.1 KB · Views: 115
  • 1983.jpg
    1983.jpg
    64.8 KB · Views: 113
  • 1985.jpg
    1985.jpg
    78.1 KB · Views: 111
  • 1986.jpg
    1986.jpg
    63.4 KB · Views: 116
  • 1987.jpg
    1987.jpg
    72.3 KB · Views: 118
  • 1988.jpg
    1988.jpg
    84 KB · Views: 121
  • 1989.jpg
    1989.jpg
    75.6 KB · Views: 115
  • 2004.jpg
    2004.jpg
    77.3 KB · Views: 116
Last edited:
Re: Getting to Throttle Bodies

Suppose you just wanted to look at them.

As stated in Step 1 - This is the procedure you'd use if you were replacing your Fuel Pressure Regulator or installing the Audiovox Cruise Control. So, it should be helpful for someone that has never done this.
 
Great work to show how this is achieved. Don' t have a need at the moment, but I hope when I need to work on some new (to me) area of the bike there are some instructions as clear as this available.
 
Back
Top Bottom