'95 ST11 Alternator upgrade started!

Mr. BR

Just a local commuter...
Joined
Aug 7, 2009
Messages
131
Location
South San Jose, CA (Almaden)
Bike
'05 Yam FJR1300
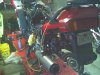
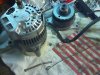
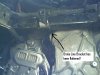
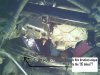
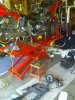
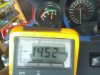
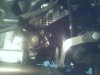
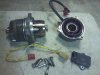
Last night I started in on the 40amp upgrade for my ’95 ST11 with 75k miles. I had pulled the lower fairings off earlier in the week so I could quickly dump the oil and filter after my commute. So last night it went up on the lift and 3 hours later I had everything removed: gas tank, rear wheel, swing-arm, old alternator. Straight forward work and everything came off as expected. I had a 17mm hex wrench for the swing-arm bolts but not the special tool for the “castle” style lock nut ring. For the ring, I gave it a wack with a hammer and large brass drift and it loosened; both sides are marked so I can get them back to where they were before. Call it “shade-tree wrenching” but it works. The stator cover bolts were a little hard to access but I had extensions and a swivel joint to get my hex drive on them. And yes, they were a bit stiff and “squeaked” during removal. I was a little worried that that the hex-bolt heads would strip out but they didn’t. A little gentle prying and the stator come off and then the gear drive. However, it took me about 10 min. of jockeying the gear drive around to actually get it between the frame rails. My bike is a CA model so it has the wire loop for two hoses going to the Vapor Recovery Canister. I bent the loop down and that helped (I believe it needs to be removed anyway). The new Alt unit is from a ’97 ST11 with less than 20K miles on it according to the salvage yard I purchased it from ($500 plus tax and shipping for Alt, drive gear, harness, fuse block). The unit is clean and the brushes measured 10mm so I’ll leave them be. My Lewis pin was made from a std door hinge pin. I just happen to have one laying around and found it to have a 6mm dia. (cut, drill, deburr, polish and voila! One Lewis-Pin clone ready to go). We’ll see how it actually works with my clothes-hanger rip cord!
Regards,
Mr. BR
 

Attachments

  • alt upgrade-apart.jpg
    alt upgrade-apart.jpg
    113.2 KB · Views: 58
  • Alt upgrade.jpg
    Alt upgrade.jpg
    115.7 KB · Views: 57
Just a hint on the Lewis Pin: a piece of strong cord with a handloe tied the outside end of yur clothes hanger gives ya some "snatch". Yack it a good one and the pin should pop right out.

Keep us poSTed.

I've used the drift and marker trick before. Works within tolerance.
 
Did the same thing on my '95 red ST1100 in October. Took a long time and I was terribly sore after doing it since I didn't have a lift. Lots of bending over and such. Nothing was too difficult... except I did have to grind the underside of the brake line bracket to fit the new alt in. I just ground down the shorter end of the "L" shape as it protruded down from the crossmember a little too far to fit the alt in. I then hit the bare metal with a little black RuSToleum.
 
except I did have to grind the underside of the brake line bracket to fit the new alt in. I just ground down the shorter end of the "L" shape as it protruded down from the cross member a little too far to fit the alt in.

Well, here it is... 1:45am and I'm done for the night. Neither the 60degree or the 90degree methods (youtube) worked and yes, I also ended up flattening the "L" shape of the brake line bracket as it was in the way. I also filed down the corner of the lower diagonal frame bracket but I'm not sure that helped. Anyway, the alt is bolted in but I must have fooled with the actual install for an hour. Then I spent another 30 min trying to get that little aluminum cover to fit on the Alt. Ended up trimming away more than needed AND in the wrong place... but I eventually got it.
Brendan
 
Sounds about typical. :D

My "success" usually happened from going for a pee break and letting the other guy try. :rofl1:

And that's after doing about a half dozen of'em.
 
I remember when I did mine, I unbolted the brake line bracket and brake lines from their run in order to get the alternator to fit down the gap.
 
Here?s a few more notes on my install last night. And yes, I do feel the hard part is over!!!
My home-made genuine imitation Lewis-pin worked fine? but it took two attempts. The first time my coat-hanger rip cord came off the Lewis-Pin as I didn?t have it bent into a good enough loop. Second attempt went fine and as someone suggested, it did take a significant ?jerk? to dislodge the pin and I used a screw-driver as a ?T-handle?. The actual installation of the gear drive unit (with new O-ring) was easy with the L-Pin in place.
After that it was the alt install? clearly there is something different about the ?95 (and other pre-?96 bikes?) as there was no way the alt was going to go in as easy as shown in the You-tube videos. Is it the lower diagonal frame brace directly behind the alternator? Anyway, I eventually found I needed to bend the brake line bracket up even further than expected AND flatten the smaller but vertical part of the bracket (it has an ?L? shaped cross-section). After that I somehow managed to squeeze it through.
Then it was getting the aluminum shield installed and that took a while as well but I got it after trimming off add?l material. Next it will be cleaning up a few things before I start the reassembly. The drive shaft and u-joint look good and I?ve got new O-rings for the rear drive splines. I will also fire it up and do a quick test on the Alt before the swing-arm goes back on? which reminds me that I need to get a gallon of oil and a filter!
Regards,
Mr. BR
 

Attachments

  • Alt gear drive IN.jpg
    Alt gear drive IN.jpg
    88.1 KB · Views: 44
  • brk line brkt.jpg
    brk line brkt.jpg
    52.8 KB · Views: 48
  • Alt in above.jpg
    Alt in above.jpg
    66.3 KB · Views: 45
looks good from here. ditto on the taking everything on and off a few times . matter of fact I even did a couple of rounds grinding the break line retainer on Frayadjacent s bike. didn t need to do it on mine now and that 40 amper just sails under the frame piece with a certain agility now. LOL
 
The left-right orientation of that bracket is not critical, so there's probably some diff. bike-to-bike.
 
Re: '95 ST11 Alternator upgrade started! (now finished!)

Alternator upgrade all done.
All that remains is the Tupperware around the engine but I’ll leave that off for a few days while a put a few miles on it.
I removed the old 3-pin wires/regulator and added the fuse block and connected the new harness; it was nice to remove those since they're not needed anymore. After adding the oil and filter, I fired it up and immediately had 14+ volts at a high idle (picture below). After that it was few hours repainting the scratched frame tubes, re-routing some drain tubes and some general cleaning. Today it was installing the swing-arm plus 3 new O-rings around the rear drive splines and a new layer of moly paste. Gas tank install was straight forward as was the rest of the items to make it road-worthy. I had been running only one headlight so I reinstalled my 2nd 60/55W bulb and hooked up both of them. With my temporary analog gauge still in place, I took it for a brief ride and it sits right around 14V and shows little change to different loads such as hi/low beams and brake lights.
Anyway, here’s a few notes from this little project:
**not a difficult job, just lots to do from start to finish. I probably spent 15 hours on this but I was not in a hurry and was cleaning as I went.
**some of drain hoses come up short because they need to route around the new larger alternator (I’ll need to extend them a few inches).
**I spent $500 on the alternator, drive gear, harness, fuse-block (plus tax and shipping LA to San Jose, total: $568. Donor bike was a '97 ST1100 with ~18k miles on it and front-end damage).
**New battery was ~$75 and in hindsight, probably not needed.
**Additional items not directly related to the Alt change was the oil and filter (it was time anyway) and the O-rings for the rear drive splines (clearly needed).

I also wanted to say a big Thank You to those who had done this before and posted their wisdom on ST-Owners and other sites. I printed out many of those checklists and had them handy throughout this project. A big help without a doubt!!

Regards,
Mr. BR
“upgraded” ’95 ST1100
 

Attachments

  • Alt upgrade apart3.jpg
    Alt upgrade apart3.jpg
    83.2 KB · Views: 31
  • new volts.jpg
    new volts.jpg
    54.2 KB · Views: 26
  • Alt updgrade final.jpg
    Alt updgrade final.jpg
    71 KB · Views: 33
  • left-over parts.jpg
    left-over parts.jpg
    87.6 KB · Views: 26
Update and a question:
Finally, after a week of solid rain, I was able to commute on the bike with my new 40 amper installed. Only 35 miles so far and all is well but I’ve still got my temporary volts gauge taped to the handlebar cover for now. I’ve noted that while riding the volts stay rather constant at ~14.1V; even when idling it may only drop to 14.0 but nothing less so far. If I blip the throttle, it does move just a little but that’s it. Farkle-wise, I have no extras except both headlight bulbs are 60/55W instead of the OEM 45/45W units. Is it normal for the Volts to be so steady?

(and I'll admit there's certainly a question of accuracy with the old gauge too as it's probably 20+ yrs old and from a car. You can see in the photo a few posts back that it doesn't quite match the DVM readings)

Thanks,
Mr. BR
 
Last edited:
Is it normal for the Volts to be so steady?

Good job on the alt. When I put mine it, it ran at 14.4 at first, but once I started adding my extra lights and stuff it dropped down to 14.1. That is where it stays pretty much most of the time. If I am sitting in traffic with my extra stuff is on it will start falling, but just blip the throttle and goes right back up again. I did notice once I installed my HID headlights, it now sits at around 14.2. Don't be afraid to add extras, this alt can take it. Before my HID, I was running 100/55w headlights, running lights which are 55w each, heated gear along with the other small stuff and always run around 14.1/14.2. I do have to say it takes a little while for the 28 amp fears to wear off....meaning you are always thinking that this alt will fail too. Enjoy the new alt!!
 
I do have to say it takes a little while for the 28 amp fears to wear off...

Ha ha, my thoughts exactly.
However, I do enjoy having that voltmeter despite there being little need for it (a Honda Marine Voltmeter may be in my future). Anyway, thanks for sharing your experience on this and enforcing the fact that I really don't need to worry about it...
Regards,
Mr. BR
 
Back
Top Bottom