Carb Install Finally! Couple ?

Joined
Jun 14, 2021
Messages
75
Age
56
Location
Minnesota
So it's been awhile since I pulled the carbs to get rebuilt and have a few questions. In the mean time I've replaced coolant hoses,o-rings, carb boots and did the PAIR removal.
1 Do I remove the big hoses on the side that goes to the front of airbox?
2. What did the front elbow from the plenum hook up to or do I remove that and cap?
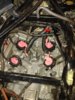
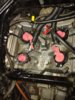
3. There is a hose with T connector in the front of carb area resting on the coolant hose that runs up to the EGR valve. And also a long hose that comes from the EGR and looks to go on top. I believe the short connects to the carb hoses in the front right.
4. Finally, where does the idle adjustment cable and adjuster sit once installed.

I appreciate all the help and couldn't have done any of it without the group. One of these days I need to find a shop manual.
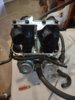
IMG_20210803_175504395.jpgIMG_20210803_180158320.jpg
 

Smudgemo

Intermodal Man of Mystery
Joined
May 17, 2019
Messages
558
Location
Berkeley, CA
Bike
'08 GS / '78 CB550
I'm not sure I fully understand these questions, and I'm not where I can refer to a manual, so it's going to be a somewhat from memory shot.
1. The two large hoses that go from the sides to the front are for the sub-air filter box that is part of the air filter housing (lower half.) Buy a new sub-air filter as they disintegrate.
2/3. I think this photo will help you

4. The enrichener cable clamps to the left and above the #2 carb. You can see it in this picture (gold clamp.)
 
OP
OP
Neiko1967
Joined
Jun 14, 2021
Messages
75
Age
56
Location
Minnesota
Ok on your second picture I see that the T I was referring runs from the EGR valve to the front of the carb and down to the EVAP canister. Since I removed the PAIR do I cap the T or do I no longer need the EVAP canister so I can remove and cap it by the EGR valve?

I did pick up a lawnmower filter and made my own. The original just crumbled when I tried to remove it.
 

Smudgemo

Intermodal Man of Mystery
Joined
May 17, 2019
Messages
558
Location
Berkeley, CA
Bike
'08 GS / '78 CB550
I think the answer to what I think you're asking is to just hook the EVAP back up as that's a different system from the PAIR. I removed the PAIR in both bikes and left the EVAP in place, but both are CA spec bikes so I'm not sure we'd have the same setup.
One thing to note is that by combining and capping the 1/3 vacuum lines as you did, you won't have a line run up to the air valve by the thermostat. If you have or are deleting the fuel cutoff valve and are capping the #3 line, you still need #1 doing work.
 
OP
OP
Neiko1967
Joined
Jun 14, 2021
Messages
75
Age
56
Location
Minnesota
I think the answer to what I think you're asking is to just hook the EVAP back up as that's a different system from the PAIR. I removed the PAIR in both bikes and left the EVAP in place, but both are CA spec bikes so I'm not sure we'd have the same setup.
One thing to note is that by combining and capping the 1/3 vacuum lines as you did, you won't have a line run up to the air valve by the thermostat. If you have or are deleting the fuel cutoff valve and are capping the #3 line, you still need #1 doing work.
I was told my bike was a "California bike" so we might have the same set up. So I did delete the fuel cutoff so do I need to plug 1&3 into each other like I have 2&4?
 

Smudgemo

Intermodal Man of Mystery
Joined
May 17, 2019
Messages
558
Location
Berkeley, CA
Bike
'08 GS / '78 CB550
No, cap #3 by itself and plug #1 back into the air valve mounted by the thermostat. That small nipple pointing down at the very front.

When you sync the carbs, you will need a short length of extra hose you can hook up there, apply a vacuum and pinch off. The other four tubes then hook up individually to whatever gauge you're going to be using.
 

John OoSTerhuis

Life Is Good!
Joined
May 10, 2005
Messages
5,221
Location
Bettendorf, Iowa
Bike
1991 SSMST1100
STOC #
1058
I was told my bike was a "California bike" so we might have the same set up. So I did delete the fuel cutoff so do I need to plug 1&3 into each other like I have 2&4?
No. 2&4 provided the vacuum for the PAIRS. Remove the T and cap the two hoses. All ready for the next carb sync.

John
 

John OoSTerhuis

Life Is Good!
Joined
May 10, 2005
Messages
5,221
Location
Bettendorf, Iowa
Bike
1991 SSMST1100
STOC #
1058
PS Take the T from 2&4 and insert it inline in the #3 hose to the Auto Fuel Valve. Add a short length of hose to that and cap it. All ready for a carb sync. BTDT (pics avail)

John
 
OP
OP
Neiko1967
Joined
Jun 14, 2021
Messages
75
Age
56
Location
Minnesota
Ok. So I will need to disconnect 2 and 4 T and cap separately? Run 1 up to EGR leave T in 3 with a little short hose and cap for synch? What about the front of the plenum base? Is that fresh air intake? what does the elbow hose connect to or just leave it not connected to anything?
 
OP
OP
Neiko1967
Joined
Jun 14, 2021
Messages
75
Age
56
Location
Minnesota
Here is what I did. I used 1/4 post to plug 2&4. Plugged 1 to EGR valve and 3IMG_20210807_194115542.jpg I will leave as is, plugged with T capped off and remove T for synching as I believe there is enough hose for that. I also capped off the plenum intake on front and then capped vacuum line to cannisters. I will install carbs on my day off as I don't want to rush it right now.
 
Joined
Feb 5, 2005
Messages
8,537
Age
77
Location
Kingman, Arizona
Bike
2000 ST1100 ABS TCS
STOC #
004
The idle screw's home is in the slot cut into the rubber shield under the fuel filler door.
I just added a zip tie to hold the idle adjust screw in place on the rubber shield. Drill thru the rubber block and add the zip tie. Got tired of haaving the adjuster flop around. (This is an old tip from early 1100 days. :D )
 
Joined
Aug 10, 2015
Messages
2,042
Location
Fort Worth, Texas
Bike
91 ST1100/06 ST1300
Here is what I did. I used 1/4 post to plug 2&4. Plugged 1 to EGR valve and 3 I will leave as is, plugged with T capped off and remove T for synching as I believe there is enough hose for that. I also capped off the plenum intake on front and then capped vacuum line to cannisters. I will install carbs on my day off as I don't want to rush it right now.
She really came clean!!!
I did similar with my 1991 recently. Cut the carb synch hoses a bit longer and zip tied them to the frame so I wouldn't have to go fishing for them next synch. Check the fittings on the head they attach to. The one under my #3 carb was loose, not even finger tight.
 
Top Bottom