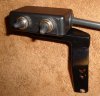
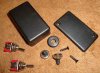
I finished assembling my switch box, and fabricated a mounting bracket which will be sandwiched between the clutch lever clamp and a RAM dual-ball mount. Photos show the finished product and extra parts I bought for spares. I made the bracket by forming 16-gauge sheet steel into small angle-bars, then cut to size & welded.

You are using an out of date browser. It may not display this or other websites correctly.
You should upgrade or use an alternative browser.
You should upgrade or use an alternative browser.
CCS-100 Alternative to stock control panel
- Thread starter Brave Salmon
- Start date
I really would like to do this. Can someone post how to wire this up using the stock wires?
The simple schematic in the first post above seemed fairly straightforward to me, but I went without out the LED light (yellow oval in schematic) and its ground wire.Can someone post how to wire this up using the stock wires?
The simple schematic in the first post above seemed fairly straightforward to me, but I went without out the LED light (yellow oval in schematic) and its ground wire.
Ok. Not as straightforward to me. So if I cut off the Audiovox touch pad I should have those color wires available and just follow the schematic?
Thank you.
You "should" but I won't swear to it. I haven't installed my CCS-100 yet, and the "dashpad" controller (small flat gray box with switches) did have those wire colors coming out of it. You'll find there's one or two extra wires, but they're not needed unless you wish to burn an on/off LED and backlighting.So if I cut off the Audiovox touch pad I should have those color wires available and just follow the schematic?
EDIT TO ADD: After assembling my control box, I double-checked continuity using a small multi-meter to ensure the switches were oriented how I like them. Specifically, I wanted SET/COAST to be a downward push on the momentary-on switch, and RESUME/ACCEL to be an upward push.
- Joined
- Feb 5, 2005
- Messages
- 8,519
- Age
- 77
- Location
- Kingman, Arizona
- Bike
- 2000 ST1100 ABS TCS
- STOC #
- 004
I've gotta do this, the original switch box is failing.
I finished my CCS-100 installation today, and then took it for a test ride while the bike was still naked. I need to flush my hydraulic lines before I put all her Tupperware back on. The cruise control worked great at speeds below 40 MPH, and the switch assembly I fabricated and described above worked flawlessly. I'll try the cruise control at higher speeds after she's buttoned all back up.
In addition to the handlebar switch, I did a couple other things a little different. I fabricated a small white nylon "anti-snag" plate tie-wrapped to the front of the throttle bodies, and I anchored the CCS-100 cable bracket to a different bolt on the engine (see photos). Another cruise control thread spoke about trimming some of the rubber intake snorkel in order to gain clearance around the added cable. Me? I rerouted the (crankcase ventilation) breather hose to the interior of the airbox (again, photos attached).
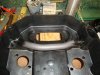
I did include a vacumm canister in my installation, and used one which has a built-in check valve. The cruise control module was mounted where my left-side Honda dashboard speaker was located, and the canister replaced the right-side speaker. I'll probably list the OEM speakers and enclosures once I've finished cleaning up.
In addition to the handlebar switch, I did a couple other things a little different. I fabricated a small white nylon "anti-snag" plate tie-wrapped to the front of the throttle bodies, and I anchored the CCS-100 cable bracket to a different bolt on the engine (see photos). Another cruise control thread spoke about trimming some of the rubber intake snorkel in order to gain clearance around the added cable. Me? I rerouted the (crankcase ventilation) breather hose to the interior of the airbox (again, photos attached).
I did include a vacumm canister in my installation, and used one which has a built-in check valve. The cruise control module was mounted where my left-side Honda dashboard speaker was located, and the canister replaced the right-side speaker. I'll probably list the OEM speakers and enclosures once I've finished cleaning up.
Attachments
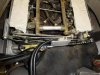
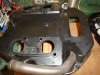
Nice job on the mounting bolt for the servo chain and protective plate. I haven't found the PCV hose intereference to be a problem.
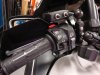
I've attached another photo showing how my cruise control switch box is mounted.I finished assembling my switch box, and fabricated a mounting bracket which will be sandwiched between the clutch lever clamp and a RAM dual-ball mount.
After I reinstalled all the Tupperware and took her for a longer test ride, another issue became apparent. The idle speed was not returning to normal unless I "rolled off" the throttle. OK, something's hung up somewhere. Fortunately, my first guess at where the problem was located proved to be correct.
When I initially routed the vacuum line from the engine to the reserve canister, I ran the hose out the front of the frame where the throttle control cables are located ... adjacent to the rubber snorkel which feeds the airbox. I was concerned there may have been too much pressure on the throttle cables from having the vacuum hose stuffed in there, so I rerouted the vacuum hose away from those cables. Problem fixed, and the CCS-100 is operating great.
Thanks to all on this forum which have provided countless installation guidelines and trouble-shooting tips. All that information proved priceless.
")
Attachments
Man! I wish I had installed this years ago! What a great farkle!
I've got a CCS-100 on the way, and I really like what a lot of you guys have done with the switch/control replacement. I may have to do something like this. I like the pics Hoowasat posted, but I'm afraid that would interfere with the choke on an 1100...
I'm thinking about just a flat plate screwed to the clutch reservoir... the axis of the two screws is perfect to position something above the control/switch housing... just got to be sure access to the choke isn't obstructed.
I'm thinking about just a flat plate screwed to the clutch reservoir... the axis of the two screws is perfect to position something above the control/switch housing... just got to be sure access to the choke isn't obstructed.
Thanks, but all I did was share some additional installation photos. It sounds like you're already thinking it through in regards to where to locate your switches. If it weren't for this thread, and the CCS-100 installation articles found HERE, mine might still be sitting in the box.I like the pics Hoowasat posted, but I'm afraid that would interfere with the choke on an 1100...
And HERE is an article installing CCS-100 on an ST1100
Blrfl
Natural Rider Enhancement
I've got a CCS-100 on the way, and I really like what a lot of you guys have done with the switch/control replacement. I may have to do something like this. I like the pics Hoowasat posted, but I'm afraid that would interfere with the choke on an 1100...
It will. There was an 1100 at the tech day where we did our cruise controls and we did a quick test with the brackets I built.
--Mark
Thanks for the feedback Blrfl... I'm thinking about bolting to the brake reservoir and having the unit basically right over the pivot for the clutch... the idea being that I could use my index finger to flick the switch.
We'll see how that works out...
We'll see how that works out...
LarryC
SToog2
Just finishing up my CCS-100 install when I came across this thread. While lQQking for the CC on eBay I found IP65 WATERPROOF control pad replacement ($36.00 us). Anybody tried one of these?
- Joined
- Aug 6, 2007
- Messages
- 4,215
- Age
- 49
- Location
- Grant, MN (aka Stillwater)
- Bike
- ST1100 & ST1300
- STOC #
- 6145
Just finishing up my CCS-100 install when I came across this thread. While lQQking for the CC on eBay I found IP65 WATERPROOF control pad replacement ($36.00 us). Anybody tried one of these?
Got a link? I did a search just now and couldn't find anything.
I went with the normal control pad with the waterproof cover. I don't know, I will try it for a while but I may switch to a custom switch pod like what is in this thread. The only complaints that I have are that the buttons are backwards for me. I have to reach a bit further than I like to hit the set/resume buttons.
LarryC
SToog2
The add says "Waterproof" IP65 rated.
What this IP rating really means:
6 means "Totally protected against dust"
5 means "Protected against low pressure jets if water from all directions - limited ingress permitted"
"Ingress" means "the act of entering"
These switches are NOT waterproof but water restistant. There are no seals. The only protection is the cover and soft membrain that make up the switches and covers the circuit board.
I have had no issues with it in light to short duration moderate rain. I have had water enter my switch during prolonged moderate to heavy rain.
Just wanted everyone to be aware.
- Joined
- Aug 6, 2007
- Messages
- 4,215
- Age
- 49
- Location
- Grant, MN (aka Stillwater)
- Bike
- ST1100 & ST1300
- STOC #
- 6145
Hmm, now why couldn't I find that in a search.
Anyhow that is the control pad that came with my CCS-100. I bought mine from Murphskit. He sells the same control panel separately.
control panel link
For my install I opened up the control pad and used clear RTV gasket maker to seal it up really good. Then I used his optional control pad cover. I would say it is really sealed up good now. The problem is that it is a little hard to hit the buttons. Not terrible but I will give it some time to learn where they are by feel before I decide if I want to change it. It is just sometimes I have to hit the button more than once. The other thing is that I would like the buttons reversed. I have it mounted so the on/off is close to my left hand but I have to reach a bit far to hit the resume/set buttons. If I did a custom switch like those shown here I could flip them and have the on/off be more of a reach. I typically just tap my brake when I want to cancel anyhow so I don't use on/off much other than when I first fire up the bike.
So far I have been happy with it. It takes a bit of getting used to. Mainly because when I had the vista cruise I had enough resistance in the throttle where it wouldn't snap closed as soon as I let go of the grip. I have taken that off now and don't have the resistance now so I have to use the cruise more.
some might not be aware that this switch arragement is not limited to the CCS100, it also works on the "global cruise" electronic cc from audiovox/rostra
Share: