Clutch Lever Parts Replacement

Joined
Dec 26, 2007
Messages
92
Age
76
Location
Fort Myers FL & Elkhorn WI
Bike
2007 ST1300
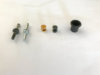
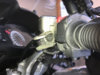
The clutch lever on my ST1300 has gotten floppy so I'm replacing the bushing. I also ordered a new push rod and the rubber boot. I removed the clutch lever and the bushing fell into my hand. The push rod came out but the boot seems stuck and I don't want to force it without determining if it can be replaced easily. On the parts diagram, it looks like the boot butts up against the circlip. I'm wondering if that's the case or does that circlip hold it in? Can the push rod and boot be replaced without disassembling the master cylinder?

IMG_0428.jpg

IMG_0425.jpg
 
Joined
Feb 25, 2016
Messages
4,780
Location
Northumberland UK
Bike
VStrom 650
I've got an 11 and I've never worked on the Clutch master other than lubing the bush, but I have never found a circlip holding in a rubber boot anywhere.
I think it's time to be brave and pull the thing out, it's probably just grimey.
Although on the safe side wait until someone who knows for definite chimes in. That Bush looks horrible.
Hope it helps.
Upt'North.
 

John_Diego

Site Supporter
Joined
Feb 11, 2006
Messages
318
Location
Chula Vista, Ca
Bike
ST-1300/GL1800
Pull it out, empty the reservoir and clean, remove the piston, clean everything throughly, re-assemble with a little bit of brake fluid on the rubber parts, fill the reservoir. Took me a long time to get all the air out, found that it was better to lightly tap the lever then a full pull. You might want to replace the lever also.
 
OP
OP
Ron_WI
Joined
Dec 26, 2007
Messages
92
Age
76
Location
Fort Myers FL & Elkhorn WI
Bike
2007 ST1300
Pull it out, empty the reservoir and clean, remove the piston, clean everything throughly, re-assemble with a little bit of brake fluid on the rubber parts, fill the reservoir. Took me a long time to get all the air out, found that it was better to lightly tap the lever then a full pull. You might want to replace the lever also.
Thanks for the info John. However, I don't want to empty the reservoir at this time. Do you know whether I can replace that boot just by pulling it out and inserting the new one?
 

dduelin

Tune my heart to sing Thy grace
Site Supporter
Joined
Feb 11, 2006
Messages
9,666
Location
Jacksonville
Bike
GL1800 R1200RT NC700
2024 Miles
010688
STOC #
6651
Just pull the boot out, or what is left of it. There is no retainer - it just fits in there up against the circlip..

The circlip in the drawing retains the spring and piston of the master cylinder. It's on the other side of the boot.
 

CYYJ

Michael
Joined
Jun 10, 2013
Messages
2,398
Age
69
Location
Toronto & Zürich
Bike
None any more.
STOC #
2636
Hi Ron:

Just in case you are not familiar with how the assembly looks when all the parts are new (rather than perished), the smaller end of the rubber boot (part at far right of your photo) fits into the groove in the middle of the pushrod (part at far right of your photo).

You can see the partial remains of the perished rubber boot in the groove of the old pushrod in your photo above.

You may wish to pack the inside of the boot with a grease that will assist in keeping water & dust out. I'm not sure what kind of grease to use, it needs to be grease that will not harm the rubber boot.

Be sure to grease the inside of the new brass bushing, where the outside end of the new pushrod will go.

Michael
 
Joined
Nov 2, 2016
Messages
193
Location
No VA, DC
Hi Ron:


You may wish to pack the inside of the boot with a grease that will assist in keeping water & dust out. I'm not sure what kind of grease to use, it needs to be grease that will not harm the rubber boot.


Michael
I had good experience with sil-glyde on rubber parts. YMMV
 
OP
OP
Ron_WI
Joined
Dec 26, 2007
Messages
92
Age
76
Location
Fort Myers FL & Elkhorn WI
Bike
2007 ST1300
Hi Ron:

Just in case you are not familiar with how the assembly looks when all the parts are new (rather than perished), the smaller end of the rubber boot (part at far right of your photo) fits into the groove in the middle of the pushrod (part at far right of your photo).

You can see the partial remains of the perished rubber boot in the groove of the old pushrod in your photo above.

You may wish to pack the inside of the boot with a grease that will assist in keeping water & dust out. I'm not sure what kind of grease to use, it needs to be grease that will not harm the rubber boot.

Be sure to grease the inside of the new brass bushing, where the outside end of the new pushrod will go.

Michael
Thanks a bunch! Just the info I needed.
 
OP
OP
Ron_WI
Joined
Dec 26, 2007
Messages
92
Age
76
Location
Fort Myers FL & Elkhorn WI
Bike
2007 ST1300
What a difference a few small parts make! The deterioration happened so gradually I didn't notice much until it was pretty bad. Like brand new now. Thanks for the help on getting me fixed up.
 
Joined
Sep 4, 2013
Messages
8,168
Location
Cleveland
Bike
2010 ST1300
If you want to pack the boot w/ grease, silicone paste for brakes (made by 3M) or a similar brake grease is the way to go.
 
Joined
May 24, 2014
Messages
30
Location
North Bay, ON
Bike
2007 ST 1300
Hey!,
I just replaced the clutch lever and the brass bushing on my new-to-me ‘07 ST1300. What a difference! It’s like brand new.
I was surprised at the wear and tear on the parts, but when you think that one is actuating the clutch many, many more times (and through longer travel) than the brake lever, it follows that it will wear more quickly. Keep in mind that the wear, and associated free play, on each part is cumulative. What looks like minor individual wear on each piece can add up to excessive total wear and free play on the system.
Based on this awesome thread on this AWESOME website, I have ordered the pushrod and boot as well. I intend to keep this system well lubed in the future.
Thanks everyone.
Cheers,
Bill

I just did a test ride and what a difference! Smooth gear changes and normal clutch “feel”.
 
Last edited:
Joined
Sep 22, 2015
Messages
1,292
Location
Wasaga Beach, Ont. Canada
Bike
'04 ST1300 Blue STar
I recently changed out my 2004's csc. The effort went along well enough,,, but after a prolonged bleeding process,,, both conventional and vacuum,,, I still needed to have a better feel on the clutch lever. The levers bushing is obviously worn,, and that along with wear on the pushrod caused about 3/4" of free play at the levers end. By comparison,, my 2012's free play was about 1/4", as it has much less wear and tear. So I swapped the clutch levers,,, (but not the pushrods),,, and this affected them to about 1/2" play each. This was better,,, but I trialed putting an .08 to .10 thou spacer inside the plunger (item #3) bush's seat, which effectively lengthened each pushrod. The result was a full stroke on both levers,,, and a solid feel. Now the spacers are obviously an interim/band-aid solution, and replacement parts are on the way. But I thought these results were interesting enough to share. Cheers,,, CAt'

 
Top Bottom