Hi everyone,
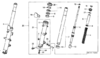
I'm working on replacing the seals in my front forks on my '06 and ran into an unusual problem. I have the shop manual and the first fork went okay. I'm on the second one at the part where I need to remove the fork socket bolt from the bottom of the fork and I can't get it out - it just spins. Then manual says that if this happens to temporarily reinstall the spring, spring seat, spring collar and fork cap. I did that but it didn't help. Any ideas what's wrong and what I need to do to get this apart? Thanks!
I'm working on replacing the seals in my front forks on my '06 and ran into an unusual problem. I have the shop manual and the first fork went okay. I'm on the second one at the part where I need to remove the fork socket bolt from the bottom of the fork and I can't get it out - it just spins. Then manual says that if this happens to temporarily reinstall the spring, spring seat, spring collar and fork cap. I did that but it didn't help. Any ideas what's wrong and what I need to do to get this apart? Thanks!
")