Fork Oil for ST1100 ABS ?

... can’t drain ABS II forks without removing them and inverting?
Correct...
The drain bolts got omitted on '96 onward ABS-II/CBS forks...
Taking them apart to flush all the crud out and inspecting the Teflon coated bushings wile at it, is more effective anyway.
(fun fact: the new spare fork bottoms for my '00 standard/non-ABS didn't had them drilled anymore either... thought about drilling & tapping for originality, but cancelled in favor of flushing...)
 
Final update : YSS springs /150mm air gap + new(to me) Wilbers rear shock .Test ride in the sun today .She ain't no Rock'n horse now. Better, yea. - But time will show , She is a lot stiffer. No nose dive at red lights or when braking / acc in slow moving traffic . Nice! Feels planted at speed. She probably sits a little higher now - Because - easier to get up on the center stand. When rocking it static ,with front brake locked I can compress the forks about 3 cm /1.25 " (I'm 90kg) -does that sound about right ? It was a lt softer before : So It's new to new feeling riding the ST now.
 
Last edited:
I put a cable tie on the fork tube for my own reference, my rider sag is around 48-50mm(fork depressed with me 88kg onboard) with aftermarket PS springs.

you can also know during emergency braking how close you are before hitting hard stop with the cable tie position.

Didnt measure when on original factory spring years ago but rider sag was way higher cos when putting bike off main stand, front will sink a lot.
 
My measure was maybe the wrong way of doing it. ST Off the stand - and just leaning in on it with ,with feet on the ground and f brake locked. I'l try the zip tie and som hard braking. Haven't had a chance to do to much testing , and unsure of what would be "right".
 
Yss springs. In the name of ST1100 science I put the yss springs on - If I live to tell, I can always go back. YSS web site calls for a 15cm air gap and 10w oil for the ST11. So thats what I did. The right leg took 700ml and the left 650. A bit more than original set up. They are not back on the ST yet. But they are definitely a lot stiffer or "firm" as Yss calls it. That said the amount drained out of the forks was low , about 400 and 300ml. Not that I complained ,but it was kind of mushy .I guess. Excited !
Photo from the touch up shop.
My shop and manual spec 533 right and 486 left for 96-02 ST1100A. Online sources specified 372 and 380. Who's right?
 
My online manual concurs with your numbers of 533/486 for ABS2, however I think it’s better to confirm with the level(140/136mm) just to be sure the level is not too far off if you’re not completely tearing down the forks and just changing the oil.
My shop and manual spec 533 right and 486 left for 96-02 ST1100A. Online sources specified 372 and 380. Who's right?


When I rebuilt my non abs ‘00 and did via oil level, it took slightly less oil than specs but not too much(-20-30ml).
 
The forks have different dampening systems in each side. Do they also have different dampening characteristics when operated individually? When I removed them to change the oil I compressed each individually and the damper rod fork bounced quickly and the cartridge fork rebounded slower. Is this normal?
 
My shop and manual spec 533 right and 486 left for 96-02 ST1100A. Online sources specified 372 and 380. Who's right?
Not me, thats for sure .I not done here after all. The ST is way to stiff -for my liking - I made a big mistake ! To much fork oil -150 mm air gap with forks extended not compressed. Out to the garage.
 
Not me, thats for sure .I not done here after all. The ST is way to stiff -for my liking - I made a big mistake ! To much fork oil -150 mm air gap with forks extended not compressed. Out to the garage.
When you have your fork oil level corrected could you compress them by hand to compare the dampening? One of my forks was like a pogo stick. I’m wondering if that’s normal. It doesn’t seem right to me and I don’t know if I should disassemble to search for a problem.
 
When you have your fork oil level corrected could you compress them by hand to compare the dampening? One of my forks was like a pogo stick. I’m wondering if that’s normal. It doesn’t seem right to me and I don’t know if I should disassemble to search for a problem.
I recall each fork has a separate function. I changed the fluid in mine a few years ago but can’t answer your question. Some of the more knowledgeable will chime in soon before you take them apart again.
 
New Update !!! I made the mistake of setting the oil level to 150mm with forks extended . Now , i popped the caps ,pulled the springs and sucked out about + 200 ml fork oil. Air gap is now 150 mm, forks contracted. Test ride. Yes, now this is right. Very nice ride, smooth , and firm . Nice response to heavy braking , does not dive much. I don't know exactly how much oil is in each , but it is close to levels in the Clymer Manual.
 
When you have your fork oil level corrected could you compress them by hand to compare the dampening? One of my forks was like a pogo stick. I’m wondering if that’s normal. It doesn’t seem right to me and I don’t know if I should disassemble to search for a problem.
I didn't take the forks off the bike when correcting the oil levels . Its heavy bike, strong spring and compressing by hand isn't going to tell you much . How do you know only one is a pogo stick ? Its pretty easy to check the oil levels on the bike, if you have the tools and a jack, I'd look there. The left side has cartridge damper , that I assume dampens rebound . The right side is simpler , I don't if there is any rebound damping there.
 
Last edited:
I didn't take the forks off the bike when correcting the oil levels . Its heavy bike, strong spring and compressing by hand isn't going to tell you much . How do you know only one is a pogo stick ? Its pretty easy to check the oil levels if you have the tools and a jack, I'd look there.
I just leaned on each fork on the floor to compress them then let them rebound. One rebounds as fast as I let go. The other took longer to rebound. They had the correct amount of oil in them originally. I decided to change the oil since its a new to me bike and I found it doesn't rebound fully when I get off it. When I back it up the forks extend a bit then it squats again when I stop pulling on the bars.
 
If I understand you correctly :On the bike - the forks are not supposed to rebound fully . The weight of the bike (and you) are supposed to compress the front forks about 3-4 cm (sitting on the bike with rider gear ,and not on the stand -static-). It sounds right that one fork would rebound right away (right side on 96-02) , think it's the left side on pre 96. I'm no expert on these matters , but it's my understanding of the way these things should work.
 
If I understand you correctly :On the bike - the forks are not supposed to rebound fully . The weight of the bike (and you) are supposed to compress the front forks about 3-4 cm (sitting on the bike with rider gear ,and not on the stand -static-). It sounds right that one fork would rebound right away (right side on 96-02) , think it's the left side on pre 96. I'm no expert on these matters , but it's my understanding of the way these things should work.
Thanks for the responses. I watched Delboy’s Garage video and he pumped the cartridge fork at the end and it rebounds quickly like mine. I wish he would have shown how to reassemble the damper rod fork. I’m not clear on the use of the rod holder tools.
 
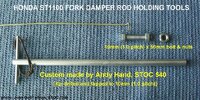
Good video . I also wished that too. But the damper rod is no big deal . It's fasten by the allen bolt in the bottom of the fork and slides out with the top cap ,spring and everything .There is a little aluminum cup that the allen head bolt goes thru, under the damper rod-so that one is loose . The trick is when assembling (first time). To drain the damper ,you have to pump it ,and to do that the spring has to come off and to do that -the cap must off. To take the cap off the damper rod -there is a nut (14mm) under that locks them together. You will figger it out. As in the video, when putting together ,you fasten the damper rod -with out the spring (don't forget the little cup) with the allen head bolt and new washer at the bottom - you might not get it very tight at this stage . Fill oil and pump the D rod till its has sooth action - now sett oil level ,without the spring inserted. Now Put spring,washers and lock nut to cap. That is the tricky part , but not difficult : Rod holder tools - A steel wire ,a magnet . You will might need a extra hand ,because the rod will sink while you are threading the spring down over it. I threaded a steel holding wire though the spring, and pulled the damper rod up. you won't loose it.
Before you start: While the forks on the bike -Loosen but- Leave the caps on - forks off bike -then lossen the bottom allen bolt. I had use impact gun to loosen the allen head bolts om mine. So going on- new washers and as Delboy says don't over tighten them . That was my quick guide. You could also ask some mc shop to do it, just deliver the forks. Only spesial tools needed is a long 6mm allen socket
Do you have the Clymer Manual ? What is you want to do with the forks ?
 
Last edited:
Attached is a pretty long video(50mins) of a suspension guru working on a vfr, the forks cartridge looks very similar to our st1100 cartridge, the last 5mins shows the assembly of the cartridge.


Basically the red tooling/rod he used to connect and hold the cartridge rod is the same idea as the clothes hanger/nut/bolt idea from John O and the others

I bought a similar tooling rod to use to pump/hold the rod from dropping into the tubes, however I had aftermarket(PS) springs which is much longer/stronger than factory, hence had a hard time compressing the springs, putting the washer under the rod nut and holding the rod same time, even with a helper assisting.

If you have original factory fitted springs you should have an easier time compressing the springs to slide the washer 😀

Picture taken from st archives for references.i think the tooling on the bottom is similar to the red rod holder shown in video.

Apologies for the long post.
 

Attachments

  • 8BED7184-D69B-45D7-89DC-8096E021E109.jpeg
    8BED7184-D69B-45D7-89DC-8096E021E109.jpeg
    163.7 KB · Views: 1
Thanks everyone. Forks are back together and they have the same feel. When compressed by hand so maybe there was nothing terribly wrong with them. I have some bad cupping in the front tire so I wanted to rule out suspension issues as a cause.

On a side note I noticed my fairing cracking as I was working on the forks. 😳😖 It started at one of the brass inserts where the inner middle cowl attaches to the right side upper cowl. It got worse over a few days of not touching it so I removed it to relieve any stress in it that was causing this. Over to ST-Riders plastic repair forum I go.
 
Attached is a pretty long video(50mins) of a suspension guru working on a vfr, the forks cartridge looks very similar to our st1100 cartridge, the last 5mins shows the assembly of the cartridge.
Well, I'm puzzled... 🤔

he does not care at all about the orientation of the cut/gap of the bronze bushings (for me always out or inbound; never at the load bearing front/rearward...)

And not unloading a torque wrench when putting it away is also a no-go for me personally... ;)

But yes, just dumping old oil and fill new doesn't cut it...

I do my forks about every 36,000km/22,500miles, means complete disassembly and clean/inspect every nick and cranny in there...
(kinda explains why the simply drain bolts of the early non ABS ST have been omitted later on...)
 
Back
Top Bottom