Getting to Know the Bike

Joined
Mar 6, 2024
Messages
43
Age
70
Location
Detroit
Bike
2003 Honda ST1300
So I started today to remove the fairing to see what's under there, even though the fairing seems to be in good condition - no cracks, broken tabs, etc (the good news). The fairing was removed before, perhaps when the bike had it's 32K valve check/adjustment (have paperwork). That said, there were missing fairing screws and plastic fasteners (as normally expected as a result of a half-ass job - this is the bad news).
The bike had several accessories installed and that is obvious as soon as the seat is removed:

20240327_141149.jpg

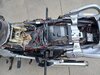
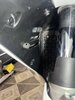
That looks (kinda) tidy and nice but things get somewhat worse towards the front of the bike:

20240327_141141.jpg

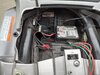
Several things going on here: unplugged connectors (top of pic), loose canister that seems to had been attached with a metal clamp (doesn't look OEM to me), abandoned wires isolated with duct tape, etc.

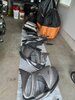
The other side is somewhat similar:

20240327_141214.jpg

Note the unplugged wires by the ABS pump, then there's this hanging thing by the horn - seems to be some kind of sensor supposed to be secured by a screw somewhere.

20240327_141222.jpg

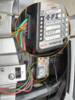
Looking at the fuse box the PO installed, it seems he had cruise/radio/GPS/heated jacket installed - also some wire nuts in there:
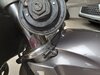
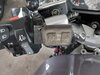
20240327_141324.jpg

And the cruise:

20240327_141444.jpg

As much as I appreciate comfort features I'm not a fan of these "installations" and they'll go off the bike. It seems that some of the future work on this bike will be electrical, nothing that can't be fixed with a wiring diagram and a six pack (at a time).

Overall, happy with the purchase, mechanically the bike is pristine, even if a little bucherred electrically. Plastics are in good shape, some scratches most of them just scuffs in the clear.

20240327_141522.jpg
 

dduelin

Tune my heart to sing Thy grace
Site Supporter
Joined
Feb 11, 2006
Messages
9,685
Location
Jacksonville
Bike
GL1800 R1200RT NC700
2024 Miles
008131
STOC #
6651
Canister likely part of the cruise control install. "Wire nuts" out back are Posi Taps and very useful and well regarded in some circles.
 
Joined
Sep 4, 2013
Messages
8,197
Location
Cleveland
Bike
2010 ST1300
I’m taking the easy one.
The easier one yet is the red connector aft near the fusebox. That is the direct line to your ECU and was originally covered in black tape and taped to the wiring harness on the right side under the pillion seat. You don't want to damage that or get it gunked up with dirt.

While you are under the fairing, you might eyeball all the connectors for signs of overheating and/or corrosion - discoloration of the wires (tending toward brown) or melting of the plastic housing over the connectors themselves. Pay particular attention to the 23 pin connector behind the right headlight (tho I am not sure if earlier bikes had a full 23 pin unit). This is for all the grounds and has caused a plethora of confusing symptoms when one or more of the connections corrode or melt.

You might find this helpful.
 
Joined
Aug 11, 2013
Messages
3,559
Location
kankakee
Bike
R1200rt
Just looking at pic #1 red wire looks like it is getting pinched as it goes over frame for seat, could be a problem. Butt connectors are ok but ( pun intended ) the connectors with heat shrink would be much better to eliminate future corrosion/problem. 1711637611269.png
 
Joined
Jan 29, 2024
Messages
95
Age
29
Location
Columbus, OH
Bike
2003 ST1300A
Just looking at pic #1 red wire looks like it is getting pinched as it goes over frame for seat, could be a problem. Butt connectors are ok but ( pun intended ) the connectors with heat shrink would be much better to eliminate future corrosion/problem. 1711637611269.png
Even easier, unscrewing that wire from the terminal block on the fuse box and snaking it under the cross member with the rest should be just as easy. Obviously only if it's desired to keep that accessory.
 

STRider

Site Supporter
Joined
Mar 17, 2020
Messages
1,114
Age
64
Location
Oregon
Bike
2012 ST1300A
STOC #
50
@draser , I agree with your assessment of the quality of the PO's installations. The apparent hasty nature of the dismantling of these accessories tells me the PO experienced problems which they were unable to or unwilling to fix. Case in point, the canister which we believe is the actuator for the cruise control.

That red connector is as @SMSW describes. For reference, my 2012 1300 had a blank cap and black tape over it. My gear position indicator is now plugged into it.

I would also suggest looking under the lid of the Fuseblock. The wires emerging from the terminal block grabbed my attention. They look like they could be shorting against one another, perhaps even being the source of the PO's frustration. I know they're on the output side and shouldn't in themselves be a problem if they short to each other, but it can contribute to transients which mess up things like the cruise control, perhaps causing inconsistent operation.

1711650549160.png
 
OP
OP
draser
Joined
Mar 6, 2024
Messages
43
Age
70
Location
Detroit
Bike
2003 Honda ST1300
I’m taking the easy one. Sensor at horn is temp sensor. Goes here
Thanks, I like your floors.

"Wire nuts" out back are Posi Taps
Yeah... coming from an automotive/engineering background... they're not OEM.

If you're planning to remove the cruise control anyway, I'm glad to offer more than your trash can
What do you have in mind? Whereabouts in Col's are you, I used to live in Bexley...

While you are under the fairing, you might eyeball all the connectors for signs of overheating and/or corrosion
Part of my maintenance plan, will clean/deoxit/dielectric grease all connectors.

Just looking at pic #1 red wire looks like it is getting pinched as it goes over frame for seat, could be a problem. Butt connectors are ok but ( pun intended ) the connectors with heat shrink would be much better to eliminate future corrosion/problem.
My plan is to remove all added wiring/splicing/connectors and route original wiring to match service manual. I normally solder my wiring and heat shrink over when I add wiring to vehicle.

Thanks guys!!
 
Joined
Jan 29, 2024
Messages
95
Age
29
Location
Columbus, OH
Bike
2003 ST1300A
Thanks, I like your floors.


Yeah... coming from an automotive/engineering background... they're not OEM.


What do you have in mind? Whereabouts in Col's are you, I used to live in Bexley...


Part of my maintenance plan, will clean/deoxit/dielectric grease all connectors.


My plan is to remove all added wiring/splicing/connectors and route original wiring to match service manual. I normally solder my wiring and heat shrink over when I add wiring to vehicle.

Thanks guys!!
Small world! I'm in Grove City now, and have zero issue popping up to Detroit at some point if I end up that way sooner than you're down here.
 
Joined
Sep 4, 2013
Messages
8,197
Location
Cleveland
Bike
2010 ST1300
Part of my maintenance plan, will clean/deoxit/dielectric grease all connectors.
Deoxit cleans the connectors. Dielectric grease is an insulator. If you smear d-g on a connector, it will have to scrape the grease off as the male and female parts are pushed together. Many connectors do this, some might not. A better way to use the d-g is to clean the connectors, push them together, and then press d-g into the ends of the plastic housing to keep dirt and moisture at bay.
 
Joined
Aug 11, 2013
Messages
3,559
Location
kankakee
Bike
R1200rt
.


My plan is to remove all added wiring/splicing/connectors and route original wiring to match service manual. I normally solder my wiring and heat shrink over when I add wiring to vehicle.
ya might want to keep that auxiliary fuse box , wired properly of course, just incase you later want to add heater grips, audio, usb charging ports, gps and so on. :biggrin:
 
OP
OP
draser
Joined
Mar 6, 2024
Messages
43
Age
70
Location
Detroit
Bike
2003 Honda ST1300
Having a nice summer day up here today, I thought I'd get the bike home (from my friend's house), so I can start working to getting it roadworthy.

So I roll the bike out of the garage and place it in the sun to do a quick walk around to make sure I can ride it home, it's a 15 mile ride give or take. First thing I noticed oil level was low so I went and bought a gallon of Rotella T4 and added oil to the upper mark on the sight glass (didn't take much).

Then checked tire pressure, front was in the 30's - added air to 42psi. The rear air valve wasn't easily accessible so I wanted to roll the bike forward but it would not roll, I thought it was in gear but it wasn't. It acted like a stuck caliper, then after fiddling with the rear brake pedal somehow the caliper released and the bike rolled. I applied the brakes and bike acted normally releasing every time. Filled rear tire to 42 psi as well.

So, I start the bike, put in gear and took off. After about half a mile I started losing power and finally stopped on the side of the road. Bike acted like the clutch was gone and at some point it wouldn't even go in gear. So I had to push the bike back to my friend's house (hilly road), clutch was dead and bike wouldn't move under power.

The guy I bought it from said he's had the clutch replaced on it, looks like I have to start there.

Not a good day... next week I'll get a trailer to bring her home.
 

Terminator2

Site Supporter
Joined
Jun 27, 2016
Messages
191
Age
68
Location
Auburn California
Bike
2006 ST1300
Not supposed to use Rotella T4 as I recall. I have used Rotella T6, Honda GN4, Mobil 1-4T. Also, the wires running under the seat, one is on top and seems to have some bare wire exposed. If you change out the oil and filter (remember to strap clutch handle in depressed position), your clutch should return to life. Other members will voice opinions soon.
 

Gus1300

Site Supporter
Joined
Apr 5, 2007
Messages
563
Location
Haymarket VA
Bike
04 1300A
Check the orientation of the pushrod from the lever into the clutch MC piston; it can go in either way, but there's only one right way and if it's wrong, it could result in the same condition you describe. Don't ask how I know!
 
Top Bottom