Lumina 14 cu ft trailer

rjs987

Robert
Site Supporter
Joined
Sep 25, 2009
Messages
1,059
Age
71
Location
West Des Moines, IA
Bike
2024 Kaw Vulcan S
2026 Miles
005169
I was enough of a pest with texting short occasional bits of information every once in a while about wanting this and how much it would cost compared with how much used cargo trailers cost across the nation (with the added cost of travel to get any of those) as well as how I intended to pay for one (out of my own personal bank account that she finally said "ok, get what you want and sell some of those antique coins I have to help pay for it." I'm not worried about any fallout since I've been dealing with that for years.

I did ask her which color between white sides and back or black sides and back. She said to get the black since that seems to be more common and goes better with my bike. Gotta give her some investment in it since she is letting me get one.

The hitch I made for the Uni-Go trailer didn't work for the Uni-Go trailer since I think it was too low. But it is the right height for this type of trailer so all should be good there. I just need to decide between putting a swivel ball coupler or a swivel Heim coupler ($50 difference) on the tongue.

This trailer comes with a vintage old style 4 pin flat connector with 2 oval tail lights with combined brake/turn lamps on the rear bumper. So I plan to update that to the more modern and natural 5 pin flat connector and add a pair of oval lights. I'd keep the 2 wires to the factory lamps for turn signals only (and tail lights) and add another matching pair of oval tail/brake lights with a flashing brake function near the top of the back panel.

This all aluminum trailer costs the same or around 1/3 what a used 20 year old Bushtec or similar trailer costs and those used trailers are half way across the nation so would be a problem to transport to me. I don't want the version that Northern Tool or Harbor Freight has since those seem so flimsy and are a bigger cargo capacity than I want. The USA Trailer Store has free shipping to my curb since I am in the eastern half of the USA.

1779990125341.png
 
I think I'm just going to stick with the traditional ball coupler setup... which means the swivel coupler setup that is offered by The USA Trailer Store for the Lumina trailer will be added to my order. This will allow me to pull the trailer with any other traditional trailer hitch on any other vehicle (almost) if I should ever need to do that.
 
Found out I missed the free curb-side shipping by one week due to the cost of gas going up so much. Still not a lot of shipping since they are soaking 87% of it. ONE WEEK! But still a good price on a new pull behind motorcycle trailer. And still curb-side delivery though... as long as the 18 wheeler can drive down my street... which I've seen done more than once in the past for deliveries to my own house as well as other houses.
 
Last edited:
Just received an email saying the trailer will be delivered Monday via FedEx. Not bad for a freight shipment from SC... 4 days. Almost faster than the US Postal Service.

I also have some farkles arriving from Amazon to upgrade the electrical system from the ancient 4 pin plug configuration with combined turn and brake lights to the better much more modern 5 pin plug with separate turn and brake lights. Included in those farkles are additional oval LED lamps for the brake and tail lights as well as the flashing brake module.

I rode the bike to the weld shop to talk with the welder I've used before about the adapter I'm making to bolt onto the hitch.
 
Oops. Looked closer at the details that posted an hour or two after notice of delivery estimate. The package weight that is being delivered is 8 lbs. So likely not the trailer. More likely the swivel insert for the coupler that I also ordered from the vendor that is being shipped separately.

I have read at least one review that stated 9 days shipping for the trailer from SC to the PNW. So I am expecting possibly 5-6 days for the trailer itself to be at my curb. That would be Tuesday or Wednesday so still really good if that timeline holds.

If it arrives anytime next week it might be possible I'll be pulling it to LOCSTOC. The welder said to bring him the steel I want to shape and weld and he'd knock it off right away. So likely I'll have the adapter done by Friday.
The electrical farkles will all be here Monday from Amazon.
I have everything else I need to put it all together. Except I might have to buy a spare tire to put with the trailer. 5.30 x 12, 5 lug rim.
 
Last edited:
The hitch I made for my Vulcan S worked out well to keep using the paddock stand without removing the hitch. The stand design fit around the Uni-Go receiver with plenty of space to spare since it was relatively flat and only stuck out to the rear barely more than an inch.

But the adapter I am making to bolt onto that hitch for using a tow ball to pull the Lumina trailer sticks out to the rear too far for the paddock stand to fit around it. Therefore I know I will have to remove the adapter... without needing to remove the entire hitch... when I use the paddock stand. 4 bolts that will be easy to get to.

After changing the rear tire early this month I know I'll have to remove the entire hitch to do that again to fit the tire out from under the fender. I don't think I can angle the wheel enough to get out around the hitch. But that only happens once a year... about. Just extra details to deal with for having a hitch and pulling a trailer. I feel it's worth it.
 
Because the hitch I made is cold rolled steel, and the adapter I am making is using stainless steel, I will be treating the surfaces that touch to prevent galvanic corrosion. I will also be using class 10.9 hardened bolts and nuts to bolt the adapter to the hitch.

The hitch is powder coated so that handles insulating that part from galvanic corrosion. I also plan to coat the mating surface of the adapter with black electrical tape for double protection. I'm not buying any other special coatings for such a small surface. The bolts and nuts and washers are zinc plated 10.9 metric fasteners so not good for direct contact to stainless steel. Stainless bolts are softer than 10.9 class bolts. I'll used nylon washers between the stainless and the washers. I did this kind of setup before with mixed metals with good results. I also have a can of Flex-Seal rubberized coating spray. Good for a lot more than just sealing rain gutters. I am thinking to spray that on the stainless where the tow ball and nut/washer contact the stainless tow mounting plate. I could also use electrical tape for that .
 
I'm no metallurgist, bu
Because the hitch I made is cold rolled steel, and the adapter I am making is using stainless steel, I will be treating the surfaces that touch to prevent galvanic corrosion. I will also be using class 10.9 hardened bolts and nuts to bolt the adapter to the hitch.
I'm not a metallurgist, but stainless steel and cold rolled are basically iron - you will not get galvanic corrosion between the two metals. I've used stainless steel bolts on mild and carbon steel parts oudoors for ages - mostly because the stainless bolts can be removed years later (no rust) and I've never seen any corrosion at the interface. If you were to bolt stainless to copper, brass, or aluminum that is a different story.
 
It is true that corrosion would be minimal over a few years duration. But per the galvanic corrosion charts stainless and cold or hot steel are at different levels and can result in at least a little noticeable corrosion over time. Maybe not rust, but a chalky white deposit which is still corrosion.
I've used stainless fasteners to mount aluminum license plates for many years. There is typically some corrosion on the aluminum after just a few years. The plates are typically replaced before it becomes much of an issue.

The hitch I made for my AK 550 was made using stainless steel and bolted to the aluminum frame of the AK. I used electrical tape and nylon washers to insulate between those 2 metals and that worked out very well. The aluminum frame would have been the sacrificial metal in that case so it was important to protect it since that was the rear frame of the bike. The bolts/washers/nuts I am using on the adapter I am making are zinc coated... also the sacrificial metal when against stainless. The zinc coating would be eaten away should there be any galvanic corrosion exposing the underlying unprotected steel to the elements. I figure taking the precaution is better than not taking it.

I also know that stainless steel is not corrosion proof but rather very corrosion resistant.

Since I do sometimes ride in rain and in winter conditions corrosion is more of an issue than those who only ride in fair-sunny-dry weather.
 
Received email today that the trailer is shipped from SC. MAYBE it will be here in time to set it up for LOCSTOC.
Other than installing the wheels, fenders, rear bumper and tongue I will be adding another pair of lights and replacing the 4 pin connector with a 5 pin connector to bring it up to date with a proper trailer harness.
 
Now the fun begins!
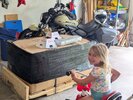
The expectation is for curb-side delivery but the driver deposited the crate in my garage as shown so I don't need to drag it in from the street.
My youngest granddaughter just had to photo bomb this picture (7.5 yo). That beige container on top the trailer packaging is the new 1/2 inch click torque wrench I also bought since I didn't have one of those. I do already have 1/4 and 3/8 inch drive torque wrenches and a torsion bar 1/2 inch drive torque wrench. The torsion bar wrench only goes to 150 ft lbs and I needed bigger than that. The new one goes to 180 ft lbs.
PXL_20260605_173100233.jpg
 
That's just the side that got cleaned when my wife put away her planting stuff.

Most of today was doing the electrical mods to make the 4 pin connector into a 5 pin connector and run the extra wire to the rear through the frame. IT WAS HOT TODAY!

The trailer tongue is installed. The swivel coupler is installed. I had to run to Lowe's to get a set of M10 washers to fill the extra space between the tongue tube and the swivel coupler insert. There was too much slop even with the bolts tightened but a washer on each side at each bolt filled the space nicely.

The wheels and fenders are installed and the trailer is now flipped right side up. I had it laying on its top to do all the work until this step was done. I checked the grease in the hubs and it looks good to go from the factory.

My initial measurement for coupler height from the ground looks to be right on target. I was initially thinking of using a 1/4 inch thick stainless plate to mount the tow ball on but decided I'd go just a smidge thicker at 5/16 inch. That plate should be here tomorrow and then on Monday I'll take the steel to the welder to have him form the adapter and weld on the plate. If I can get that done early next week then I'll definitely be pulling the trailer to the next event June 17.

Looking at the assembled trailer (mostly assembled) it has a LOT MORE ground clearance than I am accustomed to so it seems rather tall. The box is only 18 inches deep and it is almost the same off the ground. 12 inch wheels will do that. It does make my bike look smaller. I will have no problem seeing this thing behind my bike.
I adjusted the latch since the lid doesn't close tight. It will likely still keep wetness out since the 2 gas shocks on the lid pull it down tight but I can lift it almost 1/4 inch at the back (hinge is at the front). It does have weather stripping around the lid but I may add a thicker weather stripping.

Tomorrow I'll be adding the bumper with the factory lights and also add the extra lights I bought as well as the cooler platform. I don't know if I'll use a cooler but it will be there for added luggage or a cooler if I wanted. This trailer also has a luggage rack on the lid to tie on more stuff. But I hope I won't accumulate massive amounts of "stuff" to carry to use that. I am expecting a significant amount of empty space inside the box at least for now. I'll even have room for the kitchen sink and maybe a dishwasher.

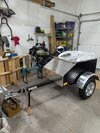
The bumper is not on yet but the wires are hanging down to connect to the lighting. The luggage rack is still in bubble wrap and is just sitting on the lid here.
PXL_20260606_020151955.jpgPXL_20260606_020232299.jpg
 
Last edited:
Trailer is all done being assembled and farkled. Tires aired up and lug nuts torqued per spec.

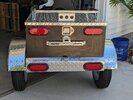
I'm very glad I opted to move the brake lights to the added oval LED lights at the top of the back panel. Also very glad to have flashing brakes back there. The LED lights I added are brighter than the factory LED lights... even just the running light mode.

PXL_20260606_180939969.jpg

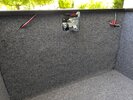
The interior carpet allowed me to put the wires inside behind it for much of the interior. Just as all of you cringe a bit when poking holes in a new bike for farkles I was cringing when drilling the holes for the LED lights and wiring. I used a grommet in the hole for the wires going into the box at the bottom right corner (covered by the carpet). I also caulked all the holes I drilled including the grommet. The grommet is in that location because it is up behind the bumper and protected from weather and road debris. I used zip tie pads to secure all the wires that were not inside a frame tube including across the bumper since the wires there are just hanging up under the bumper.
PXL_20260606_180113080.jpg

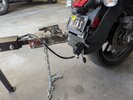
This is approximately how the trailer will sit when on the towball. Looks like I measured right for the electrical harness. Plenty of slack for the trailer at any angle to the bike without straining.
PXL_20260606_180903524.jpg

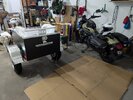
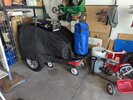
Here it is tucked in the corner of the garage where it will live when I'm not using it. The cover was a free bonus item that came with the trailer. It's actually a really nice heavy cover. The EGO box will go to recycling soon and the blue dry bag has my tent and tarp in it just waiting for the next camping event. Almost everything will go inside the trailer. Since the trailer has a lot of ground clearance I figured I'd make use of that space to store stuff out of the way. The Rav4 parks next to it just fine as well. It doesn't get any closer than that white pole.
PXL_20260606_193229854.jpg

Here is a link to 2 videos that show the lights in action.
https://photos.app.goo.gl/BZxtghD4GmMZ6CVi8
 
Last edited:
I was just thinking that it's a good thing this is a light trailer (170 lbs empty). A general rule of thumb is that any trailer you pull with a bike should be no more than half the weight of the bike. Even with the trailer loaded... at least how I am intending to load it... it should be right at half the empty weight of my bike. And with me sitting on my bike going down the road it will definitely be way under half. It remains to be experienced how this trailer will act being pulled behind my bike. I should have the adapter made and mounted sometime next week and then I'll know.
 
I saw that model trailer being pulled behind a GoldWing today, on the way to the Brisket Buffet hosted by @Nashcat .
We were both heading north on I65 between Birmingham and Nashville.
There was a time when I couldn't ever see myself pulling a trailer with my motorbike.
But my German Shepherd changed that.
Then again, there was a time when I couldn't ever see myself putting a car tire on my bike, either...
Maybe the moral of the story is, never say never?
Or, don't knock it till you've tried it?
Or at least keep an open mind?
No matter what the moral may be, your camping will be much more comfortable now.
You've put a lot of thought into this, just like your last one.
 
The trailer tongue is installed. The swivel coupler is installed. I had to run to Lowe's to get a set of M10 washers to fill the extra space between the tongue tube and the swivel coupler insert. There was too much slop even with the bolts tightened but a washer on each side at each bolt filled the space nicely.

I cannot believe they sent a swivel coupler that didn't match the size of the trailer tongue! Seriously? I could understand if you were mixing and matching different company's products, but ...
 
I cannot believe they sent a swivel coupler that didn't match the size of the trailer tongue! Seriously? I could understand if you were mixing and matching different company's products, but ...

I'm fairly sure the company I bought the trailer from didn't actually make the swivel coupler but they just sell it. If I were able to torque the bolts a lot more I could have squeezed the tongue tube enough to be a firm connection. But I didn't want to bend the metal that much and didn't want to put that much torque on the bolts. They do list the inner dimensions of any trailer tongue the swivel coupler fits and include a note to make certain the tongue you have is not too SMALL for it.
 
What lights are they, please?

These are the lights...
LED trailer lights

I like them a lot more than the factory lights. And there is no need to cut out a big oval hole in the panel to mount them! That was one of the primary things I was looking at.
Please note: the flashing option is NOT a part of these lights but due to the flasher module I installed on my bike on the trailer brake wire.
That is this module...
flasher modules
See this post for where I installed it: https://www.st-owners.com/forums/th...kawasaki-motorcycle-today.190987/post-2603658
 
Last edited:
Back
Top Bottom