Melting headlight connector?

Joined
Jun 13, 2011
Messages
68
Location
St.Paul Minnesota
Bike
2016 BMW K1600GT
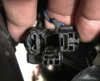
My '05 left headlight has been an intermittent affair this season and now its totally not functioning. - I used to be able to reach up and push against the connector (light went back on...) but recently this method has not been working successfully - a recent thread on headlight replacement had me exploring why the headlight connector was not contacting properly ... and to my surprise - a MELTED connector! (pic)
1. Is this common?
2. wrong bulb - too hot?
3. A more (worrisome) systematic problem?
4. Just replace the connector & hope for the best?

Does anyone know if this little plastic part can be sourced from a Honda dealer (Still) or does it require purchasing the whole headlight assembly - or after market part ?
Thanks for any input. - yours truly, headlight cyclops....
 

Attachments

  • IMG_5637.jpg
    IMG_5637.jpg
    95.2 KB · Views: 63
That is indicative of a loose connection. If a person can catch that early enough, the spades can be bent inward making a tighter connection and thus no heat to deform the plastic.
 
1. No
2. Probably not. People have been swapping out oem halogen lamps for higher wattage bulbs. I replaced 60 watt high beam lamps for 110 (or 100) some years ago with no problems.
3. Probably not, but, read below.
4. yes and no.
Electrical connectors fail because of wear and/or manufacturing tolerances (only occasionally), corrosion, and perhaps damage when we mate the pieces together. Any connection needs tight, clean, metal to metal contact in order for a low resistance path for the electricity. Higher resistance equals more heat which kills the springyness (technical term) or anneals (softens) the connector metal. This results in a loose connection and more resistance and more heat. End result is oxidation of the connector, high resistance, melting plastic and insulation.

Get a new headlight connector, and do a trial fit to the lamp. It should mate tightly. Splice the pigtails onto the OEM harness and you should be good to go. The gold standard would be a western union type soldered splice, but crimp connectors using the proper tool are ok too. I prefer the crimp tools that press a dimple into the tubular crimp connector - when you look closely, these do a great job of really squeezing the wire between two pieces of metal tightly. The type that simply flattens the tube (like a pair of pliers would) will often leave the wire loose within the tube. Note that you MUST use the crimp tube (butt splice connector is the proper term) sized for the wire you are using. Too large means the wire will be loose within the crimped connector, too tight and the wire will not fit.

Your bike is 14 years old, so corrosion might be reariing its ugly head. Its a good idea to regularly check the grounds and other connections. By this I mean once a year visually look over the wiring harness, look at the connectors for signs of overheating esp. the problem areas for our bikes - notably the big 23(?) pin connector near the right headlight. You are looking for darkening of the insulation and signs of overheating - melting plastic. Check the main ground strap from the battery where it attaches to the frame for rust/corrosion. Dielectric grease is an insulator. If you slather it on connectors before pressing them together, you are depending on the connector to scrape it off as the pieces mate in order to make the connection. It is better, I think, to spread the grease around the connection after you press the pieces together to seal out moisture. That said, slathering the stuff on before pressing the male and female connectors together usually works.
Wow - 1st class answer ... THANK YOU - looks like there is a future parts-run to the Local Honda dealer parts counter & hope for the best...
 
If Honda does not sell the connector separately or if you cannot wait for one to be ordered you can purchase any H4/9003 headlamp connector from any supplier of your choice such as this- Novita High Beam Lamp Socket SC04. The terminal ports in the connector will be in the same locations and the terminals will fit your bulbs. The only difference is that the one that you purchase will probably not have the locking tabs that lock the connector on to the bulb's terminals as the OEM Honda connector has. This is not a significant concern as most cars for years did not have this locking feature and connectors did not come loose from the bulbs.

I would suggest buying a connector that comes complete with the terminals installed and a short pigtail of wire already attached to them. You can then simply solder or crimp the new connector to the existing wiring on your bike.
Again - excellent information - THANK YOU for this link & your depth of information - for the fun of it, going to try both options...
 
Hmm, maybe this explains my headlight gremlin....

@robofavo - when your headlight was intermittent, did you find when it wasn't working, the blue high beam light came on (despite high beams not being on)?
 
Hmm, maybe this explains my headlight gremlin....

@robofavo - when your headlight was intermittent, did you find when it wasn't working, the blue high beam light came on (despite high beams not being on)?
ad.hom - Yes Correct, the 'bloody blue-dash light would come on when the left primary headlight blinked-out - This was my "intermittent headlight event" from last years riding season, I'd reach up under the front cowling and give the connector a push & the headlight would come back on, hence the blue dash light would go off. This year, I could push on the connector with success but as soon as I let off finger pressure, the head-light would go dark & blue dash light is on.
 
Overheated LH headlight connections are not that common on ST1300s but it is not unheard of. Every so often a thread like this pops up and the problem may start with the LH headlight as this one and my similar problem did. The fact that you had the high beam light coming on indicates a bad ground connection in a headlight circuit and the ST1300 has some history with problems associated with weak or wonky grounding of electrical circuits in the front half of the bike. In this case one I would wonder if the ground side of the headlight connector went bad first or did one of 2 harness connectors known to compromise the ground circuit go bad and overheat at the headlight like my 2005 did. I had only minor overheating of that connector but it progressed from there.

I would check the ground circuit from the headlight to the ground connection to the frame under the rear of the gas tank. Initially my 2005 had the LH headlight go out and it was not the bulb. I "fixed it" with a jumper wire to known good ground so I fashioned a separate permanent ground from the LH connector to a 10mm bolt threaded into a threaded hole provided on the left side of the frame behind the head stock. That fixed the LH headlight but later I began having intermittent problems with the entire headlight and other lights up front not working properly, just a weak barely discernable glow of the headlights and running lights, high beam indicator glowing. This happened a few times but the engine always started and I got home. This progressed to a no-start situation and a dead bike. Eventually I found the 24 pin harness connector located above the LH cylinder head was overheated where the ground wire passed through it. This one green wire carries all of the devices in the front half of the bike to the frame ground under the gas tank. Although mine proved undamaged, there is another ground bus (fitting that connects numerous grounds to one) found behind the RH headlight. This yellow connector brings various grounds to a single wire that passes through the 24 pin harness connector which went bad on my 2005. The yellow bus does not come apart like the 24 pin does. There have been ground issues that originate at the yellow bus in other threads and these problems were fixed by bringing all those grounds together in a way other than relying on the OEM bus which was heavily corroded.


This is just one thread on similar headlight or dash light problems found by Googling https://www.google.com/search?client=firefox-b-1-d&q=Fixed+my+electrical+problem+ST-Owners.com
 
Hmm, maybe this explains my headlight gremlin....

@robofavo - when your headlight was intermittent, did you find when it wasn't working, the blue high beam light came on (despite high beams not being on)?

You're describing the symptoms my bike had. Corrosion had eaten nearly all the ground wire on the right hand connector so I had intermittent on off behavior of the high beam and indicator. After I replaced the wiring at the connector, no more problem. But I had started to melt the plastic by then.

I have a replacement headlight loom waiting to be installed if it ever gets close to that bad again but in the meantime I have also switched to LED lamps so the circuit carries less load.

Moral: have a good look at every ground connection in the headlight circuits, and then all the others.
 
Last edited:
ad.hom - Yes Correct
have a good look at every ground connection in the
Thanks both. I've had the dash open a few times to look for the gremlin & looked at the grounds and especially the main connector that attaches the clocks (my bike has a pair of USB sockets just above the dash, with the positive coming from that connector).

The only thing I haven't really looked at is the headlight connector itself, so if the spades are a little loose that could account for it.

I'm away at the moment, but I'll open the dash up for another look ASAP.
 
The only thing I haven't really looked at is the headlight connector itself, so if the spades are a little loose that could account for it.
My ST buddy was having some wonkiness with his headlights which is often either a dirty starter switch or a bad ground somewhere. He couldn't find any corrosion or melted bits among the usual suspects but found when he ran an additional ground from the right headlight socket's ground to a good clean frame point the wonkiness went away instantly. So he made the connection permanent.
 
@robofavo - when your headlight was intermittent, did you find when it wasn't working, the blue high beam light came on (despite high beams not being on)?

The issue of the Blue high-beam indicator lamp remaining lit has come up before. Here's a link that may be useful in resolving your gremlin.
 
Now that I'm back from vacation, I found the gremlin...
IMG_20190914_120548.jpg

That's LH headlight connector, ground pin. Didn't really have time to investigate further, so for now I'll run with 1 headlight (LH disconnected), and it'll let me monitor for other issues.

I would check the ground circuit from the headlight to the ground connection to the frame under the rear of the gas tank.
Presumably this is where the head harness grounds itself, via the yellow connector behind RH headlight?
dirty starter switch or a bad ground somewhere.
I did note today that after putting the bike together again, I had the same problem as last time, didn't want to start. Like last time, playing with the kill switch solved it.

Curiously though, holding the kill switch just away from RUN position primed the fuel, letting go of the switch rests in RUN killed the bike. A little more rocking and she runs fine.

So, another strip of the switch assembly & some studying the wiring diagram is in order.
 
Last edited:
Now that I'm back from vacation, I found the gremlin...
IMG_20190914_120548.jpg

That's LH headlight connector, ground pin. Didn't really have time to investigate further, so for now I'll run with 1 headlight (LH disconnected), and it'll let me monitor for other issues.


Presumably this is where the head harness grounds itself, via the yellow connector behind RH headlight?

I did note today that after putting the bike together again, I had the same problem as last time, didn't want to start. Like last time, playing with the kill switch solved it.

Curiously though, holding the kill switch just away from RUN position primed the fuel, letting go so the switch tests in RUN killed the bike. A little more rocking and she runs fine.

So, another strip of the switch assembly & some studying the wiring diagram is in order.
The headlight ground runs to the yellow connector then to the white 24 pin connector above the left side cylinder head, behind the left middle cowl. then to the frame ground found underneath the rear of fuel tank.
 
Possibilities...
 
Back
Top Bottom