Power to the pre '96!

Joined
Feb 6, 2011
Messages
51
Location
Tacoma WA
Bike
SOLD 1995 ST1100
STOC #
8679
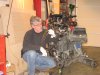
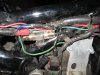
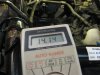
Well, here goes! I have time off from work and an eBay40 amp alternator on the work bench.

Kick off questions;
* Is there a better price (and / or service) for John O's parts list than CHEAPCYCLEPARTS.COM? I come in at $125.52 + shipping for all factory parts but the alternator assy.
* I have the Haynes ST1100 manual. Where do I get the Honda ST1100 service manual with all the cool pics?

I plan to replace the steering head bearings and mess with my single wheel trailer project while the alternator parts come in...
 
Joined
Jan 4, 2013
Messages
18
Age
54
Location
The Netherlands
Bike
ST1100 m 1999
If you change the head bearings be sure to use the SSH903R bearings instead of the original ones.
These are a whole lot better and last longer.
 
OP
OP
Doug Hicks
Joined
Feb 6, 2011
Messages
51
Location
Tacoma WA
Bike
SOLD 1995 ST1100
STOC #
8679
I ended up buying all the recommended parts from partzilla.com. $135 for everything except the alternator (eBay) including the optional (but recommended) driveshaft parts. The loaner tool kit is on its way from Mt. BTW, I couldn't find a shop to bench test the eBay alternator. The splined shaft throws them off.
 
OP
OP
Doug Hicks
Joined
Feb 6, 2011
Messages
51
Location
Tacoma WA
Bike
SOLD 1995 ST1100
STOC #
8679
Out with the old. All the removal steps are done. The most intimidating step was cutting the wiring harness. Reassurance came from finding the pic of the removed harness in the loaner kit documentation.

Wish I knew someone with a solvent tub - parts cleaner.....
 

Attachments

Joined
Jul 28, 2007
Messages
3,151
Location
finger lakes ny
Bike
1999 ST1100
STOC #
7959
Cutting the wiring harness. I suspect that will be the biggie for me as well, when I get to doing this project. Any input/pics about that would be appreciated Doug.
 

ST1100Y

Site Supporter
Joined
Dec 4, 2012
Messages
5,031
Age
59
Location
Vienna, AuSTria
Bike
ST1100Y, ST1100R
STOC #
637
I understand the bearing load adjustment can be tricky.
I guess the OEM rates for the stem nut won't work with tempered bearings...
Normally you'd probably now need a spring scale (I'm sore someone made a write up on this somewhere...)

I'd do the following check we use on cornfirming proper rates/funtion/integrity on OEM head bearings:
- jack front up till rear wheel touches the ground
- move front wheel from 'straight' to about 1/2-way tilted and let go; the steering should it not 'stick' there (too tight), but move slowly until it hits the steering limiter; same to the other side.
If the steering literally 'falls' through without any resistance, it seems too lose, so give the nut a small tweak and check again.

But lets see what others, who've already dealed with those roller bearings, think about that??

The lock-nut shall not be torquered, just twist it on till it touches the securing plate slightly, then twist back till the first gap matches the tabs of the tin, bend up/into done (its all fixed with the upper tripple-clamp)
 

The Cheese

Good luck on the upgrade. The kit made mine so much easier. Well that and a parts washer. Everything got cleaned. Good times.
 
OP
OP
Doug Hicks
Joined
Feb 6, 2011
Messages
51
Location
Tacoma WA
Bike
SOLD 1995 ST1100
STOC #
8679
I'd do the following check we use on cornfirming proper rates/funtion/integrity on OEM head bearings:
- jack front up till rear wheel touches the ground
- move front wheel from 'straight' to about 1/2-way tilted and let go; the steering should it not 'stick' there (too tight), but move slowly until it hits the steering limiter; same to the other side.
If the steering literally 'falls' through without any resistance, it seems too lose, so give the nut a small tweak and check again.

But lets see what others, who've already dealed with those roller bearings, think about that??

The lock-nut shall not be torquered, just twist it on till it touches the securing plate slightly, then twist back till the first gap matches the tabs of the tin, bend up/into done (its all fixed with the upper tripple-clamp)
I like this procedure. I've read that tightening the lock nut down tight against the adjustment nut and then torquing the upper yoke into the adjustment and lock nuts can change the adjustment to the steeing bearings. I don't see that being a problem here. It also looks like a fast (and easy) no tools required, steering stem bearing adjustment check.
 
OP
OP
Doug Hicks
Joined
Feb 6, 2011
Messages
51
Location
Tacoma WA
Bike
SOLD 1995 ST1100
STOC #
8679
The 40 amp alternator is in!! Great - great directions in the loaner kit. I didn't need to use the FrenStick. My finger was enough to wiggle the shaft into mesh with the gears. I was so afraid of having the Lewis Pin malfunction; I bench tested it twice. I then snaked a coat hanger wire up from the oil drain opening - through the engine and pulled the Lewis wire back through with the hanger ( after installing the Lewis Pin into the gears on the bench ). I REALLY didn't want to loose that pin in the engine, so I wiggled the wire with very light pressure three times before the pin came out. Then the pin hung up at the oil drain hole! I wiggled and turned the wire and wiggled some more for two or three minutes before the pin came out.

Wiring and swing arm install to go but the intimidating part is behind me. Happy Dance!! :D
 
OP
OP
Doug Hicks
Joined
Feb 6, 2011
Messages
51
Location
Tacoma WA
Bike
SOLD 1995 ST1100
STOC #
8679
Tried to reinvent the wheel today. Or in my case, the 50 amp fuse. Thought that West Marine would have a nice waterproof fuse holder. No ceeegar! Stopped by NAPA on the way back home and bought a really nice water resistant, blade type fuse holder. The thing was too big to fit anywhere. After wasting 1/3 of the day, I went to Radio Shack and picked up the 'gold plate special'. I installed the fuse on the frame, wanting to keep the old rectifier area for that accessory fuse panel of my dreams! Had to start the bike up on the gas in carbs to prove the used eBay alternator works. ( Posting a pic of the volt meter reminds me of baby pics. )

Now the frustrating part. I hope someone reads this that has the experience with handlebar rocker switches; The bike wouldn't start! The headlight came on, the dash lit up...no start. I finally figured out it was a bad contact in the engine kill switch. I have had the same problem with my headlamp high - low beam switch. Can I take these switches apart and clean the contacts or are they throw away? :confused:
 

Attachments

Joined
Aug 23, 2012
Messages
787
Location
Lexington, KY
Bike
1998 ST1100
STOC #
8643
I've had good luck cleaning switches by opening the switch housing, spraying in plastic safe contact cleaner, rubbing the contacts with cotton swabs or a rag, re-lubricating with dielectric grease and reassembling. This process works wonders for the turn signal switch which when dirty will prevent your signals from flashing right!
 

ST1100Y

Site Supporter
Joined
Dec 4, 2012
Messages
5,031
Age
59
Location
Vienna, AuSTria
Bike
ST1100Y, ST1100R
STOC #
637
...spraying in plastic safe contact cleaner...
Proper advise given!

Switch housings are held together with the two Philips head bolts on the bottom; different lengths, remember where they came from, do one switch at the time.
Upon installation remember that the lower half has a pin that goes into a bore in the handle bar; check placement and free movement of choke and throttle cables during assembly.
 
OP
OP
Doug Hicks
Joined
Feb 6, 2011
Messages
51
Location
Tacoma WA
Bike
SOLD 1995 ST1100
STOC #
8679
Well that's it. My last day of vacation and everything is done except my crappy radio install in the middle of the handlebars ( and no AM reception ). What a haul; All filters and fluids replaced (including fork oil), valve adjust, front wheel bearing replacement, steering stem bearing replacement, clean engine kill and high/low beam switches and 40 amp alternator upgrade. My victory lap was to ride to the Gerbing's dealer and buy those T5 gloves. No ceeegar. Backordered until mid Feb...
 
Last edited:
Top Bottom