Pre-load oil leakage (Fixed)

Joined
Oct 4, 2015
Messages
18
Location
South UK
Bike
ST13 - 2004
FYI People.
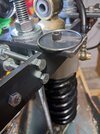
When I bought my 2004 ST13 it had no oil in the adjuster, topped it up and all was good. However, it appears to have suddenly failed as there was a lot of oil on the shock and around the lower mount. Time for it to come out the bike...

Shock out the bike.
Remove two 10mm bolts holding adjuster to bracket afer winding it right back off.
removed seat height adjuster to gain better access to top shock nut.
Remove side panel
as my shock had been out before to be serviced the lower bolt was in the "correct" way ie nut on RH side so easy to remove lower bolt without loosening the RH footplate.

Magnet ready to capture top nut before it fell into the bowels of the engine compartment.

A bit of fiddling to remove shock, lowered rear wheel so it just touched exhaust clamps, lift up rear of lower shock yoke, slide it back as far as it will go and it just clears enough to get the top eye out and toward the you then wiggle out after removing adjuster from hose.

Give it all a really good clean to remove dirt ect as you don't want this getting into the seal area later.


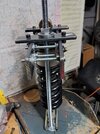
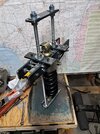
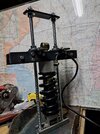
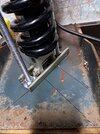
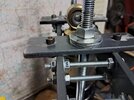
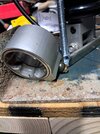
I had some machine plate with a handy set of holes and a bracket, with two 10mm stud length which allowed me to compress the shock spring enough to remove the spring clip holding the pre-load slave unit in place and in fact the spring assy.


Oh, nearly forgot. There is a very small allen grub screw you can just see the thread hole in the picture above on the preload slave.
Remove this before compression to get at spring clip as I think it bears on the clip.
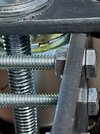
Spring clip


Once the clip is removed (bit fiddly but don't force or bend it.


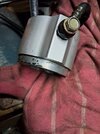
You can relax the spring compression and remove the preload slave unit.


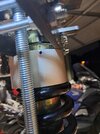
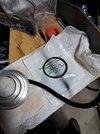
I just kept refilling the adjuster and pushed out the the inner cylinder, have a clean area, rags and paper so not to contaminate the slave unit.

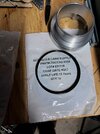
Slave unit separated, easy to do.


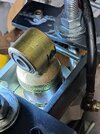
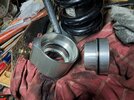
Only one seal was leaking on mine but it might be wise to replace both.
From measuring the one leaking on mine 2.5 cross section by 50mm inside Diameter. However I would just take it to a supplier and get a replacement. As it happens I had a suitable one in my box of spare O rings...
Sorry' I forgot to measure the larger one.


Make sure it's spotless, lube it up with clean oil, pop he seals back in and reassemble in reverse order.
I tested mine under a bit of pressure before fitting spring clip back on and it seems all good, so it's back on the bike next.


Wish me luck with getting the shock back in.

hope the above helps someone.
not too bad a job the spring compressor might be the worst bit to source.

EDIT;
All done. Not so bad popping the shock back in.

\v/
 
Last edited:
Nice write up, you did a good job with the pics. What keeps the preload cup from pushing all the way out if you keep cranking it? Just the amount of fluid available?
 
Nice job and well presented.

For those of us that have topped off the preloader but do not ever see evidence of oil leakage as you did - I still wonder where the preload adjustor oil goes?

When the spring was off the shock body did you ascertain the shock still damped and the leaked oil was from the shock internals instead of the preload mechanism? I am sure you did but you didn't make that clear.
 
Thanks for the comments.

Yes, I assume the adjuster would bottom out before seals are exposed. Also I think it mighy be 10mm at most compression on shock at max, the inner slave has a lot more than that to expose the seal.

Shock is good. MCT had worked on front and rear 4 months ago. Also when I had the shock out I refilled the preload adjuster and wound it up. Within a minute there was fresh oil weeping from under the slave.
Have a look under the swing arm. Mine was damp from the oil creeping there.
\v/
I was speaking rhetorically. Many ST1300 shocks require topping off the preload adjuster but there is never any evidence of the oil leaking out, whether under the swing arm, on the shock itself or out of the remote preload wheel/piston assembly. It [preload oil] simply compresses or disappears which is impossible as far as I know but I bought and installed two Hagon shocks both of which leaked within a few thousand miles so I familiar with where shock oil goes when it escapes.

FWIW, after I topped off the preload adjuster I began the practice of unloading the adjuster when the bike was to sit for for more than a day or two. I haven't had to ever top it off again in 5 years.
 
Yeah bit strange that. The seal completly failed if enlarge the picture of it you can see where it's started to break up. Piston and cylinder are spotless and unmarked.
I had the the spring off and plastic shroud to clean it all off and its still good.
 
Thanks for the post OP. Very well done.

I have two questions for anyone who might know:

What is the torque spec of the hollow banjo bolt that holds the adjuster hose to the top of the shock?

From where did you source new crush washers?

Thanks.

Good Ridin'
slmjim
 
The Dan said:
Nice write up, you did a good job with the pics.

+1 Especially the pic of the O-ring.


dduelin said:
I still wonder where the preload adjustor oil goes?

+2 My first ST's preload adjuster had very little oil in it at say: 28K miles. My second ST's adjuster had almost no oil at less than 1K miles. Both showed no evidence of any leakage.
 
So. I'm trying this task this week. I have the shock out of the bike but cant seem to get that grub screw out. Is it possible to compress the spring without removing that screw? I'm also trying to sort out the material for making the spring compressor, how much force is required to compress that spring, in the pics it looks like 1/2" plate steel, is that really required?
your thoughts
Lyle
 
I'm also trying to sort out the material for making the spring compressor, how much force is required to compress that spring, in the pics it looks like 1/2" plate steel, is that really required?
your thoughts
Lyle

1/2" might be overkill, but better to be over then under. If it is a stock spring, it's rated around 700#'s. Aftermarket, for me, 1300 #s. Quite a bit of potential energy stored there.
 
Hi all,

understand that this post is back in 2016, any kind soul and repost the photos on how to remove the o-ring

thaks in advance
 
For those of us that have topped off the preloader but do not ever see evidence of oil leakage as you did - I still wonder where the preload adjustor oil goes?

Recently got 'new' ST, preload knob spun in and out with no pressure at all. Almost NO oil in it when I performed the preloader service, cleaned in and out, cleaned detent ball, checked all seals, filled up with jack stop-leak fluid, solid as a rock. Nice clicks, and pressure at first click. Sweet. One month later, 3 spins in before any resistance... no leak detected, no evidence, no trace. Mice?? Crazy.... Anyone has a theory on this, please share.
 
Filling in some data here, hopefully helpful to someone.
As someone who does not often adjust the preload, I have found the built-in "bleedoff to zero feature" very annoying, but had no idea how to service this beyond repeatedly refilling the oil.

Using the info above (missing pics) and other like Mellow's Rear Shock Removal article, i have fixed the preload bleedoff leak.
We shall see how long it lasts.
It was simple, so here is documentation.

My leaking o-ring looks like it was damaged at original assembly, not purely normal wear.
Note: O-ring min buy was 10 sets, so i have extras and will share locally.
Note: Yes, if we arrange, I will help you do this in my garage if you bring your shock. It is surprisingly simple, and you don't have to refill.
(Fort Worth area)
 
Remove your shock.
There are articles and threads on how to do this.
Darkside tire affects this.
I did remove the seat adjuster bracket, but probably next time would instead move the rear brake reservoir out of the way and remove the bracket it attaches to.

I spent hours trying to grind a Harbor Freight car spring compressor to work.
It wouldn't work.

I made a spring compressor.
Very safe, yet simple.
If you can do the fab work, you figure it out from the pictures. But yes, if you have a question i will try to answer.
There are limitless variations to this that will work.
 

Attachments

  • 20241015_210948.jpg
    20241015_210948.jpg
    121.5 KB · Views: 11
  • 20241015_211027.jpg
    20241015_211027.jpg
    202.1 KB · Views: 11
  • 20241015_211121.jpg
    20241015_211121.jpg
    170 KB · Views: 11
Used 1/2in threaded rod and a 1/4in bar from Home Depot, 1/4in bolts, and some scrap in the garage.
It does bolt through the table top.
Used a piece of UniStrut at the bottom, to eliminate the possibility of it slipping sideways.
 
Couple more views.
 

Attachments

  • 20241015_210931.jpg
    20241015_210931.jpg
    168.2 KB · Views: 6
  • 20241015_211111.jpg
    20241015_211111.jpg
    110.9 KB · Views: 6
Loosen the 1.5mm Allen screw and mark orientation of the adjuster (banjo bolt) before compressing.
I used three washers with some grease between, and grease on the threads, to reduce required torque and "torque-ing."

It only takes several turns of the 1/2in nuts (alternating, 1/2 turn at a time) to compress, and the force is not as tremendous as I seem to have anticipated. (Not so scary, once you just do it.)

Compress only enough to expose the clip ring.
My crossbar design got in the way, but it was still very easy to reach in with two long, thin screwdrivers and gently open the ring just enough to slide up out of the groove.
Not the easiest pic to capture, but you can see it here, and see where that screw bears.
 

Attachments

  • 20241015_211944.jpg
    20241015_211944.jpg
    105.6 KB · Views: 5
  • 20241015_212415.jpg
    20241015_212415.jpg
    157 KB · Views: 5
  • 20241015_212428.jpg
    20241015_212428.jpg
    159.4 KB · Views: 5
Last edited:
Clip removed, release compression.
Preload adjuster slides off.
Crank the adjuster all the way, refill, crank all the way again, and you will push the cylinder out.
 

Attachments

  • 20241015_212929.jpg
    20241015_212929.jpg
    107.1 KB · Views: 8
  • 20241015_213528.jpg
    20241015_213528.jpg
    126.2 KB · Views: 8
  • 20241015_213858.jpg
    20241015_213858.jpg
    118 KB · Views: 8
  • 20241015_215116.jpg
    20241015_215116.jpg
    193.3 KB · Views: 8
Like a brake caliper.
Clean up.
Remove orings using a "soft" tool.
I use the "sharpened" end of a wooden clothespin. Whatever.
Lube the grooves and new orings with your oil of choice and install.
I used some Honda fork oil that was sitting around.
Lube well with plenty of your oil, and gently install the "piston." Obviously, don't mash or roll your new orings.
You can see those sizes and McMaster-Carr numbers.
2.5mm x 58 ID
2.5mm x 49 ID
(I could not find an old style hydraulic seal shop to walk in and order like we used to.)
 

Attachments

  • 20241021_192935.jpg
    20241021_192935.jpg
    104.3 KB · Views: 4
  • 20241021_193125.jpg
    20241021_193125.jpg
    107.8 KB · Views: 4
  • 20241021_194020.jpg
    20241021_194020.jpg
    126.9 KB · Views: 4
Last edited:
Back
Top Bottom