You are correcting and R & R-ing (remove and restoring) a lot of what I would call neglect and abuse on a motorcycle. Routine maintenance would have kept the bike in good riding condition and things like the brakes and clutch would never have deteriorated to the condition you are seeing. I'd be willing to bet none of your bikes would ever reach the condition this bike was in when you bought it.

You are using an out of date browser. It may not display this or other websites correctly.
You should upgrade or use an alternative browser.
You should upgrade or use an alternative browser.
Re-baking my ST1300 (Almost-full-redoing)
- Thread starter leondante
- Start date
You are correcting and R & R-ing (remove and restoring) a lot of what I would call neglect and abuse on a motorcycle. Routine maintenance would have kept the bike in good riding condition and things like the brakes and clutch would never have deteriorated to the condition you are seeing. I'd be willing to bet none of your bikes would ever reach the condition this bike was in when you bought it.
My world is what surrounds me, people and objects. Being spiritual is good, but even a nice forest needs care and not littering, in spite of being something that could bring you a "spiritual" experience. I'm creating MY nice world around me when I take care of everything around me. The Universe will be as I do, mine at least (most of the time, bad luck is there everyday too).
There's something out there I baptized as "The Law of Chaos". It's not the mathematic theory of chaos. What I mean with this is there is this factor in the universe and its laws imposing that everything will cost you double the effort most of the time. I'm really prepared to FAIL GREATLY ALL THE TIME. I know about this chaotic law that's out there getting horny with the idea of a thread going mangled, a hose breaking out, my dog eating my special-sized o-rings, myself losing some special, unique screw that costs 70€, whatever that thing can get to make my life worse. And having that in mind is basic not to go really deep into the apathy abyss.
So, I work at least double to get things nice, and that makes my life itself a nice place.
And that's why I like to work my stuff like this, it makes my life nicer and easier, even costing two or three times the expected effort.
- Joined
- Nov 11, 2025
- Messages
- 33
- Location
- NC - central (80%) or western(20%)
- Bike
- Street Glide &ST1300
- 2026 Miles
- 003400
Thanks for sharing. I’ve been wondering what my ST looks like naked.NEXT STUFF, the wheels.
The dude painted them wheels with spray black paint. A pretty bad neighbourhood paint. My very friend of a substance that acetone is did the trick. So I was able to take out some neurons of mine and the paint too, sniffing some acetone for a while. First I washed them with that pink alcaline workshop floor degreaser I told before (which is impressive to take out the weird brown grease that the rubber of the tires sweat, making them full black again). Then I cleaned them with acetone and paper towels.
I was so excited about the results that I forgot to take pictures of the front wheel cleaned from the paint.
I used a chinese cheap paint pencil for the letters. It's some specific oil based paint for tires, so I hope it last some good time there. Anyways looks great and rebranding them again wouldn't be anything but easy and kinda fast. And it can be cleaned with (of course) gasoline if something turns bad.
FFW the final result. Also, new special bearings and seals for my nice wheels. I plan to paint all the bike later but not for now.
Slow and steady my body is getting ready to test this massive piece of art, but my hair is getting gray doing all of this job. I just want to use it before retirement.
Cooler stuff is coming. I'm saving the brakes and wiring for special and specific posts, as they were the most worky stuff here. And I did not properly the wiring stuff yet on the bike (alarm, GPS tracker, etc).


......I'm really prepared to FAIL GREATLY ALL THE TIME. .......
This philosophy is actually quite common......that's how most of the motorbike shops operate in my area! And I am fully prepared for that.
This philosophy is actually quite common......that's how most of the motorbike shops operate in my area! And I am fully prepared for that.
Here they fix bikes to get money and forget drastically fast about the bike's dignity or even the biker's risks. And we have a very common and painful unprofessionality epidemic. The last dude I talked to who told me that worked for a living fixing motorcycles insisted me that the crankshaft joint beared pressure in my Vmax 1200. Its a lid with a rubber to stop splashing coming out. There are 0.0 bar there. And HE was the "professional".
Sadlsor
Site Supporter
You mean, what your ST looks like DISSECTED.Thanks for sharing. I’ve been wondering what my ST looks like naked.
FIFY.
You mean, what your ST looks like DISSECTED.
FIFY.
This one makes my day, really. I am really thankful for your comment. You just took my second smile from me for the day. First one was my lovely wife and kids when coming home after work.
Well, now I'm sharing the wiring diagrams I most liked from every of them I checked out. I looked up everywhere, even in this forum, and I just found these (maybe here, maybe not) that were really detailed and with soberb quality. So here they are, just in case they were not uploaded already to the site having in mind the data loss that happened.
Attachments
Last edited:
Well, lets go with the BRAKES STUFF.
Mine of damn brakes were not that bad, but a lot of hoses of the front wheel and one going to the rear brakes were broken because the heat and time. The fabric was on sight, exposed, waiting for bursting anytime anyday. So, my body was ready to find out how to get a reasonable solution to fix it without selling another kidney on the deep web.
BEFORE:
Rear brake pump was nasty.

One of the breaking points on the hoses. This was the rear one.
.jpg")

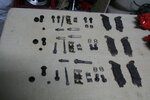
Front wheel hoses. A couple or three of them needed replacement in order to achieve the "health status" I wanted for all the systems in the bike. There were a total of 4 or 5 individual parts in this picture. The thing is that they made these with two kind of rubber hoses, and one of them clearly was expired already. So any part with that kind of hose was broken. I had to change them all. And I did it.

The rubber boot I talked about before. I chose a 3€ bag of 5 pieces over a 20€ a piece from Honda. I will change them every weekend if needed, I can buy them forever, no safety risks on this thing. If at the end of the day I'm saving half the money around all the motorcycle it's a massive difference, and many times the difference between getting the bike running and achieving the goal or not doing anything with the bike at all.

I find out that they sell replacement for the bullseyes on the brake master cylinders. Like 2€ the bag of 5. Mine were ugly and cracky, so I decided to give it a try. Notice that you could put a 3€ o-ring if you want. The plastic will be chinese, but a good o-ring could do a big difference instead of the cheapest one they came with. Again, you have to get it really bad to get a safety thing here, because you need to get air inside the system to lose brakes and you still count with the rear//combined one. For getting it out you should get to push it without damagin the aluminium, a bit tricky but doable with patience.


So, I started dissasembling stuff...


I used a ultrasonic cleaner to clean the calipers. I had the luminous, brilliant idea of using an alcaline workshop cleaner that could take off the armour out of a tank. The thing took off the painting from the calipers. And the copper from the brake pads, and kinda "anodized" it onto the chromed surfaces around it.


Pushed in properly the pistons to avoid painting inside the cylinders and taped all the proper holes for the same reason. I can clean the pistons better than the cylinders inside without risking damagin sealing surfaces.


I used proper brake caliper paint for it, of course. It's not that expensive. A bit of a cutter for dig up the "NISSIN" did the final trick.
The Secondary Master Cylinder was a bit stuck too and maybe it is yet. I had some issues because my adicction to using gasoline for everything messed up the rubber ring. I cleaned the rear brake seals and this SMC seal with gasoline. Had to buy new all the rear caliper seals. About the SMC seal, it expanded just a small bit, so now no matter what I do the thing won't get OUT from the cylinder after going in really good and smooth. The parts cost 75€ because they sell it as a group of pieces. I cannot pay it now and from scrapyard it cost close to it but they only sell all the bracket for the caliper, so I'm frogged out of the swamp of getting it working with original parts by the moment. I didn't like it but I ended up chosing by eye-o-meter a pretty similar (clearly a copy) of the piston/seal of the thing on Aliexpress for like 5€ and the damn thing fitted extremely well, used only the rubber part and stored away the rest. I don' trust its durability, even that it's working well, so I'll be with 5 eyes over it checking for leaks and any weird stuff, specially for stucking, as this could damage the rear brake caliper or disk if it don't un-brake properly after using the front brakes. I even cooked the old seal with a thermic bed for electronic boards, around 120 C degrees, not too much, to see if evaporating the gasoline inside the rubber could do the trick. Didn't work.

After a lot of thinking, I decided to try cutting the sleeve of the hydraulic terminals and solder new ones with TIG machine. I couldn't find around half of them new, so that was not a solution. I needed a press and a lathe to create those sleeves again.

Mine of damn brakes were not that bad, but a lot of hoses of the front wheel and one going to the rear brakes were broken because the heat and time. The fabric was on sight, exposed, waiting for bursting anytime anyday. So, my body was ready to find out how to get a reasonable solution to fix it without selling another kidney on the deep web.
BEFORE:
Rear brake pump was nasty.
One of the breaking points on the hoses. This was the rear one.
Front wheel hoses. A couple or three of them needed replacement in order to achieve the "health status" I wanted for all the systems in the bike. There were a total of 4 or 5 individual parts in this picture. The thing is that they made these with two kind of rubber hoses, and one of them clearly was expired already. So any part with that kind of hose was broken. I had to change them all. And I did it.
The rubber boot I talked about before. I chose a 3€ bag of 5 pieces over a 20€ a piece from Honda. I will change them every weekend if needed, I can buy them forever, no safety risks on this thing. If at the end of the day I'm saving half the money around all the motorcycle it's a massive difference, and many times the difference between getting the bike running and achieving the goal or not doing anything with the bike at all.
I find out that they sell replacement for the bullseyes on the brake master cylinders. Like 2€ the bag of 5. Mine were ugly and cracky, so I decided to give it a try. Notice that you could put a 3€ o-ring if you want. The plastic will be chinese, but a good o-ring could do a big difference instead of the cheapest one they came with. Again, you have to get it really bad to get a safety thing here, because you need to get air inside the system to lose brakes and you still count with the rear//combined one. For getting it out you should get to push it without damagin the aluminium, a bit tricky but doable with patience.
So, I started dissasembling stuff...
I used a ultrasonic cleaner to clean the calipers. I had the luminous, brilliant idea of using an alcaline workshop cleaner that could take off the armour out of a tank. The thing took off the painting from the calipers. And the copper from the brake pads, and kinda "anodized" it onto the chromed surfaces around it.
Pushed in properly the pistons to avoid painting inside the cylinders and taped all the proper holes for the same reason. I can clean the pistons better than the cylinders inside without risking damagin sealing surfaces.
I used proper brake caliper paint for it, of course. It's not that expensive. A bit of a cutter for dig up the "NISSIN" did the final trick.
The Secondary Master Cylinder was a bit stuck too and maybe it is yet. I had some issues because my adicction to using gasoline for everything messed up the rubber ring. I cleaned the rear brake seals and this SMC seal with gasoline. Had to buy new all the rear caliper seals. About the SMC seal, it expanded just a small bit, so now no matter what I do the thing won't get OUT from the cylinder after going in really good and smooth. The parts cost 75€ because they sell it as a group of pieces. I cannot pay it now and from scrapyard it cost close to it but they only sell all the bracket for the caliper, so I'm frogged out of the swamp of getting it working with original parts by the moment. I didn't like it but I ended up chosing by eye-o-meter a pretty similar (clearly a copy) of the piston/seal of the thing on Aliexpress for like 5€ and the damn thing fitted extremely well, used only the rubber part and stored away the rest. I don' trust its durability, even that it's working well, so I'll be with 5 eyes over it checking for leaks and any weird stuff, specially for stucking, as this could damage the rear brake caliper or disk if it don't un-brake properly after using the front brakes. I even cooked the old seal with a thermic bed for electronic boards, around 120 C degrees, not too much, to see if evaporating the gasoline inside the rubber could do the trick. Didn't work.
After a lot of thinking, I decided to try cutting the sleeve of the hydraulic terminals and solder new ones with TIG machine. I couldn't find around half of them new, so that was not a solution. I needed a press and a lathe to create those sleeves again.
Attachments
So, I bought this lathe...

And fixed it a bit...


So I could do the sleeves... And bought a manual press for the sleeves, but discovered that the real press I needed cost around 1000 or 2000€, so again, that was a big NO to my wallet. So I turned back to the first thing I checked out when looking for solutions, so I bought some AN3 standard hose and adaptors, and gave them a try. Oh man, that was a succulent success.


.jpg")
The thing was 30€ for 5m of generic hose, and around 5 euros each hydraulic terminal, reusables all of them buying only a brass teethed thing it has inside to cramp the hose. It has 250 bar of working pressure and 400 bar of bursting pressure. No matter how much chinese manufacturers lie, for the 150 bar of pressure our braking systems need its a win no matter what.
So, for being sure, I decided to put a BAROMETER ON THE MASTER CYLINDER, just to be sure that it is really OUT of the risk of bursting anything.
Generic parts from Aliexpress, around 15€ all of them:

The dial is for gas containers (copper inside if I'm not wrong, so no risk with brake fluid) and was provided with a teflon axial seal, but I needed a radial one. They sell a new kind of seal that is a metal ring outside and a rubber one inside (in the picture), a substitute for copper rings. The thing worked impressively well, so I had my accessory ready to work:

.jpg")
.jpg")
The master cylinder, with all my strenght, and only having the barometer, reach hardly those 250 bar. When everything connected and properly working, at the end of the lever, it reaches 100 bar. You could use less than 30 bar for a common braking, 80 for an emergency one. You surely won't need those 100 bar. That's my reading data, with my way of driving. I tested it some days ago, my very first time riding this bike. Brakes really hard, and needs very less pressure from your hand for braking.
And fixed it a bit...
So I could do the sleeves... And bought a manual press for the sleeves, but discovered that the real press I needed cost around 1000 or 2000€, so again, that was a big NO to my wallet. So I turned back to the first thing I checked out when looking for solutions, so I bought some AN3 standard hose and adaptors, and gave them a try. Oh man, that was a succulent success.
The thing was 30€ for 5m of generic hose, and around 5 euros each hydraulic terminal, reusables all of them buying only a brass teethed thing it has inside to cramp the hose. It has 250 bar of working pressure and 400 bar of bursting pressure. No matter how much chinese manufacturers lie, for the 150 bar of pressure our braking systems need its a win no matter what.
So, for being sure, I decided to put a BAROMETER ON THE MASTER CYLINDER, just to be sure that it is really OUT of the risk of bursting anything.
Generic parts from Aliexpress, around 15€ all of them:
The dial is for gas containers (copper inside if I'm not wrong, so no risk with brake fluid) and was provided with a teflon axial seal, but I needed a radial one. They sell a new kind of seal that is a metal ring outside and a rubber one inside (in the picture), a substitute for copper rings. The thing worked impressively well, so I had my accessory ready to work:
The master cylinder, with all my strenght, and only having the barometer, reach hardly those 250 bar. When everything connected and properly working, at the end of the lever, it reaches 100 bar. You could use less than 30 bar for a common braking, 80 for an emergency one. You surely won't need those 100 bar. That's my reading data, with my way of driving. I tested it some days ago, my very first time riding this bike. Brakes really hard, and needs very less pressure from your hand for braking.
About getting the air out and the DOT4 in, I used a syringe with this nice couples from my loverly Aliexpress. Notice that metal+rubber rings:

This was so I could create a strong and big flow of brake fluid to erase those bubbles.


The thing was about making an explosive brake fluid injection so the bubbles came out in that plastic cup, from where I took again that (now new and clean) brake fluid again until there were no bubbles:

I got brake fluid into my eyes. I discovered that didn't harm or hurt. Anyways was not a nice experience and tried not to get myself in thatn situation. I'm glad I can tell you that information without damage on myself. Also, I got brake fluid onto the ceiling.
I don't remember how exactly I did the bleeding. I just know I tried too a vacuum pump for AAC I have, but the issue of that is that it takes air after getting all the fluid out of the cup or whatever I used on the other side of the circuit.
I just followed logic for it, chasing bubbles one by one until finishing them. The master cylinder new nipple was of big help. A bit of teflon tape on the threads of nipples too, a very big help.
A MASSIVE HELP came from a flowback stopper of aluminium from Aliexpress that cost around 2€ and is sold exactly for brake bleedings. Just a silly valve for hoses made all out of aluminium, a steel ball and a steel spring. It needs teflon tape too, be aware of it, you can dissassemble it and put that tape on its threads too, it leaks a bit there.
I followed kinda properly the workshop manual for chasing bubbles, stimulating manually the SMC and pushing the pistons back in sometimes. All went nice, except for that moment when I pushed too hard and the hose flew away. Smeared all the bike with brake fluid. I spent a lot of time washing it to avoid corrosion, using water so it got already chemically deactivated, hope that's how it works for brake fluid, I think it's that way but I'm not fully sure.
I have not pictures of the front wheel new hoses, they look great. I used the old original rubber protectors for them, so they aren't that noticeable. But the stainless steel fittings look amazing. I'll take and post pictures in another moment.
This was so I could create a strong and big flow of brake fluid to erase those bubbles.
The thing was about making an explosive brake fluid injection so the bubbles came out in that plastic cup, from where I took again that (now new and clean) brake fluid again until there were no bubbles:
I got brake fluid into my eyes. I discovered that didn't harm or hurt. Anyways was not a nice experience and tried not to get myself in thatn situation. I'm glad I can tell you that information without damage on myself. Also, I got brake fluid onto the ceiling.
I don't remember how exactly I did the bleeding. I just know I tried too a vacuum pump for AAC I have, but the issue of that is that it takes air after getting all the fluid out of the cup or whatever I used on the other side of the circuit.
I just followed logic for it, chasing bubbles one by one until finishing them. The master cylinder new nipple was of big help. A bit of teflon tape on the threads of nipples too, a very big help.
A MASSIVE HELP came from a flowback stopper of aluminium from Aliexpress that cost around 2€ and is sold exactly for brake bleedings. Just a silly valve for hoses made all out of aluminium, a steel ball and a steel spring. It needs teflon tape too, be aware of it, you can dissassemble it and put that tape on its threads too, it leaks a bit there.
I followed kinda properly the workshop manual for chasing bubbles, stimulating manually the SMC and pushing the pistons back in sometimes. All went nice, except for that moment when I pushed too hard and the hose flew away. Smeared all the bike with brake fluid. I spent a lot of time washing it to avoid corrosion, using water so it got already chemically deactivated, hope that's how it works for brake fluid, I think it's that way but I'm not fully sure.
I have not pictures of the front wheel new hoses, they look great. I used the old original rubber protectors for them, so they aren't that noticeable. But the stainless steel fittings look amazing. I'll take and post pictures in another moment.
Sadlsor
Site Supporter
Color me completely impressed!
Outside of a couple of gents here, not a lot of people I've seen go to your level of detail.
The brake hose and calipers look great.
Outside of a couple of gents here, not a lot of people I've seen go to your level of detail.
The brake hose and calipers look great.
ST Gui
240Robert
Just a biiiiiit.And fixed it a bit...

That is a LOT of work and attention to detail. I'm lovin' this thread!
Impressive level of detail and effort - just be careful inhaling fumes and getting fluids in the wrong places! Your safety is also important!
Did you follow the step-by-step procedure for the order of bleeding? It's important...
Did you follow the step-by-step procedure for the order of bleeding? It's important...
Impressive level of detail and effort - just be careful inhaling fumes and getting fluids in the wrong places! Your safety is also important!
Did you follow the step-by-step procedure for the order of bleeding? It's important...
I think yes, the workshop manual. Maybe I'm doing another bleeding after some riding so the bubbles come out better. By now brakes feels great.
diferg
Dan & Ingrid
Leondante. I remember when you first started posting on this site. Many were skeptical about your project and your methods. Now most of us are in AWE of your accomplishments. Good on You Leondante!
Glad to read that. But wait to finishing it, I still want to paint it.Leondante. I remember when you first started posting on this site. Many were skeptical about your project and your methods. Now most of us are in AWE of your accomplishments. Good on You Leondante!
ST Gui
240Robert
There was a brake bleeding procedure that was posted some time ago that was faster than and as thorough as the service manual. The SMC still had to be unbolted and turned so the valve was at 0000. It probably didn't survive the update.Did you follow the step-by-step procedure for the order of bleeding? It's important...
There was a brake bleeding procedure that was posted some time ago that was faster than and as thorough as the service manual. The SMC still had to be unbolted and turned so the valve was at 0000. It probably didn't survive the update.
It would be so sad if I didn't have it with me and if I wouldn't post it here later...
I'm uploading it later.
- Joined
- Nov 20, 2005
- Messages
- 899
- Location
- Cedar City, Utah
- Bike
- 12/04/AZ05 ST 1300s
- 2026 Miles
- 000568
WOW, like already said: "That's a lot of work!"
I've restored three ST1300s and I'm still working on my forth, which entailed more, since I did an engine swap.
It seems that the bikes in Europe get a lot dirtier than the ones I've dealt with. Just the condition of yours, when you got it, blew my mind!
I've restored three ST1300s and I'm still working on my forth, which entailed more, since I did an engine swap.
It seems that the bikes in Europe get a lot dirtier than the ones I've dealt with. Just the condition of yours, when you got it, blew my mind!