So there is clearly some binding in the bearing of the rear wheel. You can expect the amount of turn to be less when the pads are fitted, because the pads will still be in contact with the brake disks and dragging slightly. When the wheel is moving it nudges them away a little bit more.
If you pushed the caliper pistons back manually I wouldn't have drawn the conclusion that the SMC wasn't working.
It takes a few pumps of the SMC to move the pistons in that situation. And it would have to move the pistons back to meet the disk.
Normally the travel on the SMC is about 1-2mm. The wheel will turn with your foot (cos you have to lie down next to the bike in order to turn the wheel and apply the SMC. You apply the SMC With your hand and the rear wheel should lock - you cannot move it with just your foot.
The real test is whether or not in releases the rear wheel when you release the SMC - so that you can move it with your foot.
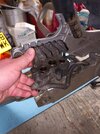
Below are the photos that I took of the barke pads for the ST1300A6 when I had one. At the time, the 06435-MCS-GO2 pads were the ones that were available. The G03 variant came later, and I also use that. The rear pads have been the same sort for the A6 and my current A9 model. Not so the front pads - they changed on 08. I keep a set in stock so that I can change them when they need changing, and I order a new set when I intend to change them - so I get to compare the the later version with the previous version. I could not find a difference.
In the photo, the two pads on the right - one upright, one lying down - are for the front. The rear pads (left one of the pair leaning against each other) have the square notch in the tab end, the front ones do not.

If you feel that there is really not enough room in the caliper, then take out the white heat shield from the pad that is furthest way from the pistons. Put it on one side and replace it a couple of weeks later when the pads have bedded in. But it is there for a reason and the pads should fit with it in place. Mine do. It is there to prevent the heat from the brake pads from being transferred to the caliper and the brake fluid - because the rear caliper is in the hot air flow from the engine and is right next to the exhaust. You really don't want the build up of heat to melt your piston seals - which is what will happen - That is the top of the snake straight back to square one.
I always think that the pads are a bit of a tight fit when I put them in, but once in position and aligned properly and the wheel has turned - they are prefectly OK. And your disks will have worn down a bit over the years so it really shouldn't be a problem.
This is a photo of brand new pads fitted to my current ST1300A9 - later model bike but the caliper, the bracket and the pads are the same as yours.
Pistons are pushed in all of the way. There is plenty of room as you can see.

As I mentioned above - the SMC for the A6 is very different from the SMC for the A8 - so hopefully they will send the right one !
But I had a question mark about the SMC with my current bike. I wasn't sure what I was seeing, but the SMC was one possibility. I ordered a new one because it was worth the money to get that niggle out of my head. The issue was not with the SMC at all - I can't remember what the issue was now, it's probably on these pages somewhere. But I fitted the new one and examined the old one. It was perfectly OK. So that is cleaned and dried and stowed away in parts.
Whereabouts in the UK are you ?