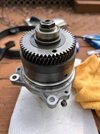
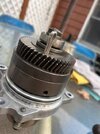
Reinserting The Alternator Drive Gears Into The Engine

When the alternator base plate is removed and the oil has been drained leaving the drain plug out, you have the Lewis pin aka pin that holds the split gears aligned, on a cable that you can run through the drain hole out the hole in the back of the motor and to the alternator drive gear in your hand. Insert base plate gear assembly, pull wire and Lewis pin out of drain hole.
I'm just trying to envision all this in my mind as I'm sure a few others may be too.

So this lewis pin sounds like it is a pin that is inserted in an alignment hole found in both of the split gears while the alternator drive is installed?

Yup?
Nope?
 
So this lewis pin sounds like it is a pin that is inserted in an alignment hole found in both of the split gears while the alternator drive is installed?
Like the cam-shafts the alternator drive gear features offset, spring-loaded gears to reduce lash and noise...
While the cam drives are accessible to be aligned to mesh properly with the reduction gear upon installation, is that not feasible inside the engine case...

alternator drive released.jpg ST1100 alternator drive.jpg

hence two work-ways possible:

i)
- align the drives while outside the case and drive a 6mm(?) cotter pin through the holes of the gears to lock them in place
- drain oil
- thread a cloth hanger wire through the engine case and out the drain hole
- attach a rigid braided wire (i.e. clutch cable) to the pin and thread the other end through the case utilizing mentioned cloth hanger wire
- insert alternator drive
- once in place yank on the braided wire and hope/celebrate a Holy Mass that the pin comes out/fit through the drain hole without any issues

ii)
- place drive into case
- place a tool/handle into the (hollow) shaft to twist it clockwise for the aprox 2mm required to have it mesh the gears
- proceed with the installation

yours truly prefers the 2nd... 😎
 
Last edited:
ii)
- place drive into case
- place a tool/handle into the (hollow) shaft to twist it clockwise for the aprox 2mm required to have it mesh the gears
never done this procedure before, but I'm curious about something I've seen in the service manual regarding removal of the alternator.

It says after removing the mounting screws to rotate the alternator base clockwise and put an 8mm bolt into the top-left hole (the top-left alternator mounting hole, but now the alternator base is no longer aligned with that hole so you can put a screw in there next to the alternator base).

Is that doing the same thing as what you've described above? The rotation would have to be more than 2mm (at least 8-10mm to have the base clear the mounting hole) so I'm not sure if its the same thing or not.
 
Like the cam-shafts the alternator drive gear features offset, spring-loaded gears to reduce lash and noise...
Not to confuse the issue, but the gear that drives the clutch basket (on the 1300) is also one of these "offset, spring loaded gears". There is a screwdriver slot that one uses to compress the spring and align the gears when assembling this gear/clutch basket. If one does not compress the spring, you will have an unholy rattling clutch. You can ask how I know. The dealer's mechanic made that mistake on my bike....at my expense.
 
never done this procedure before, but I'm curious about something I've seen in the service manual regarding removal of the alternator.

It says after removing the mounting screws to rotate the alternator base clockwise and put an 8mm bolt into the top-left hole (the top-left alternator mounting hole, but now the alternator base is no longer aligned with that hole so you can put a screw in there next to the alternator base).

Is that doing the same thing as what you've described above? The rotation would have to be more than 2mm (at least 8-10mm to have the base clear the mounting hole) so I'm not sure if its the same thing or not.
Nope - Under normal circumstances the drive stays in the engine and that bolt is to keep it from coming out and hold it in position.
In my case, because of the age and mileage, the 'wrestling match' to separate the alternator from the drive pulled the drive out.
My last one I was able to pry the alternator out of the drive with a screwdriver and keep the drive in the engine.
Which really simplifies things! ;)
 
FWIW, it appears that a 12MM hex tool will fit into the alternator drive shaft (14mm and 13mm will not).
We'll see how the rest of the story goes once I get my new o-rings in hand. ;)
 
FWIW, I am also working on a fix for the sidestand wobble.
What causes it is the bolt shank gets wear and the 'tab' on the frame turns into an oval.
We'll see how this 'fix' sorts out also. ;)
 
FWIW, I am also working on a fix for the sidestand wobble.
What causes it is the bolt shank gets wear and the 'tab' on the frame turns into an oval.
We'll see how this 'fix' sorts out also. ;)
When I had my 1991 ST1100 I also had a small metal lathe. I drilled out the oblong hole for the bolt and made a steel bushing. I also cleaned up the shoulder on the bolt, there was wear there as well. When I made the bushing I made a fairly snug fit on the shoulder of the bolt. Pressed the bushing in the frame and reattached the side stand.Put a little grease on the bolt. There is enough leverage with the length of the side stand the snug fit was not an issue. I kept the bike another 40k miles and all was still good. There was little lateral movement in the side stand after the fix.
 
When I had my 1991 ST1100 I also had a small metal lathe. I drilled out the oblong hole for the bolt and made a steel bushing. I also cleaned up the shoulder on the bolt, there was wear there as well. When I made the bushing I made a fairly snug fit on the shoulder of the bolt. Pressed the bushing in the frame and reattached the side stand.Put a little grease on the bolt. There is enough leverage with the length of the side stand the snug fit was not an issue. I kept the bike another 40k miles and all was still good. There was little lateral movement in the side stand after the fix.
I'm taking the same course except sourcing a bushing that should work after enlarging the hole on frame.
If it works, the cost is less than $20 for the bushing and proper drill bit from Amazon. ;)
We'll see how it goes!
 
except sourcing a bushing that should work after enlarging the hole on frame.
Will you secure the bushing into the frame or just use the bolt and nut to hold it all together. I guess it's really not necessary to make a friction fit or tack weld the bushing to the frame. It's not like it would be a part frequently removed.
 
Will you secure the bushing into the frame or just use the bolt and nut to hold it all together. I guess it's really not necessary to make a friction fit or tack weld the bushing to the frame. It's not like it would be a part frequently removed.
The bolt through the sidestand should hold everything in place between the outside and inside of the sidestand.
 
Okay, I finally met with success - thanks to Martin and his good counsel and Alberto's pictures. A bit 'fiddly' but the trick for me was getting 3 8x32mm bolts and stabilizing the drive one I got the 'first' gear inserted. What was happening was the drive was twisting out of the engine gear when I put pressure on the drive 'drive shaft'. So what you need -

12mm Allen wrench
3 8X32 fully threaded bolts
Small brass hammer
Bike in gear
A ton of patience.

Insert the drive into the engine as far as it will go.
What's sticking out - the o-ring will be equidistant between the flange and the engine - maybe a 1/4 inch showing in total.
Install the 3 bolts into the mounting holes and tighten until snug (not tight).
Insert the 12mm Allen wrench into the shaft opening where the alternator goes in.
I put an extension on the end of the wrench so I would have plenty of leverage.
Slowly turn the Allen wrench clockwise by small increments while lightly tapping the bend of the wrench to push the drive in.
You are not driving in with force, just assisting its progress. ;)
It is sort of a 'feel' thing (about 2mm of a turn) but it will snap into place.
 
Last edited:
Glad that method worked out as expected!
By the way, do you have the swingarm removed? When I tried installing the drive gear that way, I had to insert driveshaft and lock it with screwdriver because every time I turned the drive gear with an Allen key, the crankshaft started rotating.
 
Glad that method worked out as expected!
By the way, do you have the swingarm removed? When I tried installing the drive gear that way, I had to insert driveshaft and lock it with screwdriver because every time I turned the drive gear with an Allen key, the crankshaft started rotating.
Yes the swingarm is out. I did make sure the bike was in first gear so that seemed to take care of it.
 
Back
Top Bottom