Missed that. I guess I'll blame it on my unfinished first cup of coffee.Maybe I didn't make it clear, but I DID use a 5/16" Ready Rod as a sacrificial piece of metal. Just took it out this morning and cleaned it. Put her back in and resumed cooking. Jevers

You are using an out of date browser. It may not display this or other websites correctly.
You should upgrade or use an alternative browser.
You should upgrade or use an alternative browser.
Rusty tank boil x 2
- Thread starter Jevers
- Start date
No worries, I'm a little foggy in the morning until I get my coffee! I will post how well the Sea Foam works when I'm ready to seal both tanks. I only choose that cuz i had handy.Missed that. I guess I'll blame it on my unfinished first cup of coffee.
I believe he is referring to the MAIN tank. There is a water drain tube to the left of the gas cap. The tube runs inside the tank and exits underneath and to the ground. It has nothing to do with the lower tank.Hi John, I have read another post where you were talking about the drain tube from the tank fill. On the photo #1 above, which tube is the one from the filler neck? I assume at the 11 o'clock? If that is so seems strange they would go through that much to drain it through the inside of the lower tank. This is one thing on my bikes that I have never looked at or thought of, but not had an issue either.
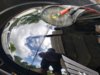
Well, I checked the tank at 7am and topped it off. Turned it back on and didn't check it again until 2:30pm. When I opened up the LARGE plastic tub, I was horrified to see the White Vinegar running down the side of the tank! It was very warm and humid and being inside that black tub in the sun probably made everything expand. The YouTube videos all said that the White Vinegar won't harm your paint. Wrong, now i have a light streak running down the side of the tank and there little pin dots around the gas cap. Oh well, it was pretty scratched up to begin with. Who knows? Maybe it will buff out or it could be a good excuse for a color change. But man o MAN did it clean the rust out! I did the same procedure as the lower tank and now she's resting in the A/C waiting for the Por-15 to arrive. Check out the couple of pictures I took while trying to quickly get the White Vinegar off of the paint. I also took a short video of the electrolysis in action, even with the power off, but I can't get it to post for some reason.
Attachments

rwthomas1
Site Supporter
That is quite a bit of rust. Lining is the correct move I believe.
RT
RT
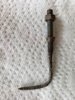
Just give you an idea of the "power" of White Vinegar and electrolysis after 21 hours, check out this picture. That is a 5/16" threaded rod previously bent 90° to clear the bottom of the tank. That perfectly tapered threaded collar started out as the nut next to it! Just be extremely careful with your eyes, skin and of course the paint! Jevers
Attachments
GGely
Site Supporter
Nice job, Jevers, and as above, make sure to seal the metal. As Jethro noted, Por-15 works well, as do others.
If you check out the CX550/GL650 forum, someone there is doing this almost every week, so there’s lots of good info there.
If you check out the CX550/GL650 forum, someone there is doing this almost every week, so there’s lots of good info there.
Thanks for the heads up!Nice job, Jevers, and as above, make sure to seal the metal. As Jethro noted, Por-15 works well, as do others.
If you check out the CX550/GL650 forum, someone there is doing this almost every week, so there’s lots of good info there.


Sadlsor
Site Supporter
That is incredible!Just give you an idea of the "power" of White Vinegar and electrolysis after 21 hours, check out this picture. That is a 5/16" threaded rod previously bent 90° to clear the bottom of the tank. That perfectly tapered threaded collar started out as the nut next to it! Just be extremely careful with your eyes, skin and of course the paint! Jevers
Sadlsor
Site Supporter
They surely do look CLEAN.The main tank (1st pic) turned out great! The lower tank, a little bubbly. Not sure why, but I'm going to run with it.
Remarkable transformation!
Share: