Yes - except for the diaper of course!Ok... hand wash my new baby... got it. I'll treat it just my my son when he was newborn...")

You are using an out of date browser. It may not display this or other websites correctly.
You should upgrade or use an alternative browser.
You should upgrade or use an alternative browser.
Shock adjustment
- Thread starter Zeoran
- Start date
OP
OP
Oh, I don't know... those cloth diapers actually make really good washing clothes... ;-)
ST Gui
240Robert
It would also help if the bike's year and model were listed in the appropriate sections so they appeared in the poster's avatar. Of course for those members busy scooping up multiple STs this wouldn't help.John OoSTerhuis said:Edit: please put “ST1100” in your thread subject line if not poSTing in a model specific sub-forum.
OP
OP
Done.
OP
OP
I'm still working on getting a better picture of the shock absorber. In the meantime, I noticed yesterday that at high speed (above 70mpg) the speed gauge needle did a lot of jumping +- 5mph while riding. Is this normal?
Also, what's the best solution for getting a replacement throttle lock? And does anyone know where I can get replacement cord hooks? (the helmet hooks that are supposed to be under the seat that flip out)
Also, what's the best solution for getting a replacement throttle lock? And does anyone know where I can get replacement cord hooks? (the helmet hooks that are supposed to be under the seat that flip out)
Last edited:
The hooks you refer to under the seat, the ones that flip out are not for helmet use actually. There are two curved metal pieces attached to the frame under the seat that are for that purpose. The fold out things are for attaching bungee cords should you want to strap something onto the seat. They are like hen's teeth. You better buy a lottery ticket if you find a pair.
A Vista Cruise will work as a decent throttle lock. Get the right size - 7/8 inch bars.
A Vista Cruise will work as a decent throttle lock. Get the right size - 7/8 inch bars.
Re getting the bike on the stand. If your tires are not OEM spec size that could be part of your problem. The 160/70-17 size is standard. a 170/60 size, or a 160/60 size will make it harder to centre stand.
OP
OP
That's a good point... I hadn't thought about it. I know that the rims say "Pan European" on them, which is the name of the bike in Europe. I don't know the size offhand and I didn't ride into work today because I've been extra-exhausted lately and didn't want to risk it. I'll be able to confirm the tire size and get better pics of the shock absorber this weekend.
I noticed yesterday that at high speed (above 70mpg) the speed gauge needle did a lot of jumping +- 5mph while riding. Is this normal?
It does happen on mine occasionally. Lubing the speedo cable may help. Disconnect it at the front wheel and pull the cable from the housing. If there are any kinks, or fraying of the cable, it needs replacing.
I use a light, white grease and smear a thin coat along the length of the cable, but do not put any within about 4 inches of the top end of the cable. Getting grease up into the speedo itself can damage it. A THIN coat on the cable is all you need. Be careful not to over tighten the screw upon reinstallation, as that plastic circle around the screw will easily split.
If you do manage to split that, not to worry, as just being snug on that screw is sufficient for it to remain in place. From the voice of experience.
CYYJ
Michael
Getting the bike on the center stand is 100% a matter of ergonomics & how you position yourself relative to the bike....I can't seem to get the bike on the center stand. Any hints/tips for getting it on the center stand?
Depending on how you position yourself and where you push / pull, it can either be totally impossible or ridiculously easy to get the bike on the center stand.
Fellow forum member Dave D, who is not a big guy (maybe 160 pounds), has made an excellent video showing exactly how to do it in an effortless manner. The concept is identical for both the ST 1100 and ST 1300 (I know, I own one of each). Have a look at it:
Michael
OP
OP
Thank you very much. I won't be able to try this until I get home, but I've watch the video already and I think I know what I was doing wrong....I was missing a step. I noticed that Dave centered the bike on the center stand BEFORE pushing down and pulling back to mount it on the stand. I never did that. I assumed that it would do that at the same time as the stand was going down and the bike up. So I think the key will be centering the bike on the center stand and making sure both of the center stand feet are touching the ground BEFORE I push down on the peg and lift up on the handle to lift it up. I'll let you know how that goes really soon.
God bless,
~Mark
God bless,
~Mark
Oh yeah. That would have to make a big difference if you were pushing down on just one leg of the centre stand and I wonder if that couldn't be downright dangerous for some big muscly guy that might be able to push that stand down cockeyed and cause the bike to slide out, especially on a smooth garage floor.
ST Gui
240Robert
There's also the matter of body weight to upper body strength. I don't know if you consider that part of ergos or not. But the ST (or any bike) doesn't put itself at the top of the center stand. It's often taken for granted but it's a metric that is a factor.CYYJ said:Getting the bike on the center stand is 100% a matter of ergonomics & how you position yourself relative to the bike.
My 'Wing buddy has remarked that it's easier putting his bike on the center stand than my ST. To that end I check to see the tires are at 42/42 at the start of a ride and I don't fill up prior to parking the bike for the night. One day I'll put in a little gym time to correct all that.
Until then I can and do put it on the center stand at every day's end (except when on the road of course). I just don't make it look easy as when Dave does it.
A 12yo girl can right a 'Wing that's lying on its tip-over bars. Let's see her put an ST on the center stand. (And I'll make sure the tires are low and the tank is full - just in case.)

OP
OP
I gave the bike a once-over yesterday. I was able to get it on the center stand thanks to the advice and the video above without too much of a problem. (Thank you!) I took a bunch more pictures of the shock with the side panel off that I'll try and get posted soon. The way my shock is, there seems to only be 4 positions but then there seems to also be a whole other adjustment section on the other side but it's impossible to get to.
After all of that work and checking all my fluids, etc, I do have some new questions. A few of the screws holding the panels on are near stripped and the single screw on the front of bike just above the headlight, just below the word "Honda" is flat out missing. How/where do I get replacements for these? I'd also like to get replacements for the windshield screws as well. I'm still waiting for my new Rifle windshield and I'd like to have new screws to mount it with. This may be a stupid question, but the manual doesn't say what fluid type I'm supposed to fill the clutch chamber with. The top cap seems to imply that I use the same fluid as the front/rear brakes, is that correct?
Also, does anyone know how high I can raise the bars and still use the stock cover? I may be open to going higher and painting the bars, etc, but I don't have that kind of time or space to work in right now.
I'd also like to get replacement grips that are as close to the stock grips as possible but the fact that these have the bar-end weights is making things confusing. It doesn't seem like I can just buy a set of standard 7/8" grips and have them work. The grips that the bike came with look like these but without the throttle paddle and they're not very comfortable on a long commute.

The brake pads in the front and rear look ok for now but they're probably going to need replacing soon with the daily commute I'm making. I'm fairly confident I can do the work myself but where do I find the parts?
Thanks for all the advice and help.
~Mark
After all of that work and checking all my fluids, etc, I do have some new questions. A few of the screws holding the panels on are near stripped and the single screw on the front of bike just above the headlight, just below the word "Honda" is flat out missing. How/where do I get replacements for these? I'd also like to get replacements for the windshield screws as well. I'm still waiting for my new Rifle windshield and I'd like to have new screws to mount it with. This may be a stupid question, but the manual doesn't say what fluid type I'm supposed to fill the clutch chamber with. The top cap seems to imply that I use the same fluid as the front/rear brakes, is that correct?
Also, does anyone know how high I can raise the bars and still use the stock cover? I may be open to going higher and painting the bars, etc, but I don't have that kind of time or space to work in right now.
I'd also like to get replacement grips that are as close to the stock grips as possible but the fact that these have the bar-end weights is making things confusing. It doesn't seem like I can just buy a set of standard 7/8" grips and have them work. The grips that the bike came with look like these but without the throttle paddle and they're not very comfortable on a long commute.
The brake pads in the front and rear look ok for now but they're probably going to need replacing soon with the daily commute I'm making. I'm fairly confident I can do the work myself but where do I find the parts?
Thanks for all the advice and help.
~Mark
the single screw on the front of bike just above the headlight, just below the word "Honda" is flat out missing. How/where do I get replacements for these?
That one, on the black garnish, is not a screw. It is a push in "clip", as referred to in this fiche. Number 19.
Honda Motorcycle 2002 OEM Parts Diagram for WINDSCREEN | Partzilla.com
Buy OEM Parts for Honda Motorcycle 2002 WINDSCREEN Diagram
 www.partzilla.com
Use the Partzilla website to find any parts you need.
Brake fluid, DOT 4 for both clutch and brakes.
Last edited:
I'd also like to get replacements for the windshield screws as well.
I suggest you also check that the "well nuts" are in good shape, or just order 5 new ones. Those are number 17 on the same fiche as above. Honda calls them the cowl setting nut.
OP
OP
The well nuts are the things the windshield screws screw into, right? Despite being a tech, I've never been very good at reading parts diagrams like this. I'm pretty sure I need #16 and #8 for the windshield screws themselves and then #19 for the clip that you mentioned goes under the word "Honda" on the front cowl piece.
PS - Thanks a lot for this site, it's amazing.
PS - Thanks a lot for this site, it's amazing.
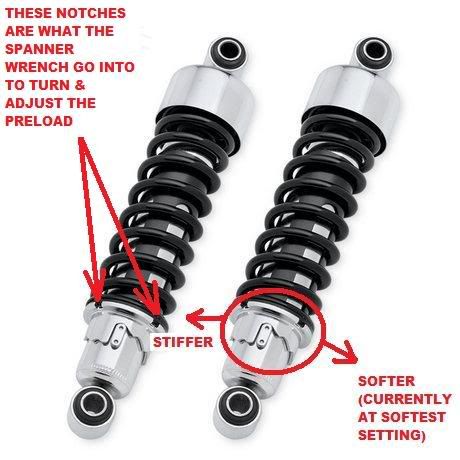
The way my shock is, there seems to only be 4 positions but then there seems to also be a whole other adjustment section on the other side but it's impossible to get to.
Look at the picture below as I explain this.
When you adjust the "preload", what you're doing is adjusting the location of the bottom of the spring on the shock body. The only part that moves is the silver notched ring that the spring sits on. Since nothing is holding the bike up or down, the top of the spring will always be the same height above the bottom of the spring, unless you change the weight on the bike.
You change the spring height to keep the shock travel in the same range of motion as you compensate for changes in weight. The unloaded ride height changes as you adjust the spring, but the loaded height is supposed to be the same with changing load weight. When you add weight, you raise the bottom of the spring; when you shed weight, you lower it.
There are not two separate height-adjustment ranges. See the metal oval welded to the shock body that the stepped ring rests on? There is a second one on the opposite side just to make the load equal around the shock, and there is a second set of steps that rest on that second oval. The whole ring moves up and down with two sets of steps resting on two ovals.
The picture below shows this shock is set to the lowest position, corresponding to be adjusted to carry the least weight, because the spring will deflect the least. Notice that the ring can only be rotated in one direction, because of the great step stopping it from going the other way. You could rotate it up the steps and drop over the big step if you wanted to.
If you were to do that, rotate the ring a full 180 degrees, and over the big step, you'd be back exactly where you are now, the only difference being you'd see the side of the ring that usually faces the wheel. It's the number of step "landings", not the number of step "risers", that determines the number of ride-height adjustments you have.
OP
OP
I adjusted the spring when I also took off the cover and took these pictures...


In the 2nd picture, I have the shock adjusted all the way to the right and I only moved it 4 positions. I didn't realize there was a 2nd 'pin' on the back side which is obviously what's using the other set of guides that I was noticing. But I still only had 4 adjustments from full left to full right.
In the 2nd picture, I have the shock adjusted all the way to the right and I only moved it 4 positions. I didn't realize there was a 2nd 'pin' on the back side which is obviously what's using the other set of guides that I was noticing. But I still only had 4 adjustments from full left to full right.
Not if you count your starting position as #1. If it was in position 1 and you moves it 4, that makes 5 positions.In the 2nd picture, I have the shock adjusted all the way to the right and I only moved it 4 positions. I didn't realize there was a 2nd 'pin' on the back side which is obviously what's using the other set of guides that I was noticing. But I still only had 4 adjustments from full left to full right.
Share: