the Ferret
Daily rider since May 1965
I saw this farkle at OH-Stoc on someones bike and thought it was a good idea. I went to Radio Shack for knobs but wasn't really happy with the knobs or the amount of work needed to turn them into key knobs so I went looking for another alternative. I found the bottle caps from certain Yamalube products to be the right size and a good match for the ST's plastics. I got the service manager at the local shop where I bought my bike (Hon/Yam) to save me 4 caps (1 spare) off of the Yamalube tank cleaner and sealant bottles. The ones off Yamalube 4 stroke motor oil would do just as well. The really nice part about this is there are no insides to gut like on the radio shack knobs.
I went to Ace Hardware and had them make me 3 short DA23 code keys. I also picked up some Ace 2 part 5 minute epoxy.

The green cap you see in the pic is my practice cap, with a popsicke stick practice key.
I squirted some of the epoxy into my green practice cap, then added an equal amount of hardener, stirred it up thoroughly and stuck the practice key in the middle. Even though it was 5 min epoxy, it didn't set up that fast, so I used 2 more popsicle sticks to hold it straight up and down while it hardened.

After 15 mins I removed the prop sticks and a successful practice knob was made

I used a dremel tool to cut off 1/2 the top of the key, and a bench grinder to make it the right length and width for my caps. Here the first key is cut to fit. I did the same to the other two.

If you saw my "Where could it have gone thread" in the general forum, yoou note I dropped one of the keys while trial fitting and it fell into the bowels of my ST. Had to pull half the bike apart to get it back out. WARNING: Do not drop your key between the faiting and gas tank. Bad things can happen.
Anyhow with the bike reassembled it was time to continue:
Here's a key, a lid, the epoxy and a stir stick

I poured the epoxy right into the lid until it was 1/3 full.. I poured the hardener into the lid until it was 2/3 full. Then used a popsicle stick to mix the two parts together thoroughly

I then stuck the head of the key down into the epoxy and held it there for a minute or two

I then set it aside with the popsicle stick supports and started on the next one. Here's a pic of 2 done and the last one curing

and here are the 3 knobs completed

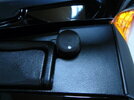
Fairing pocket


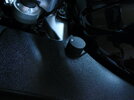
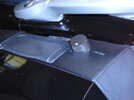
Left Saddlebag


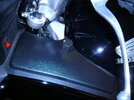
Right saddlebag


It was an easy project if you don't count tearing the motorcycle apart looking for a lost key ha ha, but hopefully you won't have to go thru that.
Costs:
3 Keys DA23 Ace Hardware $2.29 each ...$6.87
1 Two part 5 min Epoxy Ace Hardware $4.49
3 Caps off Yamalube Tank Cleaner & Sealant $ 0
Total cost of project $ 11.36
One last step. Took a small drill bit and drilled a dimple in the top lined up with the key and then took some white paint on a toothpick and filled the dimple. Now it will be easy to tell if the locks are in the closed or open position.

I went to Ace Hardware and had them make me 3 short DA23 code keys. I also picked up some Ace 2 part 5 minute epoxy.

The green cap you see in the pic is my practice cap, with a popsicke stick practice key.
I squirted some of the epoxy into my green practice cap, then added an equal amount of hardener, stirred it up thoroughly and stuck the practice key in the middle. Even though it was 5 min epoxy, it didn't set up that fast, so I used 2 more popsicle sticks to hold it straight up and down while it hardened.

After 15 mins I removed the prop sticks and a successful practice knob was made

I used a dremel tool to cut off 1/2 the top of the key, and a bench grinder to make it the right length and width for my caps. Here the first key is cut to fit. I did the same to the other two.

If you saw my "Where could it have gone thread" in the general forum, yoou note I dropped one of the keys while trial fitting and it fell into the bowels of my ST. Had to pull half the bike apart to get it back out. WARNING: Do not drop your key between the faiting and gas tank. Bad things can happen.
Anyhow with the bike reassembled it was time to continue:
Here's a key, a lid, the epoxy and a stir stick

I poured the epoxy right into the lid until it was 1/3 full.. I poured the hardener into the lid until it was 2/3 full. Then used a popsicle stick to mix the two parts together thoroughly

I then stuck the head of the key down into the epoxy and held it there for a minute or two

I then set it aside with the popsicle stick supports and started on the next one. Here's a pic of 2 done and the last one curing

and here are the 3 knobs completed

Fairing pocket


Left Saddlebag


Right saddlebag


It was an easy project if you don't count tearing the motorcycle apart looking for a lost key ha ha, but hopefully you won't have to go thru that.
Costs:
3 Keys DA23 Ace Hardware $2.29 each ...$6.87
1 Two part 5 min Epoxy Ace Hardware $4.49
3 Caps off Yamalube Tank Cleaner & Sealant $ 0
Total cost of project $ 11.36
One last step. Took a small drill bit and drilled a dimple in the top lined up with the key and then took some white paint on a toothpick and filled the dimple. Now it will be easy to tell if the locks are in the closed or open position.

Last edited by a moderator:


 I don't have to pull out the ignition key I'll just use the glove box key!!!:woo