Article [13] ST1300 - LED Mirrors - Now you get noticed with STYLE

Finally got around to doing this mod. It doesn't happen often, but I'll never forget to turn the signal off again!

My variation:
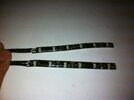
I chose to fill in most of the little vent slots in the mirror with amber LEDS, 10 per side.
I didn't want to drill the mirror slots, so I chose to modify the 3mm leds by sanding them down to 2.25mm on 2 sides such that they were oval shaped. These pressed into the slots nicely.

I then split the 10 into to groups of 5 and powered them seperately off 170ohm resistors. Coated over with quality RTV to waterproof and provide strain relief.

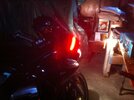
Very pleased with the results!
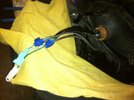
attachment.php


Installation pics:
attachment.php
attachment.php

Schematic:
attachment.php


FWIW, If anyone is interested in a "kit", I have enough parts left over to make up a couple more. It would include the modified LEDs, resistors, fast-on connectors for the signal wire, and a ring terminal pigtail for ground. You'd have to solder it up. $25 shipped US.
 
Ok I am doing something similar. I like your guys idea but want the LEDS facing out and not back.. I am using a LED strip and going to put it on the edge of the mirror housing, facing out. Using a Mode Electronics cut to length SILICON ENCAPSULATED SERIES LED STRIP part #55-73300R-0. 12 Volts right to the solder points on the strip, as the resistors are integral to the strip, no need to add any.

Part
Number Length [m] LED [PCS] Material Type Emitted Color Lumen/meter Dominant Wavelength [nm] Color Temperature View Angle
55-73300R-0 5 / 300 AlGaInP Red 120 625 n/a 120

As this is an old thread I will put pictures on as soon a s I am done.
So now you know...:p:
 
Can't wait to see what you do, Gypsyh. I did the same thing as this thread outlines. You can, however, cheat the angle a bit. I drilled out my holes with the bike and drill level and then out to side a bit. I can't really see the light from my seat when I turn the blinker on but when you're behind and off to the blind spot, they are seen at their brightest.

Don't forget to post your pics. Good luck with your project.
 
I did a mirror install this weekend. But did a single 5 led strip in the side. Use the 2.2 v 20ma lights from superbrightleds.com

You can get the LEDs and the resistors from them, $.60 each, $0.54 if you buy 10. Then get a pair of 180 ohm resistors for $0.14 each. So a total of $5.68 in parts.

In place of sanding the bodies I opened up the hole on the mirror with a 1/8" brad point bit. The hole was then reamed from the back with a slightly larger bit, 11/64 I think. Didn't go all the way through, just in enough to get the base of the led in and let the nose poke out the front. Slide in each of the leds and let the friction hold them in place.

Bought a pair of SAE connectors for each side, think a $1.25 for each pair with 18 gauge wire. Wired those in to disconnect when the mirror covers come off.

Great farkle.

Thanks guys!
 
Ok I think I am done....for now. Like I said before I wanted the LED's facing out wards. I connected the wiring into harness outboard of the wiring connectors 1P/2P coming from the upper cowl, that way it is easy to remove the mirror cover. I think I am happy with it. Let me know what you think.

Be gentle.....:o:
 

Attachments

  • IMG_3673.jpg
    IMG_3673.jpg
    254.7 KB · Views: 107
  • IMG_3682.jpg
    IMG_3682.jpg
    359.6 KB · Views: 138
  • IMG_3683.jpg
    IMG_3683.jpg
    327.6 KB · Views: 119
  • IMG_3689.jpg
    IMG_3689.jpg
    292.4 KB · Views: 173
Just ordered a set... I've been wanting to do this for a while... I had a set that were made for the Gold Wing mirrors, but they were a one piece LED that stick to rear of the hole flange on the mirror mount, and it was a pain to get the mirror cover back on... Looking forward to trying these instead... :)
 
DakotaJoe,
Thank you for posting this thread. I going to take on this farkle with the twist that playfair added (x10 3mm LEDs). I was wondering what MCD (intensity) value your LEDs are? I'd like to go with the 3mm LEDs, but keep the brightness/intensity (mcd) of your original project. It's been a couple years now and manufacturers are making brighter LEDs in smaller packages.
Thank you in advance,
Chromy
 
20130223_110559 (640x480).jpg20130223_110618 (640x480).jpgWell, I took this project on and as others commented it only took about twenty minutes.
Went to my local Radio Shack and picked up everything pictured for less than 12 dollars.
 
20130223_124713 (480x640).jpgHere's the result. Bright enough from behind, but not too bright from the rider's position due to the 30 degree LEDs.
I'm planning on installing red running light LEDs below the turn signal ones in the future.
20130223_124741 (640x480).jpg
 
I know this is an old thread, but...
All the links are broken

Does anyone have a list of parts needed for this project? LED bulbs and diodes specifically.
I am pretty sure that I still have the parts list from the member who sold these on this site. If I do it is on my computer, which is not where I currently am. If I don't get back to you tomorrow don't be shy to give me a nudge.
 
I tried this back when and didn't care for the look. The LEDs faced "up" from the ribbon cable and shined towards each other from the perimeter of the mirror housing. They didn't show well enough from the back of the bike for my taste.

Someone posted a (maybe it was Gypsyh above) link to LED strips that had the LEDs facing out to one side of the ribbon cable instead of up. The idea was instead shining towards each other they'd all "pointed out" of the cover towards the rear of the bike for greater conspicuity and functionality.

I didn't try them and don't recall if anyone did. Another potential feature was being less distracting to the rider. I tend to question suggestions of "distractions to the rider" for many things as notions and not something actually experienced.

Overall I wasn't pleased with the look of a bunch of lighted dots but that was a personal preference. If there were a version of the "sideways" LEDs and a white (or amber if required) tubing to create more solid illumination I might try again.

This just in:

I don't remember where I got the LED strips. It may have been this place:
https://www.oznium.com/flexible-led-strips

This is new (to me). It's piqued my interest somewhat:
https://www.oznium.com/flexible-led-strips/cob-led-filament

COB-LED-Filament.jpg


That would be the look I'd want.
 
Last edited:
Does anyone have a list of parts needed for this project? LED bulbs and diodes specifically.

Hm. I can't add this to my previous post via Edit.

As LEDs are diodes I'm not sure what you mean by LED bulbs and diodes. Were you also asking about replacing the turn signals with LEDs? Or was that LEDs and resistors?

The little gray cells are waking up. I did this as above before the strip of light thing and like it. Unfortunately the mirror cover shields the light so it's visible from behind at a very narrow angle. But I like and kept it.

20130223_124741-640x480-jpg.132830


From a slight distance the three LEDs appear as one so I'm ok with it.
 
Last edited:
H
I know this is an old thread, but...
All the links are broken

Does anyone have a list of parts needed for this project? LED bulbs and diodes specifically.

Here you go:

Parts List is for two sets of three amber LED arrays.

LED Qty. 6 ea.
5mm diameter round top
Emitted colour- Amber
Lens colour- water clear
Luminous intensity- 10, 000 mcd
Link- Amber LED Lights

Resistor Qty. 2 ea.
150 OHM, 1/2 watt, carbon film, 5% tolerance.

Automotive grade wire, 20 AWG, stranded Qty. 48 in. Colour matching the wires is optional.

Shrink wrap- Light blue to match R/H turn signal positive wire. Orange to match the L/H turn signal positive wire.
Alternately red can be used to indicate the positive wires, green to match the ground wire.

Courtesy of Gary Ras GEditor - ST-owners.com
As provided to Andrew Shadow - ST-Owners.com


*** Note:
If connectors are desired in the wiring, the ideal connector for this low-power application is a model airplane servo lead. The connectors are secure and of high quality and come with a wire pigtail already attached. The connector allows the painted mirror cover to be removed easily without disturbing the wiring.

There are two types of connectors: JR and Futaba - and both work fine but they are not easily interchangeable - so choose one and stick with it.

Any hobby shop that sells RC aircraft will have these. You can get a good quality 3-conductor servo extension cable in lengths from 3" to several feet - at very low cost.
Courtesy of MaxPeteST-Owners.com
 
Last edited:
Back
Top Bottom