
Jefro
I ride to Sturgis
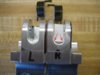
The Motor Cycle Larry Peg Lowering Kit is a well executed set of billet
aluminum blocks with clear anodizing. They allow the rider?s pegs to be
lowered about one and a half inches down, and about one inch outward.
They may scrape during hard cornering, but I haven?t found them to be a
problem. And in fact, they greatly enhance the ergonomics of the ST1300
on long rides.
Installation is straightforward, and no other modifications are necessary,
but I felt the need to lower the shifter peg and the brake pedal for my own
personal fit. I also had to adjust the brake light switch a bit.
After the install, I decided that the fit was a little loose, and the stock
spring didn?t hold them in place well enough. After careful measurement
with my calipers, I gently sanded the sides of the new brackets, and fitted
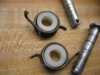
a .060 inch nylon spacer to give a snug fit. I also fitted a nylon spacer
inside the stock spring which gave it better return strength.
Now they fit firm and snug, and feel like a better installation.
I have included photos of adjustments and spacers.
Components Needed
2flat nylon washers, 1 inch OD, 3/8 inch ID, .060 thick
2 nylon spacers, 5/8 inch OD, 3/8 inch long, 5/16 inch hole
Tools Needed
grinder or rough file
5/16 drill bit
square bottom end mill or grinding bit
Hacksaw
10mm and 12mm wrenches
Installationaluminum blocks with clear anodizing. They allow the rider?s pegs to be
lowered about one and a half inches down, and about one inch outward.
They may scrape during hard cornering, but I haven?t found them to be a
problem. And in fact, they greatly enhance the ergonomics of the ST1300
on long rides.
Installation is straightforward, and no other modifications are necessary,
but I felt the need to lower the shifter peg and the brake pedal for my own
personal fit. I also had to adjust the brake light switch a bit.
After the install, I decided that the fit was a little loose, and the stock
spring didn?t hold them in place well enough. After careful measurement
with my calipers, I gently sanded the sides of the new brackets, and fitted
a .060 inch nylon spacer to give a snug fit. I also fitted a nylon spacer
inside the stock spring which gave it better return strength.
Now they fit firm and snug, and feel like a better installation.
I have included photos of adjustments and spacers.
Components Needed
2flat nylon washers, 1 inch OD, 3/8 inch ID, .060 thick
2 nylon spacers, 5/8 inch OD, 3/8 inch long, 5/16 inch hole
Tools Needed
grinder or rough file
5/16 drill bit
square bottom end mill or grinding bit
Hacksaw
10mm and 12mm wrenches
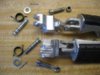
1. Remove the stock pegs and hardware.
2. Bolt on the new MCL brackets using supplied hardware.
3. You are finished. Go for a test ride.
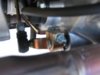
4. If you want to adjust the brake pedal, remove the right lower black
fairing using a 5mm hex allen wrench, and removing the plastic rivets.
5. Loosen the 12mm lock nut and adjust the pedal lower by turning the bolt.
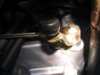
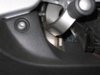
6. Adjust the brake light switch by moving the rubber window out of the
way, and turning the knurled plastic adjustment wheel.
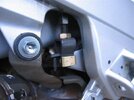
7. If you want to adjust the shifter peg, remove both lower black plastic fairings.
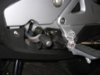
8. To make a large adjustment at the splined shifter shaft at the lower
right rear of the motor, remove the 10mm headed bolt, mark with a felt pen
the original location, then pull off the shift bracket and reinstall one spline
over. This should move the peg lower by about an inch.
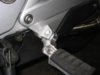
9. For minor adjustments, loosen the reverse threads of the lock nut on
the adjuster rod next to the rubber boot covered joint. I found it easier
spin the bracket around the stationary rod.
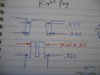
10. After I had lowered the shifter peg to a comfortable position, I
discovered that it hit the lower fairing and would not let me shift into first
gear!
11. I marked with a felt pen where the peg hit the fairing, then removed
the fairing and hacksawed away a tiny section to allow for peg movement.
This cutout is unnoticeable.
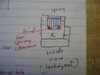
cast bike frame, so after some careful measuring and grinding, I was able
to match the cast angle to the bracket and insert a nylon spacer for a
snug fit.
13. After grinding and filing a nice flat surface, I was able to fit a .060 inch
nylon spacer for a good fit. You may need a thinner or thicker one.
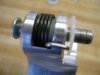
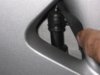
14. The spring was loose so I added an internal spacer to give it support
for a better fit around the peg pin. It is 5/8 inch OD, 3/8 inch long, with a
5/16 inch hole drilled in the middle.
15. But I found that the spring now didn?t have enough clearance inside
the bracket and was binding when the pin was inserted. I chucked into my
air die grinder a ? inch end mill and carefully cut a small area for the spring
to sit lower into the bracket.
16. Now the spring had clearance to move freely but stronger, and I
re-assembled everything back together including the lower fairings.
17. Perfect fit! Yeah, I?m a perfectionist. Now you can be too!
Conclusion
I think you will find the MCL Peg Lowering Kit to be a great addition for those long rides, and the mods I?ve described
here will make a good accessory fit even better.
Jefro.
I think you will find the MCL Peg Lowering Kit to be a great addition for those long rides, and the mods I?ve described
here will make a good accessory fit even better.
Jefro.
Attachments
-
 14533.jpg28 KB · Views: 171
 -
 14534.jpg40.2 KB · Views: 165
 -
 14535.jpg37.8 KB · Views: 153
 -
 14536.jpg30.9 KB · Views: 144
 -
 14537.jpg53.2 KB · Views: 139
 -
 14538.jpg53.4 KB · Views: 138
 -
 14539.jpg35.9 KB · Views: 135
 -
 14540.jpg31.4 KB · Views: 136
 -
 14541.jpg55.7 KB · Views: 146
 -
 14542.jpg27.5 KB · Views: 147
 -
 14543.jpg41.5 KB · Views: 151
 -
 14544.jpg36.9 KB · Views: 157
 -
 14545.jpg35.4 KB · Views: 154
 -
 14546.jpg45.9 KB · Views: 156
Last edited by a moderator:
 oPoST1: