
Capt_Gruuvy
Stay-at-Home Astronaut
OK. First an apology for not taking pictures during the install. This was completed in 5 minutes and while I was looking for an oil drain pan this was completed and buttoned up.
So I have taken the parts off and photo'd them and have tried to give you an idea of how this works.
Trust me it's easy.
1.) Eat some pie. This will make everything so much easier.
2.) Remove your seat. I assume you know how.
3.) Remove the three allen head bolts holding on the side panel.
4.) Polish the side panel that you removed. It's easy to do now.
5.) Loose the factory fuse block from the stock battery cover. Gently pry this upwards until it is hanging loose.
6.) Remove the stock battery cover. There is a clip on the top, away from you, push down on the clip whilst pulling cover. Throw this in your Parts Box so you can throw it away later.
7.) Wipe off the frame lip under this area to prepare for Velcro adhesion. Sounds so Technical .... oooooohhhhhhh exciting now isn't it ?
8.) Apply 1/2" Velcro fuzzy to the frame in about an 8" - 10" length. Precision is not necessary. However, if it is to you cut the Velcro to EXACTLY 9.34" !
8.a) Leave about 1/4" clearance from the front edge of the frame. Too much here and you'll have fuzzy hanging out from under the panel and this isn't a GoldWing so leave no fuzz showing.
9.) Remove the solid '08 Side Panel from it's shipping packing.
10.) Adhere 1/4" Velcro itchy side to about 8" - 10" of the lower lip of the panel.
10.a) If you cut your Velcro fuzzy to EXACTLY 9.34" then cut the Velcro itchy side to EXACTLY 9.35" (to allow shrinkage) and apply DIRECTLY inline with the Velcro fuzzy. If you misaligned this portion, remove all Velcro, curse the day you were born and start all over ....... LOSER !
11.) Snap this cover into place in reverse of removing the stock battery cover. Pay attention to adhere your Velco pieces.
12.) Put the factory fuse block in place. You know where it goes you just took it off 2 minutes ago. What are you a Goldfish ?
13.) Place the side cover you just had your kid polish back into place and put the allen head bolts back on and torque to exactly .... whatever holds them in place.
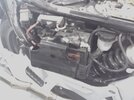
Consult the pictures below for visual aids.
For the other side it is slightly more complicated.
I will need to photo that for you as well. There is a drill involved so you may need your wife to help you.
There is a thread on this board so let me find that and I'll edit this post with that information. I don't want to misguide your drilling action.
In this article: https://www.st-owners.com/forums/showthread.php?t=39433&highlight=side+panels
There is a bracket which was mounted on the right side on a plastic tray thing that looks like it is holding some electrical stuff. If you drill a hole, big enough for a tie wrap, in the non-electrical portion just like on this article you will tie wrap the 08 right side panel to this hole and velcro everything else just like on the right side.
This side is easy too.
Let me know if you want pictures for this side and I'll be happy to do that for you.
Thanks to Adam for the install and wow what a difference ! I do like 'em plenty.
So I have taken the parts off and photo'd them and have tried to give you an idea of how this works.
Trust me it's easy.
1.) Eat some pie. This will make everything so much easier.
2.) Remove your seat. I assume you know how.
3.) Remove the three allen head bolts holding on the side panel.
4.) Polish the side panel that you removed. It's easy to do now.
5.) Loose the factory fuse block from the stock battery cover. Gently pry this upwards until it is hanging loose.
6.) Remove the stock battery cover. There is a clip on the top, away from you, push down on the clip whilst pulling cover. Throw this in your Parts Box so you can throw it away later.
7.) Wipe off the frame lip under this area to prepare for Velcro adhesion. Sounds so Technical .... oooooohhhhhhh exciting now isn't it ?
8.) Apply 1/2" Velcro fuzzy to the frame in about an 8" - 10" length. Precision is not necessary. However, if it is to you cut the Velcro to EXACTLY 9.34" !
8.a) Leave about 1/4" clearance from the front edge of the frame. Too much here and you'll have fuzzy hanging out from under the panel and this isn't a GoldWing so leave no fuzz showing.
9.) Remove the solid '08 Side Panel from it's shipping packing.
10.) Adhere 1/4" Velcro itchy side to about 8" - 10" of the lower lip of the panel.
10.a) If you cut your Velcro fuzzy to EXACTLY 9.34" then cut the Velcro itchy side to EXACTLY 9.35" (to allow shrinkage) and apply DIRECTLY inline with the Velcro fuzzy. If you misaligned this portion, remove all Velcro, curse the day you were born and start all over ....... LOSER !
11.) Snap this cover into place in reverse of removing the stock battery cover. Pay attention to adhere your Velco pieces.
12.) Put the factory fuse block in place. You know where it goes you just took it off 2 minutes ago. What are you a Goldfish ?
13.) Place the side cover you just had your kid polish back into place and put the allen head bolts back on and torque to exactly .... whatever holds them in place.
Consult the pictures below for visual aids.
For the other side it is slightly more complicated.
I will need to photo that for you as well. There is a drill involved so you may need your wife to help you.
There is a thread on this board so let me find that and I'll edit this post with that information. I don't want to misguide your drilling action.
In this article: https://www.st-owners.com/forums/showthread.php?t=39433&highlight=side+panels
There is a bracket which was mounted on the right side on a plastic tray thing that looks like it is holding some electrical stuff. If you drill a hole, big enough for a tie wrap, in the non-electrical portion just like on this article you will tie wrap the 08 right side panel to this hole and velcro everything else just like on the right side.
This side is easy too.
Let me know if you want pictures for this side and I'll be happy to do that for you.
Thanks to Adam for the install and wow what a difference ! I do like 'em plenty.
Attachments


Last edited by a moderator:

 4:
4:


")
