Just finished my Stebel horn install using the "Dana recommended" spot for the horn. I am grateful for those who go before me...it gave me the confidence to tackle this. Seriously, without this forum I NEVER would have tried this. I'd like to add my perspective on this procedure with the hope that someone finds this helpful. Sometimes saying the same thing with different words makes it "click" for someone. I am a pretty green mechanic, so if I can do this, you probably can as well.
For this project I decided to move my bike into my workshop so that I'd have a well lit and comfortable place to work. It also gave me the option of letting the process unfold over a period of days...so I was never rushed or uncomfortable. Once the ST was up on its stand and the music was playing, I began.
I started with the obvious...panel removal on the "battery side" of the ST.
I chose to take off:
-the Mirror Cover ("pops" off, two snap together electrical connections),
-the Mirror itself (two bolts),
-the Side Cover (the one with three bolts that covers the battery),
-the Inner Lower Cowl (triangular piece at the bottom of the front wheel well/two clips and two screws),
-the Right Inner Cowl (irregular shaped piece that sits above the Inner Lower Cowl and behind the Right Middle Cowl/numerous clips and one screw, disconnect the temp sensor),
-the Right Lower Cowl (several bolts) and
-the Middle Cowl (numerous clips and bolts).
In addition, as Dano points out, the Upper Cowl needs to be loosened on it's right side, but not removed...I think it takes 4-5 bolts/clips. Once loosened, as the Upper Cowl is slightly peeled open (near where the mirror bolted to the panel/frame), your new horn's mounting bracket is revealed...it's right behind where the mirror attached.
When removing all of these body panels you will be dealing with a lot of screws, bolts and clips that come in a variety of shapes and sizes. Unless you have a photographic memory, staying organized is important. I found the Shop Manual and some of the worksheets available on this forum to be essential; personally, I would not attempt this job (at this point in my learning curve) without these. I keep a set of the "body panel worksheets" (available on this forum) in my Shop Manual that have color photos of the panels and scale drawings of the attachment clips, screws and bolts...very helpful when its time to reattach the panels as the worksheets show which fastener goes in which hole of each panel.
One thing I've found really helpful is to keep the fasteners in a labelled zip lock bag...one bag devoted to each panel. Using these bags takes a few extra minutes when tearing it down, but it ultimately saves time and makes reattachment a LOT simpler. When the project is completed, I save the labelled bags for next time.
I also had to tip the gas tank up and clear a route for the wiring to travel from the horn and relay back to the battery.
Whew...that's a lot of work, trust me.
The spot Dano discovered is perfect for this horn...there's lots of room and a great bracket...predrilled no less. The bracket has two open holes...and in either case drilling the hole out to 5/16" (to fit the supplied bolt, which I suggest using since the bolt's head, which you cannot get a wrench on when tightening, will be locked into the horn's bracket and allow the nut to be tightened) was quick and easy. Dano suggests using the bottom hole which is easier to reach than the upper hole- Dr. Dano, I concur. Once attached, the "trumpets" face inward and the bottom of the horn, which houses the two electrical clips, is exposed making the process of attaching the electrical clips brain dead simple. It could not have been a better place to do the install.
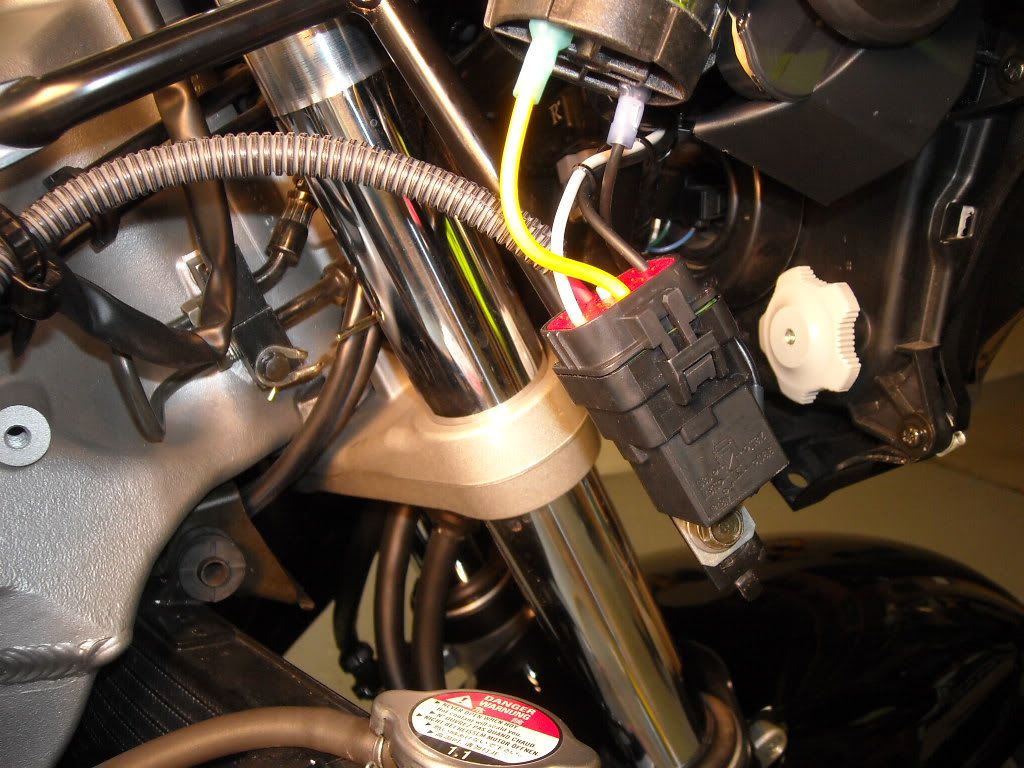
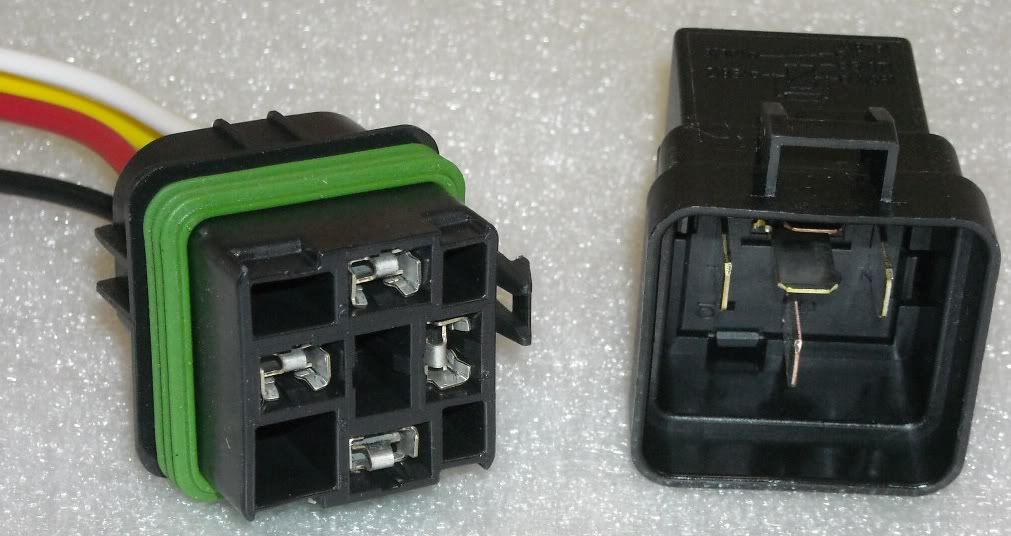
I chose to remove the OEM horn from the bike...I thought it was a cleaner install by plugging the OEM wires from the horn straight into the relay wiring. BTW, I used the Eastern Beaver relay kit for a "Single horn/Two wires." The relay kit is beautifully constructed...however, the battery attachment wires could have been longer. Because they were somewhat short, I was unable to actually mount the relay switch...it is simply resting on the frame of the bike. He makes a version of the relay kit with longer wires....I may replace the relay I used.
I found the Stebel instructions minimally useful in that they offer NO suggestions on mounting the horn...guess its impossible since they don't know on what bike you plan to install the horn. The instructions do cover installing the (included) relay, however, I took the experience to heart that several members had with the Stebel relay developing rust problems and elected to use the (waterproof) Eastern Beaver relay instead. It was another $40 or so...but I had confidence that this was a better built, more durable component.
I found the Eastern Beaver relay installation instructions to be very clear and thorough.
Not surprisingly, most of my time was spent dealing with plastic removal and reinstallation...mounting the horn (once the bracket was identified) took all of 5 minutes. Running the wiring and making those connections took maybe 30 minutes. Again, all the time is taken in unbuttoning and re-buttoning the ST's tupperware.
All in all, this was a fun project...just tough enough to be a challenge, but simple enough that I never felt like it was beyond me. Also, this project had another important characteristic (for me)...nothing's been done to the bike (other than drilling out the bracket) that can't be reversed if I chose to return the bike to OEM status....and I like that.
For this project I decided to move my bike into my workshop so that I'd have a well lit and comfortable place to work. It also gave me the option of letting the process unfold over a period of days...so I was never rushed or uncomfortable. Once the ST was up on its stand and the music was playing, I began.
I started with the obvious...panel removal on the "battery side" of the ST.
I chose to take off:
-the Mirror Cover ("pops" off, two snap together electrical connections),
-the Mirror itself (two bolts),
-the Side Cover (the one with three bolts that covers the battery),
-the Inner Lower Cowl (triangular piece at the bottom of the front wheel well/two clips and two screws),
-the Right Inner Cowl (irregular shaped piece that sits above the Inner Lower Cowl and behind the Right Middle Cowl/numerous clips and one screw, disconnect the temp sensor),
-the Right Lower Cowl (several bolts) and
-the Middle Cowl (numerous clips and bolts).
In addition, as Dano points out, the Upper Cowl needs to be loosened on it's right side, but not removed...I think it takes 4-5 bolts/clips. Once loosened, as the Upper Cowl is slightly peeled open (near where the mirror bolted to the panel/frame), your new horn's mounting bracket is revealed...it's right behind where the mirror attached.
When removing all of these body panels you will be dealing with a lot of screws, bolts and clips that come in a variety of shapes and sizes. Unless you have a photographic memory, staying organized is important. I found the Shop Manual and some of the worksheets available on this forum to be essential; personally, I would not attempt this job (at this point in my learning curve) without these. I keep a set of the "body panel worksheets" (available on this forum) in my Shop Manual that have color photos of the panels and scale drawings of the attachment clips, screws and bolts...very helpful when its time to reattach the panels as the worksheets show which fastener goes in which hole of each panel.
One thing I've found really helpful is to keep the fasteners in a labelled zip lock bag...one bag devoted to each panel. Using these bags takes a few extra minutes when tearing it down, but it ultimately saves time and makes reattachment a LOT simpler. When the project is completed, I save the labelled bags for next time.
I also had to tip the gas tank up and clear a route for the wiring to travel from the horn and relay back to the battery.
Whew...that's a lot of work, trust me.
The spot Dano discovered is perfect for this horn...there's lots of room and a great bracket...predrilled no less. The bracket has two open holes...and in either case drilling the hole out to 5/16" (to fit the supplied bolt, which I suggest using since the bolt's head, which you cannot get a wrench on when tightening, will be locked into the horn's bracket and allow the nut to be tightened) was quick and easy. Dano suggests using the bottom hole which is easier to reach than the upper hole- Dr. Dano, I concur. Once attached, the "trumpets" face inward and the bottom of the horn, which houses the two electrical clips, is exposed making the process of attaching the electrical clips brain dead simple. It could not have been a better place to do the install.
I chose to remove the OEM horn from the bike...I thought it was a cleaner install by plugging the OEM wires from the horn straight into the relay wiring. BTW, I used the Eastern Beaver relay kit for a "Single horn/Two wires." The relay kit is beautifully constructed...however, the battery attachment wires could have been longer. Because they were somewhat short, I was unable to actually mount the relay switch...it is simply resting on the frame of the bike. He makes a version of the relay kit with longer wires....I may replace the relay I used.
I found the Stebel instructions minimally useful in that they offer NO suggestions on mounting the horn...guess its impossible since they don't know on what bike you plan to install the horn. The instructions do cover installing the (included) relay, however, I took the experience to heart that several members had with the Stebel relay developing rust problems and elected to use the (waterproof) Eastern Beaver relay instead. It was another $40 or so...but I had confidence that this was a better built, more durable component.
I found the Eastern Beaver relay installation instructions to be very clear and thorough.
Not surprisingly, most of my time was spent dealing with plastic removal and reinstallation...mounting the horn (once the bracket was identified) took all of 5 minutes. Running the wiring and making those connections took maybe 30 minutes. Again, all the time is taken in unbuttoning and re-buttoning the ST's tupperware.
All in all, this was a fun project...just tough enough to be a challenge, but simple enough that I never felt like it was beyond me. Also, this project had another important characteristic (for me)...nothing's been done to the bike (other than drilling out the bracket) that can't be reversed if I chose to return the bike to OEM status....and I like that.
")