I've been wanting to add a small set of LED lights under my mirrors, but didn't want to spend the $100US for a set of the 3d printed ones.
I've been looking at other options and today I found an easy and simple solution, most of it already installed on the motorcycle.
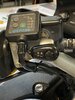
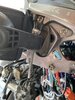
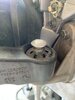
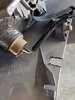
With the mirror covers removed I took a look at the mirror housings. They are bolted to the fairing securely. The rest of the mirror housing sits over top of an upright hollow shaft and is held in place by a locking spring. It effectively is a hook the rest of the mirror sits in.
Here you can see the top and bottom views, the hollow shaft and the locking ring.
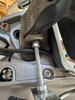
The hole in the mount is just under 1/4" at the top and just over 1/4" at the bottom. I got out my drill and drilled the top out to 1/4". You're really only shaving out the smallest amount of material on just the top lip. The fit is tight enough you'll have to thread the carriage bolt down in, which is the next step
I then got two carriage bolts 1/4" x 5" a couple of washers and 6 nuts. (edit: if you want more hanging room buy the 6" bolts and trim them if required.)
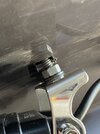
I fed the bolts down through the top of the mirror mounts. I had to thread them down by hand. You don't want to force them or beat on them. They will go with some easy turning. I had one that got tough at the final threads so I just double nutted the bottom and using a socket turned it down snug (so the square shoulder is resting on the top mirror flange.)
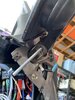
I then put on a washer, lock washer and a nut and spun them up to the bottom of the mirror, tightening them to secure the bolt thru the hollow mirror mount tube.
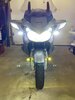
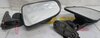
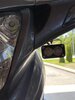
I installed one of the lights I already had on hand using two more nuts and washers. (one on the top and one on the bottom of the light bracket) for a test fitting.
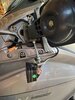
The plastic mirror cover was held up and marked where the bolt came down (just behind the bottom snap in pin) and I trimmed it with an oscillating tool so the bolt would pass thru.
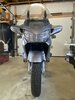
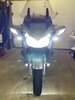
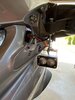
Here's what it looks like with the cover on.
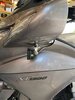

I think they turned out very nice.
Costs were $1.25 for each bolt and 0.17 for each nut. I went with galvanized as the hardware store didn't have stainless in 5" length. I already had some washers and lock washers at home.
The lights seem secure and I nudged them up against the Tupperware with hopes there would be no vibration when driving.
I've not yet had them on the road as I still need to wire them up.
The only thing I'll add is this may not work for all lights. If they are wide they may not clear the Tupperware. I'd imagine they'd hold more weight than the 3d printed versions of the mounts though.
Hope this helps someone!
edit: I added a bit of black heat shrink tubing over the bolt to cover up the bit of bolt showing under the light. You don't want to shrink it, just let it cover the bolt. That way you can easily remove it if you have to remove the bolt to take the Tupperware off.
I've been looking at other options and today I found an easy and simple solution, most of it already installed on the motorcycle.
With the mirror covers removed I took a look at the mirror housings. They are bolted to the fairing securely. The rest of the mirror housing sits over top of an upright hollow shaft and is held in place by a locking spring. It effectively is a hook the rest of the mirror sits in.
Here you can see the top and bottom views, the hollow shaft and the locking ring.
The hole in the mount is just under 1/4" at the top and just over 1/4" at the bottom. I got out my drill and drilled the top out to 1/4". You're really only shaving out the smallest amount of material on just the top lip. The fit is tight enough you'll have to thread the carriage bolt down in, which is the next step
I then got two carriage bolts 1/4" x 5" a couple of washers and 6 nuts. (edit: if you want more hanging room buy the 6" bolts and trim them if required.)
I fed the bolts down through the top of the mirror mounts. I had to thread them down by hand. You don't want to force them or beat on them. They will go with some easy turning. I had one that got tough at the final threads so I just double nutted the bottom and using a socket turned it down snug (so the square shoulder is resting on the top mirror flange.)
I then put on a washer, lock washer and a nut and spun them up to the bottom of the mirror, tightening them to secure the bolt thru the hollow mirror mount tube.
I installed one of the lights I already had on hand using two more nuts and washers. (one on the top and one on the bottom of the light bracket) for a test fitting.
The plastic mirror cover was held up and marked where the bolt came down (just behind the bottom snap in pin) and I trimmed it with an oscillating tool so the bolt would pass thru.
Here's what it looks like with the cover on.
I think they turned out very nice.
Costs were $1.25 for each bolt and 0.17 for each nut. I went with galvanized as the hardware store didn't have stainless in 5" length. I already had some washers and lock washers at home.
The lights seem secure and I nudged them up against the Tupperware with hopes there would be no vibration when driving.
I've not yet had them on the road as I still need to wire them up.
The only thing I'll add is this may not work for all lights. If they are wide they may not clear the Tupperware. I'd imagine they'd hold more weight than the 3d printed versions of the mounts though.
Hope this helps someone!
edit: I added a bit of black heat shrink tubing over the bolt to cover up the bit of bolt showing under the light. You don't want to shrink it, just let it cover the bolt. That way you can easily remove it if you have to remove the bolt to take the Tupperware off.
Last edited: