Hi, I have a 2003 ST1300. Trying to get to the alternator. I'm down to the throttle bodies. Have the clamps loosened, everything disconnected as per the manual (Haines). I am unable to lift the TB from their position. They feel locked in. Verified clamps are very loose. Manual says it a tight fit but they do not budge. Hoping somebody has any tips on breaking them loose.

You are using an out of date browser. It may not display this or other websites correctly.
You should upgrade or use an alternative browser.
You should upgrade or use an alternative browser.
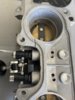
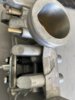
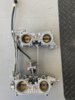
Throttle Bodies Removal
- Thread starter TFF
- Start date
The "ST1300 Articles" section will be your friend!
 www.st-owners.com
www.st-owners.com
Good luck!
Josh
ST1300 Articles
Article [13] - ST1300 - Throttle Body Removal/Sub-harness Replacement | ST1300 Articles
Throttle Body Removal and Sub-harness replacement In all of the procedures below follow the detail steps in the Service Manual. This documentation discusses only those items that are not in the SM or not covered adequately. If at all possible, ride the bike until the last segment of...
Good luck!
Josh
Use a pry bar on the left and right bolt on the back, it will take a good force to get them loose, they will pop out.
- Joined
- Feb 11, 2006
- Messages
- 8,050
- Location
- Jacksonville
- Bike
- GL1800 R1200RT NC700
- 2025 Miles
- 007920
This thread detailing my alternator R & R has some commentary and pictures:
www.st-owners.com
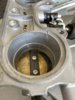
I took a piece of pipe and a nylon strap to pull upward on the throttle body frame. Use common sense and examine how any forces applied could warp or damage the throttle body frame then proceed with care. It will likely be helpful to squirt some silicone lubricate at the interface of the rubber intake tubes ( Honda calls them insulators ) and the throttle bodies. I did not do this and one or two of the insulators remained on the TB and the others remained on on the cylinder head intake stubs. It takes a good bit of force but applied evenly it will pop free.
Help removing ST1300 throttle bodies | ST1300 Related
With an apparent alternator failure I am at the point of removing the throttle bodies. I haven't done this before and am following the Service Manual procedure and came to the computer after completing access to them but not removed them yet. Are there any shortcuts here like not having to...
I took a piece of pipe and a nylon strap to pull upward on the throttle body frame. Use common sense and examine how any forces applied could warp or damage the throttle body frame then proceed with care. It will likely be helpful to squirt some silicone lubricate at the interface of the rubber intake tubes ( Honda calls them insulators ) and the throttle bodies. I did not do this and one or two of the insulators remained on the TB and the others remained on on the cylinder head intake stubs. It takes a good bit of force but applied evenly it will pop free.
A word of caution when following ANYONE’S advice for PRYING anywhere on/near the TB assembly….DON’T.
I have seen three damaged units that the owners followed advice shared on this forum, with using straps, pry bars, 2x4’s, and even bolted plywood to them to pry against etc.
The result(s) all the same, cracked housings, bent fuel rails, and about $5,000 in damage.
It amazes me that nobody notices that none of the service manuals instruct folks to pry on stuff!
Be sure you inspect for damage after following such advice.
Attachments
Kevcules
Site Supporter
If I was going to remove the throttle bodies, I think I would replace the rubber insulators while I had it off. Couldn't one try to spray some lube inside the crevices and then gently using pliers, try to rotate them to free them up. Once loosened up a little, they would separate much easier.
Good luck...
Good luck...
An easier method is to use an air gun with a long tube, and peen the end almost flat (spread out like a fan) then a needle oiler with several drops of acetone/ATF fluid (equal parts) or PB blaster on the edges, then slip the “fan” edge between the hose and fitting and one quick burst of air pops them off, just like removing handgrips.
- Joined
- May 27, 2021
- Messages
- 1,161
- Age
- 64
- Location
- Coquitlam British Columbia Canada
- Bike
- 2009 ST1300
Certainly not advice here only how it seems to me. Consider the source - never done it, I know nothing! Nothing!
Just plucking my slightly angled duel sequential carb assembly out of the boot a couple times was bad enough. Parts! I can't get any of those parts, moral of the story there - always drain the bowls.
I've read a fair bit including the manual on removing the assembly, I was close to doing it but had no cause to risk it other than wanting to clean out and inspect the vee area, check and flush out the drain area, well not gonna happen this go round. I found every TB clamp only finger tight, I believe the correct setting is supposed to be a 7mm gap, in any event I applied a bit of force and the assy is rock solid. I'm pretty sure the only way I would attempt it when the time comes is to mark up the assembly for reference then loosen or disconnect the interconnecting brackets between the two banks, then I'd only be wrastling a TB pair in line with their respective boots albeit a small amount at a time going from 13 to 24. Then at reassembly set the loose assembly upside down onto the lower air box for a final compliant fit check, then maybe tighten it up and try to press it back in as a rigid assembly, or just check and adjust the initial marks, and fit it down loose one side at a time. I might be messing with a jigsaw slinky trapazoid mess but maybe not a broken mess. Like I say, if I jump off a bridge, doesn't mean.. well you know what I mean, just how it seems to make the most sense looking at it.
- Joined
- May 27, 2021
- Messages
- 1,161
- Age
- 64
- Location
- Coquitlam British Columbia Canada
- Bike
- 2009 ST1300
I waited two years for that post, and just when I thought I might never see it...
The ST1300 articles are my friend indeed! It was the rocking back and forth while prying on it, mentioned in the article, that did it. Thanks so much Josh, really appreaciate it. I'm new to the site and still figuring out how to get around. Its great.Hi, I have a 2003 ST1300. Trying to get to the alternator. I'm down to the throttle bodies. Have the clamps loosened, everything disconnected as per the manual (Haines). I am unable to lift the TB from their position. They feel locked in. Verified clamps are very loose. Manual says it a tight fit but they do not budge. Hoping somebody has any tips on breaking them loose.
STmark1300
Ron
I was just down to the TB this week for the first time. I cleaned it from the top. It looked very precision. I got the air box all cleaned and put it back together. I am not looking forward to working on the TB.Certainly not advice here only how it seems to me. Consider the source - never done it, I know nothing! Nothing!
Just plucking my slightly angled duel sequential carb assembly out of the boot a couple times was bad enough. Parts! I can't get any of those parts, moral of the story there - always drain the bowls.
I've read a fair bit including the manual on removing the assembly, I was close to doing it but had no cause to risk it other than wanting to clean out and inspect the vee area, check and flush out the drain area, well not gonna happen this go round. I found every TB clamp only finger tight, I believe the correct setting is supposed to be a 7mm gap, in any event I applied a bit of force and the assy is rock solid. I'm pretty sure the only way I would attempt it when the time comes is to mark up the assembly for reference then loosen or disconnect the interconnecting brackets between the two banks, then I'd only be wrastling a TB pair in line with their respective boots albeit a small amount at a time going from 13 to 24. Then at reassembly set the loose assembly upside down onto the lower air box for a final compliant fit check, then maybe tighten it up and try to press it back in as a rigid assembly, or just check and adjust the initial marks, and fit it down loose one side at a time. I might be messing with a jigsaw slinky trapazoid mess but maybe not a broken mess. Like I say, if I jump off a bridge, doesn't mean.. well you know what I mean, just how it seems to make the most sense looking at it.
Superdirk
Site Supporter
Guess I got lucky with the crow-bar method. Blessings duly counted...
Superdirk
Site Supporter
Admittedly, I also count ignorance as bliss/a blessing.
Share: