Water pump valve gasket leaking

Joined
Apr 14, 2021
Messages
63
Age
42
Location
California
I really love my ST. She teaches me a lot of lessons about myself.

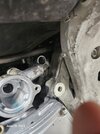
Tonight, I think I fixed the leak up top. I had a very slow coolant leak coming from the v. It just drove me nuts when I realized what a mess it makes when you start putting on the miles.

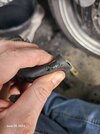
I went to install the water pump valve cover. When I tried to get the gasket to fit I must have twisted it. I couldn't get it back in the penis shape.

Well she's leaking, really leaking - like the drip has a heartbeat.

Do I need to buy a new gasket or can I just get this over with another 2 hours of my own dumb ass labor?
 
Where is it leaking at?
The round mechanical seal weep hole, or the square exit point of the front cover?
How far did you take the bike apart?
You could have over tightened the clamps on the pipes causing leaks, pinched or tore your gasket o ring, or lost your coolant mechanical seal and water pump.
Pictures or videos would help.
Square hole. I almost know it's the gasket. It didn't take that shape like on the spec sheet
 
There are a few things you can do to install that correctly.
Did you replace the alignment dowls with new ones?
Go to the hardware store and pick up 5 or 6 6mm bolts (long shoulder) about three inches long. Take a dremel tool or hacksaw and cut the head off, stick the bolt in a drill and clean it up smooth.
These are used as alignment fowls when putting a cover back on square so you don’t pinch anything.
Screw them in around the diameter of the cover, then slide the cover onto the bolts, seat it square, then simply remove the bolts, and put the cover ones back on.
Don’t use any gasket sealer on the new seal, it’s not needed.
You can warm the o ring up in warm water, or hair drier.
Don’t just shove it in the groove, start with the round end then work it around gently.
You’ll see little bumps in the cover that will hold it in place.
Try again, go slow, have patience.
Let us know how it turns out.
 
All attempts to get this thing to seal have failed. At this point I'm under the impression that the brass brush I bought at Autozone might have been too rough on the mounting surface when I attempted to clean off some of the gasket residue. I can see very small scratches on the mounting surface; so small I can't even feel them with my nails, but were talking about coolant here. I've even gone as far as ordering a new water pump valve cover along with new dowels. I'm exercising the nuclear option; when I purge the system of coolant, I'm going to let everything dry and I'm going to use Permatex 22071 (Water Pump gasket maker) along with the rubber gasket.

Has anyone had to resort to this kind of approach to getting the water pump valve cover to seal?
 
Phewww. Looks like it might be the thermostat cover now, "possibly" not the water pump cover. It was bone dry up there when this all started, but my little endoscope showed signs of dampness

I must also profess that I used very fine steel wool to clean both covers (thermostat and water pump).... lesson learned.
 
Are you sure you didn’t over tighten the clamps on the radiator?
The leaks follow the hose down and it mimics a loose cover or clamp.
It’s too easy to crush the pipes into an egg shape even with a screwdriver etc.
If you find you damaged the pipes, you can true them up with two ball peen hammers.
 
@Igofar I found the problem after several days of playing "process of elimination". Its part number 19506-MCS-010; a coolant hose that had cracked through normal wear and tear. I'm going to replace this hose along with the two hoses that connect directly to the radiator for now (as they also have small cracks). During the winter, I'll pop the throttle bodies off and replace every hose sitting on top of the engine. Right now I just want the bike in riding condition so I can enjoy the summer weather.

I cannot tell you guys how valuable it is to have an endoscope in your tool-box along with this amazing forum.
 

Attachments

  • Screenshot 2023-05-31 143728.jpg
    Screenshot 2023-05-31 143728.jpg
    81.6 KB · Views: 27
  • 20240625_182738.jpg
    20240625_182738.jpg
    115.5 KB · Views: 28
You don’t have to remove the TB to replace any/all hoses, and could risk further damage to the old insulator boots etc.
You should replace the o-rings under the water pipe fittings if you’re going after all of the possible leaks.
You may also want to replace the style clamps with breeze constant tension clamps, don’t need them, IF, you are willing to go deep at every Coolant change and snug down the cheap two piece Honda worm clamps etc.
I put 100k on mine after replacing the clamps, and never had another leak.
Good find.
 
With the miles I have put on the ST1300(s), those little leaks can be a real PIA!

In 2013, I sold my first St1300 with 174.3K miles on it to one of my sons. It had a small coolant leak so he took it apart and replaced all the hoses and used Gates Thermoplastic clamps on the larger hoses. And 11 years later and about 16K miles, he's about ready to replace them, but not because of any leaks from the clamps.

So in 2014, I replaced all the hoses on my 2004, using the Gates clamps, like Justin did, and didn't have any issues until the waterpump went bad and then due to my other ST1300s, it sat in a shed for 4 years, and then it took me another three years before I got it back on the road. It's documented here:

Restoring my 2004#1


DSC03738.JPG

So if you get to that point that you want to replace all of your hoses, take those into consideration.

And "Yes", I removed the throttlebody to get to them all! Even the hoses that run down to the oil cooler.
 
Well, the deed is done. I replaced both radiator hoses and the leads going to the thermostat housing. I must have pulled the radiator on and off at least three times trying to figure out what was going on. I thoroughly enjoyed playing "surgeon" with the clamps on the hoses leading to the thermostat housing.

Five minutes after firing it up, not a goddamn drop. Felt strangely satisfying.

I'm already ordering replacement hoses for the old coolant lines - that'll be a November/December job though.

Question about those thermoplastic bands, how do you get heat on the areas facing the intake?
 
Last edited:
Question about those thermoplastic bands, how do you get heat on the areas facing the intake?
I don't know how Justin did it, but I have seen hot air guns with an attachment that fits on the end. Look at the picture below. Some of the ones I have seen have a longer curved piece that sort of cups the heat shrink tubing. You could probably make one out of aluminum flashing. Should you use the constant tension metal Gates clamps, you will have to assemble all the hoses and clamps before tightening any. That spring on the Gates clamps is large enough that adjacent clamps will require careful positioning before tightening. I remember loosening and repositioning some three times before I got them all just right.
Screenshot 2024-07-04 at 11.04.59 AM.png
 
You don’t have to remove the TB to replace any/all hoses, and could risk further damage to the old insulator boots etc.
You should replace the o-rings under the water pipe fittings if you’re going after all of the possible leaks.
You may also want to replace the style clamps with breeze constant tension clamps, don’t need them, IF, you are willing to go deep at every Coolant change and snug down the cheap two piece Honda worm clamps etc.
I put 100k on mine after replacing the clamps, and never had another leak.
Good find.
O-rings under the water pipe fittings? Are you referring to thermostat housing o-ring? I did replace that as well.
 
I don't know how Justin did it, but I have seen hot air guns with an attachment that fits on the end. Look at the picture below. Some of the ones I have seen have a longer curved piece that sort of cups the heat shrink tubing. You could probably make one out of aluminum flashing. Should you use the constant tension metal Gates clamps, you will have to assemble all the hoses and clamps before tightening any. That spring on the Gates clamps is large enough that adjacent clamps will require careful positioning before tightening. I remember loosening and repositioning some three times before I got them all just right.
Screenshot 2024-07-04 at 11.04.59 AM.png
Thanks for this! I actually have said attachment for my heat gun. Never occurred to me to use it in this capacity. I believe I saw a pinned article about these clamps. I'm pretty sure I can get sizing from there to place my order.
 
With the miles I have put on the ST1300(s), those little leaks can be a real PIA!

In 2013, I sold my first St1300 with 174.3K miles on it to one of my sons. It had a small coolant leak so he took it apart and replaced all the hoses and used Gates Thermoplastic clamps on the larger hoses. And 11 years later and about 16K miles, he's about ready to replace them, but not because of any leaks from the clamps.

So in 2014, I replaced all the hoses on my 2004, using the Gates clamps, like Justin did, and didn't have any issues until the waterpump went bad and then due to my other ST1300s, it sat in a shed for 4 years, and then it took me another three years before I got it back on the road. It's documented here:

Restoring my 2004#1


DSC03738.JPG

So if you get to that point that you want to replace all of your hoses, take those into consideration.

And "Yes", I removed the throttlebody to get to them all! Even the hoses that run down to the oil cooler.
Wow. That install looks clean! I definitely don't want to this again anytime soon so I will be trying these clamps out when i get to pulling the throttle bodies. Love hearing about owners maintaining their STs to mileage markers like 170k miles.
 
Back
Top Bottom