What did you do with your Yamaha today?

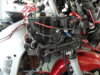
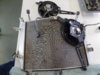
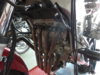
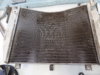
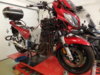
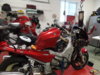
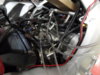
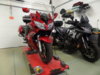
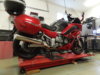
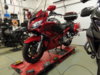
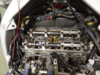
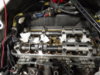
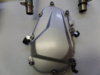
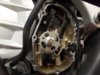
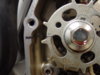
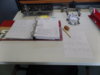
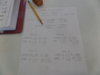
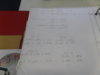
Just finished for today with the valve check. All in Spec, but on the tight end of spec. All the same as the last 25k check I did 4 years ago. No change. (and I did not cheat) I guess I could pull the cams and bring them all to the middle or loose end of spec, but spec is spec and why fix what is not broke. Next check will be at 75k. Don't know if I will still have the bike by then. Need to trim the herd and The FJR is getting heaver each year for my age. (72) Here are some pictures of todays garage time. Tomorrow I will need to go order some gaskets, as I tore the Pickup Rotor cover gasket. Need to replace the valve cover Gaskets as I do not want any leaks, and I need a couple of O-rings for the coolant tubes that fit into the head. Also need to pick up some coolant. I use the Honda Auto Coolant. Half the price as the Moto coolant, and it is the same stuff.
 

Attachments

  • SAM_6484.JPG
    SAM_6484.JPG
    161.5 KB · Views: 14
  • SAM_6485.JPG
    SAM_6485.JPG
    151.1 KB · Views: 14
  • SAM_6486.JPG
    SAM_6486.JPG
    81.3 KB · Views: 13
  • SAM_6488.JPG
    SAM_6488.JPG
    116.3 KB · Views: 13
  • SAM_6489.JPG
    SAM_6489.JPG
    108.9 KB · Views: 13
  • SAM_6490.JPG
    SAM_6490.JPG
    87 KB · Views: 13
  • SAM_6491.JPG
    SAM_6491.JPG
    60.4 KB · Views: 13
  • SAM_6492.JPG
    SAM_6492.JPG
    57.1 KB · Views: 14
Last edited:
why fix what is not broke
Exactly, not to mention by doing it you add risk of messing something up, even though I'm sure you wouldn't but risk is risk and better to avoid when possible. Good job, but I'm surprised you took any pics without first cleaning up everything lol
 
Well, unlike Chuck I merely rode my Tenere 700 for the first time in a week after we had an ice storm. I can hardly wait to check/shim the valves on my Yamahas! I have been lucky on my two previous Super Teneres in that all clearance were in spec.
 
Well, unlike Chuck I merely rode my Tenere 700 for the first time in a week after we had an ice storm. I can hardly wait to check/shim the valves on my Yamahas! I have been lucky on my two previous Super Teneres in that all clearance were in spec.
Wednesday it will be near 70 Degrees and I am going to take the V-Strom out for a spin. The FJR can sit and wait. Gotta GO RIDE.
 
After checking the valves on the FJR, and all were in Spec, I determined that I needed to order some O-rings, a rotor cover gasket, and I needed a new valve cover Gasket. The old one was hard and cracked. Maybe I could of reused it but don't want to go back into the motor again until the next valve check. So yesterday morning I went down to the Dealer and ordered the parts. Was told it would be a week or so before the parts were in. Great . I went ahead and finished the rest of the maintenance that I could without a running engine. I decided that now I have a bit more time I would pull the radiator off and soak it overnight in water to loosen the bugs and insect parts that have penetrated the cooling fins over the last 50,000 miles. However not today. Time to GO RIDE. Took the Wee (V-Strom 650) out for a 140 mile spin into the foothills. Roads were sanding and messy with the snow melt off but the weather was beautiful, 65 degrees in the foothills, and 75 in the city. Another gorgeous Colorado Day. We will be paying for it this coming weekend. Another snow storm is coming in Saturday night. Here are some pictures of today’s ride.
 

Attachments

  • SAM_6494.JPG
    SAM_6494.JPG
    156.9 KB · Views: 11
  • SAM_6496.JPG
    SAM_6496.JPG
    252.6 KB · Views: 11
  • SAM_6498.JPG
    SAM_6498.JPG
    253.5 KB · Views: 10
  • SAM_6500.JPG
    SAM_6500.JPG
    234 KB · Views: 10
  • SAM_6502.JPG
    SAM_6502.JPG
    241.4 KB · Views: 10
  • SAM_6503.JPG
    SAM_6503.JPG
    232.3 KB · Views: 10
  • SAM_6504.JPG
    SAM_6504.JPG
    251.6 KB · Views: 9
Great photos Chuck; always go riding if you can, you never know when you can't, and then it's too late. I just keep riding my MT, and was out on it last night enjoying early Autumn conditions.IMG_2938 (1).JPG
 
After yesterday’s ride it is time to get back to the garage and continue the service on the FJR. After getting the wife Mazda CX5’s oil and filter change this morning (I took it to the Dealer Shop. Worth the 47 dollar special, so I don’t have to crawl around under the car on my back), I am back in the garage. I removed the radiator to give it a good soaking in the wash tube. After 50000 miles and 7.5 years I figured it was time to get all the bug guts out of it. Because I have to wait for my gaskets for the valve cover I have the time. Not too bad of de-installation except for the last mounting bolt. It lives up behind the battery / computer box panel. This needs to be pulled back about an inch and a half to have access to the last rad mounting bolt. PITA getting to those bolts hidden in behind the main wire harness. Time consuming and a “patience buster”. But the Rad is out and now soaking in the washtub sink. A sink full of Hot Water and some Dawn Dish Soap to soften up the bug guts. Amazing how much was hiding in the Rad fins. If you do this your self be careful with the tiny cooling fins. Use a soft rag and light pressure to wipe the Rad surface off. Avoid poking at it with any tools. IE screw drivers, dental picks, sharp objects. ETC. Here are some pictures. O Don’t for get to remove the fans
 

Attachments

  • SAM_6507.JPG
    SAM_6507.JPG
    153.1 KB · Views: 9
  • SAM_6508.JPG
    SAM_6508.JPG
    171.7 KB · Views: 9
  • SAM_6509.JPG
    SAM_6509.JPG
    137.6 KB · Views: 9
  • SAM_6510.JPG
    SAM_6510.JPG
    240.9 KB · Views: 9
  • SAM_6511.JPG
    SAM_6511.JPG
    168.2 KB · Views: 9
  • SAM_6512.JPG
    SAM_6512.JPG
    90.4 KB · Views: 9
Well, finally got the Radiator cleaned and reinstalled, and also my new gaskets came in. Installed the engine valve cover, (pain in the ass. Don't try and short cut this. Remove the throttle cables from the T-body unhooked the connectors of the main wiring harness from the ejectors and fuel rail and moved them all out of the way. Made reinstalling the valve cover a lot easier. This way it is easier to check that the gasket is seated properly. I then use an inspection mirror and flash light to go around the cover and verify that the gasket was properly seated. Installed new spark plugs, installed the coils and reconnected the main harness connectors reinstalled the Air Induction System plumbing and re-hooked up the throttle cables, another real PITA that required all of my allotted patience for the next year. Reinstalled the tank, refilled the coolant system. Changed the oil and filter along with the rear drive fluid. Installed new air filter. Started the bike up, started right up. No knocks, no grinding, no leaks. Ran a couple of heat cycles to burp the cooling system. All is well. Then set the bike up to do a throttle body sync tomorrow. And then start putting her cloths back on.

Note: Some folks may have an easer way of installing the valve cover with out undoing the harness and throttle cables. If it works for you great. More power to you. Many different ways to accomplish a single task.
 

Attachments

  • SAM_6519.JPG
    SAM_6519.JPG
    156.7 KB · Views: 8
  • SAM_6520.JPG
    SAM_6520.JPG
    125.6 KB · Views: 8
Finally finished the 50000 mile maint. list for My 2014 FJR (Ruby FeeJeR) Finished up the Throttle Body Sync. Was still with in spec from last time No adjustments were required but tweaked them just the same. She now has all her cloths back on and is looking quite attractive. No left over hardware, No shortage of hard ware, all fasteners went back in their proper places. She is good for another 25 k miles. Next on the list is the 16k mile service for my 2019 Versys SE LT. But I think I will wait a week or two for that.
 

Attachments

  • SAM_6522.JPG
    SAM_6522.JPG
    116.1 KB · Views: 7
  • SAM_6523.JPG
    SAM_6523.JPG
    140.6 KB · Views: 7
  • SAM_6524.JPG
    SAM_6524.JPG
    139.2 KB · Views: 7
  • SAM_6525.JPG
    SAM_6525.JPG
    161.4 KB · Views: 7
Last edited:
Took the FJR out for a spin to close out My July Motor Miles. Rode over to Wolfensberger Road, in Castle Rock and then south on HW105 to Palmer Lake. Then backtracked back home. About a 130 mile run and 4 hours today. ( Here is a file photo of mine on Wolfensberger Rd )
https://goo.gl/maps/qHAGjcHN9tSnGjjP9

SAM_1277.JPG
 
After two years and almost 10000 miles it is time once again to re-shoe the FJR. So yesterday I went down to Performance Cycle here in Centennial, Colorado and bought some Road Smart 3"s for her. I had been running RS 4s but I seem to get the same mileage out of both the 4s and the 3s so I went with the 3's this time (less money) and the handling feels the same to me. I am too old to really push the limits of the tires. Today I remove both rear and the front and will wait until I get a cool morning before I mount them. May be Monday. Here are a few pics.


New Tires awaiting
Tire Wheel Vehicle Automotive tire Motor vehicle


Rear removed with axle and parts in place so as not to forget how they go.
Motor vehicle Automotive tire Hood Wheel Vehicle


Another shot of her rear.
Wheel Motor vehicle Automotive tire Tire Vehicle


Now to the front. Wheel Removed
Tire Wheel Vehicle Automotive lighting Automotive tire


Another shot of the front with axle in place with spacers so as not to lose them or forget which side they go on.
Automotive tire Motor vehicle Automotive lighting Automotive fuel system Automotive design


Now she just waits until I get motivated to change the tires on the wheels
Tire Wheel Automotive tire Vehicle Tread


Wheel Tire Automotive tire Motor vehicle Automotive design


For me it is break time. Almost getting to be too much work for an old guy like me. In a week and a half I will be 74
Wheel Tire Shoe Automotive tire Automotive design
 
Last edited:
I unboxed my new Yamaha Super Tenere rear wheel kit……found this super deal about a month ago surfing the net. $460.00 for a complete rear wheel laced up, bearings, seals, spacer, and bolts/screws to mount the brake disc/ABS ring. It will be good to have a second tire mounted up all the time…….at my leisure.
IMG_2321.jpegIMG_2320.jpeg
 
Last edited:
Today it was FJR Tire Changing /Mounting time. I forgot how much of a pain in the butt the rear tire on the FJR was to remove. Next time it goes to the Moto shop to be done. Worth the 30 bucks. Front tire was no problem. Took five min. to remove and another five min. to mount.


Breaking the bead on the rear tire. Took almost an hour to get that old tire removed and the new one mounted.
sam_7824-jpg.94828


Old front tire removed. Break Time before mounting the new tire.
sam_7825-jpg.94829


Going thru the process of balancing the tires.
sam_7826-jpg.94830


All mounted and ready to go back on the bike in the next couple days. (Monday) Think I am going to Go Ride tomorrow with one of my other bikes.
sam_7827-jpg.94831
 
Today I left the FJR footless on the lift with her new shoes waiting to be reinstalled, and I went riding with my Big Versys, before the rains come. I will reinstall the wheels tomorrow.

sam_7827-jpg.94854


20230509_130418-jpg.94855


sam_4315-jpg.94856


Chuck Henderson (US Army RET 1968-1991) (Forever Home – Colorado) STOC# 086,
RIDE a little FASTER, RIDE a little FURTHER
14 FJR1300A (Ruby FeeJeR) 17 Versys 300X(Little Gray Bike) 19 Versys 1000LT SE (Flying Nun) 13 Vstrom 650(Wee III)
Log into Facebook
 
I had to replace a tire whilst on tour today. Not the bargain way to do it.71616874538__DAB4E578-534C-4C43-B169-B32F5D00E950.jpeg71617096841__2B992D56-7BCD-4629-B0DD-C47954D6E117.jpeg
The last time I ran out of rubber before I ran out of trip , I finished the trip with a new bike. That was almost 9 years ago. Now the bike is not new anymore.
 
Last edited by a moderator:
Thanks to @jaroslawjaroslaw1234. pictures, over on the FJR site, I went and repaired my Neutral switch. Even it you only have one wire loose you will need to resolder all of them. Make sure you write down which color wire goes to which contact. You can bench test before you completely install the switch and assemble the the bike. Plug your repaired switch back into the harness, Turn on the bike key, use a jumper wire that is connected to ground and touch the contacts on the switch housing. Then watch the display, does the correct number come up for the correct contact position? If so, then you have the wires soldered in the correct contacts. I used a Silicone sealant that I had laying around the house to reseal the switch housing. Today after 24 hours I took the bike out for a 50 mile test ride in town where I needed to do a lot of up and down shifting. All works now. Total cost was bout 3 hours of my time. Saved 80 to 100 bucks on a new switch. We will see how long this last.
 

Attachments

  • SAM_8366.JPG
    SAM_8366.JPG
    98.4 KB · Views: 2
  • SAM_8368.JPG
    SAM_8368.JPG
    93.1 KB · Views: 2
  • SAM_8369.JPG
    SAM_8369.JPG
    78.7 KB · Views: 2
  • SAM_8372.JPG
    SAM_8372.JPG
    84.9 KB · Views: 2
You almost can't give a VStar away these days; never has the point - If you're not in love with it, don't buy it been more true. Will be riding my Yamaha in the coming weekend to exercise the parts and flush the carbs, a lot of things come to mind in the five years I've had it, first, wow what a great bike, had a weird vibration through the right handlebar, turned out to be a problem carried over from the previous owner. Second was, how long does a motorcycle battery last? Bought in 2017, charge once in a while, guess we'll see.
The same bikes that I've watched in my neck of the woods... are still for sale... like three years later, could it be the air cooled, carburated, shaft drive, harley knock off looks, one can only imagine, in any event, this was my one and only foray into this style of motorcycle for it's own sake and I'm glad I picked it up. I recall [after the carb fix] thinking, I could never buy another motorcycle and miss nothing.


IMG_8661.JPG
 
Back
Top Bottom