1992 ST1100

Joined
Aug 7, 2019
Messages
20
Location
Vestland
After riding today I notised a leak. At first I thougt it was oil, but the green gave it away... It was coolant.
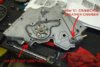
It seem to be coming from (see picture) a cover next to the Clutch master cylinder.
Small drops of green formed under the bolt (red cross). I could not see any traces of the colant coming from the top.

Is there any connection to the radiator there, or might this be comming from the standard carb, colant problem?

View attachment 255365
 

ST1100Y

Site Supporter
Joined
Dec 4, 2012
Messages
5,039
Age
59
Location
Vienna, AuSTria
Bike
ST1100Y, ST1100R
STOC #
637
Seepage at that spot is most likely caused by a failing mechanical seal of the pump...
A slim chance that it's only the internal bypass (thin hose behind cam-belt housing tending to get brittle from the heat), but considering age & mileage I'm thinking w/pump...
In any way will investigation require pulling the carbs and, if it's indeed the pump, removal of radiator and t/belt...
And you'll might use the chance to inspect and replace a number of other things while already in there that deep, just as a measure of PM...
 

ST1100Y

Site Supporter
Joined
Dec 4, 2012
Messages
5,039
Age
59
Location
Vienna, AuSTria
Bike
ST1100Y, ST1100R
STOC #
637
Going on a 7 day trip 6th of june...
Uoops... better get in gear then...

Good source for looking up part numbers (fully fiche avail) and price base (or purchase if you can't get it someplace else):
Good source for buying parts:
Then of course eBay and your local Honda stealer...
 

John OoSTerhuis

Life Is Good!
Joined
May 10, 2005
Messages
5,221
Location
Bettendorf, Iowa
Bike
1991 SSMST1100
STOC #
1058
If you’re lucky, it’s the bypass hose at the water pipe. If not, it’s the water pump bearing seal (more likely) like Martin indicated. FirST thing, check the little rectangular water pump weep hole for signs of leaking/discharge. It’s hard to get a view of it but can be done. I can dig up a picture if needed. Good luck.

John
 
Last edited:
Joined
Mar 13, 2012
Messages
5,071
Location
soCal
Bike
'97 ST1100
STOC #
687
Question for you guys who may have had the bypass hose failure, does that leak to the front like he's seeing? Since the other hoses under the carbs drain to the rear, I'd have thought the bypass hose might also drip to the rear (if its the one I'm thinking of that goes from the water pipe over to the stat housing).

If its the water pump seal, then how's the parts distribution network been working during covid, will parts acquisition be an issue given his three-week repair schedule? I seem to recall reading that the pre-96 or so water pumps are no longer available and he'll have to order a later model pump and plug the oil cooler hoses. Or, are people doing seal/bearing replacement on their existing pumps with decent success rates? I know a couple people have reported cracking the pump housing trying to get the bearings in/out.
 

ST1100Y

Site Supporter
Joined
Dec 4, 2012
Messages
5,039
Age
59
Location
Vienna, AuSTria
Bike
ST1100Y, ST1100R
STOC #
637
Question for you guys who may have had the bypass hose failure, does that leak to the front like he's seeing?
Had the pump seal failing way back on my '92, and this dripped just at the spot shown above, leaking through the t/belt case...
 
Joined
Mar 13, 2012
Messages
5,071
Location
soCal
Bike
'97 ST1100
STOC #
687
yeah, it sure seems like a pump seal leak to me as well. So that's why I was asking about parts availability within his time limits. Don't know how fast his little dribble leak might get worse, it might be worth going on the trip with the little dribble and fix it upon returning when time isn't a factor. If he tears it apart now and can't get parts in time, then his trip is off.
 
Joined
Sep 10, 2011
Messages
2,210
Location
West Michigan
Bike
'98 ST1100
STOC #
8470
I wouldn't take a chance during a 7 day trip. Plenty of time to replace or rebuild the water pump and replace the timing belt and pulleys.
 
OP
OP
Joined
Aug 7, 2019
Messages
20
Location
Vestland
But is all this located under the carbs? or do I need pull the top and front appart? Seem like a whole lot of tupperware to get there he he

If anyone has pictures of were, and what to look for. Please share :)
 
Joined
Feb 25, 2016
Messages
4,785
Location
Northumberland UK
Bike
VStrom 650
Haven't done the water pump so can't help there, but.............
The plastics come off OK and if you're removing half of them you might as well remove the lot in front of the tank and the side pieces too. You may have leaks from other hoses that you won't see until the plastics are off. Once they're removed take off the air filter housing and you should have a pretty good idea where it's coming from. Remember to cover the air intakes, really well.
Get around a dozen little sealable bags that you can put the fasteners in for each panel and attach them to which panel they refer. Will save lots of head scratching later.
You're in the dark until you rip into her.
Upt'North.
 
Joined
Jul 28, 2007
Messages
3,144
Location
finger lakes ny
Bike
1999 ST1100
STOC #
7959
Get around a dozen little sealable bags that you can put the fasteners in for each panel and attach them to which panel they refer. Will save lots of head scratching later.
Or just put em back in the hole they came out of and they're ready to go.
 
Joined
Mar 13, 2012
Messages
5,071
Location
soCal
Bike
'97 ST1100
STOC #
687
Seem like a whole lot of tupperware to get there he he
there's a fair amount more work than removing tupperware, but if you've wrenched on bike engines before its not terribly difficult.

You'll have to take the front of the bike off to get access to the water pump.

1. Remove front wheel, both forks and fender.
2. remove radiator and hoses
3. remove front engine cover to gain access to water pump, timing belt, pulleys.
4. align engine timing in preparation for timing belt removal.
5. remove timing belt and the left side (while seated on bike) cam gear (to provide a path to get the old pump out). Also remember to order new gasket for the cam gear for re-assembly.
6. remove water pump.

while you're in there you'll need to decide on what else you may want to replace. The timing belt and its pulleys are wear items that you may want to consider replacing while you're at it.

And, are you going to replace the pump, or try to rebuild it?? As mentioned before, the 1992 water pump is no longer available from Honda, but the later model pumps will bolt in, you'll need to block off the hoses to the oil filter because later models did not have those lines. Be prepared for a little shock when pricing a new water pump.

after putting the new pump in you'll need to make sure you have the timing set right when re-installing the cam gear and timing belt.

upon re-assembly there's a little grinding work that may be necessary on the front cover to get it back on behind the clutch cover. There's an article online somewhere that shows what needs to be done, its easy.
 

ST1100Y

Site Supporter
Joined
Dec 4, 2012
Messages
5,039
Age
59
Location
Vienna, AuSTria
Bike
ST1100Y, ST1100R
STOC #
637
I'd say with all parts at hand and a proper set of tools we talk about 1,5~2 days in the hangar; or one long day with the risks of getting skittish, forgetting things, etc...
A bike lift is a very good item for this task, keeping backache at bay...

I'd go for the following:
- new carb boots/isolators
- overflow drain hoses
- the coolant hoses in the cylinder valley (+ the small bypass tube)
- the 2 elbow fittings + O-rings
- overflow hose (routed towards expansion vessel)
- thermostat + O-ring + radiator cap
- water pump + gasket kit (alternative is to get the rep kit for the mechanical seal, but you'll still need new housing gasket)
- T/belt + spanner + idler pulley
 

John OoSTerhuis

Life Is Good!
Joined
May 10, 2005
Messages
5,221
Location
Bettendorf, Iowa
Bike
1991 SSMST1100
STOC #
1058
IMO, confirm the source first, check the water pump weep hole before pulling carbs. Sorry, I don’t have a good in situ image. Here’s one I poSTed here years ago:

1589829107136.jpeg

It’s just below the oil cooler hose’s nipple when viewed from below, left side, lower fairing removed (easier yet with the middle fairing off). HTH

Edit - if the water pump seizes, the timing belt fails and the valves are destroyed (interference engine).

John
 
Last edited:

ReSTored

Site Supporter
Joined
Nov 6, 2005
Messages
1,482
Location
Mississauga, Ontario
Bike
2019 Tracer GT
STOC #
4463
Get around a dozen little sealable bags that you can put the fasteners in for each panel and attach them to which panel they refer. Will save lots of head scratching later. You're in the dark until you rip into her.
Or just put em back in the hole they came out of and they're ready to go.
I'd say with all parts at hand and a proper set of tools we talk about 1,5~2 days in the hangar; or one long day with the risks of getting skittish, forgetting things, etc... A bike lift is a very good item for this task, keeping backache at bay...

I'd go for the following:
- new carb boots/isolators
- overflow drain hoses
- the coolant hoses in the cylinder valley (+ the small bypass tube)
- the 2 elbow fittings + O-rings
- overflow hose (routed towards expansion vessel)
- thermostat + O-ring + radiator cap
- water pump + gasket kit (alternative is to get the rep kit for the mechanical seal, but you'll still need new housing gasket)
- T/belt + spanner + idler pulley
^ Yes. Also take lots of pictures as things come apart.

Do you have a shop manual? I wouldn't be starting this without one. Honda manual is good, as is Clymer's. Check out the ST-Riders site as well, lots of great info there.
 
OP
OP
Joined
Aug 7, 2019
Messages
20
Location
Vestland
I opend the top to check for leaks under the carbs, but noting there. The space in my shed it way to small for me to take apart the front to get to the radiator :(

On the other hand. I have now driven 2 days in a row, and not a drop under the bike or in the front. I can smell it thou....
 
Joined
Feb 25, 2016
Messages
4,785
Location
Northumberland UK
Bike
VStrom 650
I opend the top to check for leaks under the carbs, but noting there. The space in my shed it way to small for me to take apart the front to get to the radiator :(

On the other hand. I have now driven 2 days in a row, and not a drop under the bike or in the front. I can smell it thou....
Have you checked the radiator level at the radiator and at the header tank? Also check the condition of the expansion hose to the header tank, they split at the front with age, if it is split you can cut it back and reattach if there's enough spare. Had the bike been parked for a long time before this happened?
Upt'North.
 
Joined
May 8, 2018
Messages
1,962
Location
illinois
Bike
2000 ST1100
I opend the top to check for leaks under the carbs, but noting there. The space in my shed it way to small for me to take apart the front to get to the radiator :(

On the other hand. I have now driven 2 days in a row, and not a drop under the bike or in the front. I can smell it thou....
Well when I first starting riding my 1100 that being the first ride of the season I smelt coolant too. My bike did this for a week and quit. I think i know what happened is my coolant hoses contracted in the cold garage and seeped a little coolant in the valley of the carbs. Over a weeks time it either evaporated out or was blown out by riding the bike. I do not smell it now. Sometimes during its winter hybernation it will put a couple drops on the garage floor on the left side or front side of the bike. I don't worry about it because its been doing this for years. But as my bike ages i keep thinking well maybe next year i'll do it. I still have all original hoses and yes they do get old and burst. This weekend i have a 200 mile trip planned.....hope i sure didn't just jinxed myself.
 
Top Bottom