Hello all! I have a 2006 ST1300 that needs a brake pedal switch. Anyone done one of these? I want to attempt to replace it myself but don't really know how. Thanks in advance!

You are using an out of date browser. It may not display this or other websites correctly.
You should upgrade or use an alternative browser.
You should upgrade or use an alternative browser.
2006 ST brake light switch repair
- Thread starter Matthewkk
- Start date
You sure it doesn't just need an adjustment or loose connection fixed?
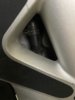
How would go about adjusting it? I think you can see it through this little rubber covered window above the brake pedal.You sure it doesn't just need an adjustment or loose connection fixed?
Attachments
My HSM (honda service manual) says to remove the right middle cowl to test the switch, so I would guess that should get you enough clearance to adjust it. Since you have to take off the right lower cowl first, you might take a look to see if you can reach it without digging deeper. You should get your own shop manual, - they go for around $50 used. Btw, go to the top of this page, click on Articles in the blue band and scroll down to the ST1300 section. I think on page 2 you will find the Tupperware Worksheet. Look at that, and John Heath wrote one article on installing the fairing.In fact, there is enough there to keep you reading for a month of Sundays.
An addendum to my earlier post. That quote I gave you was to test the switch. To adjust it, the manual simply says to hold the switch body and turn the adjuster. Yes, sometimes the manual is as clear as mud. I'd pull the black textured lower cowl and see what kind of acces this gives you. Maybe someone else who has done this will chime in. I suspect you will have to remove the middle cowl to get to the top to disconnect it from the wiring harness.Hello all! I have a 2006 ST1300 that needs a brake pedal switch. Anyone done one of these? I want to attempt to replace it myself but don't really know how. Thanks in advance!
Hold the switch body (in the middle of your little window) as you rotate the knurled nut (at the bottom of your little window).How would go about adjusting it? I think you can see it through this little rubber covered window above the brake pedal.
If the light doesn't come on or comes on too late, rotate the nut clock-wise as seen from above (edge you see to the left).
This raises the switch in the bracket, effectively increasing the pull of the spring attached to the brake pedal.
If the light stays on or comes on too soon, rotate the nut counter-clock-wise as seen from above (edge you see to the right).
This lowers the switch in the bracket, effectively decreasing the pull of the spring attached to the brake pedal.
Share: