If your alternator ever goes out, take heart. The fix is not easy, but you can do it for less than $300 dollars. Buy a replacement core for $236, have old rotor removed and the new one pressed in. It costs about $35 dollars. It takes many hours and a great deal of marking to remove and replace the throttle bodies and alternator. The hardest thing to remove is the bottom bolt on the alternator. I replaced the bottom bolt with a longer bolt and sleeve washer. I hope it never happens to any of you, but if does try this method. I did this with my wife marking connections and me doing the bolting and unbolting. This is the first work I have ever done on a motorcycle except oil changes and brakes. it saved me over $1300 dollars. It took me over 35 hours; but if you know what you are doing, it will take half that time.

Alternator core failure
- Thread starter Michael W
- Start date
W0QNX
Blacksheep Tribal Member
- Joined
- May 30, 2006
- Messages
- 3,347
- Location
- Pensacola, FL. USA
- Bike
- 06/ST1300 19/R1250RT
- 2024 Miles
- 007437
Great results for your first DIY job. Changing the ST1300 alt. is probably the hardest thing I've ever done to a bike and I do ALL my own work.
Well done !
Just did the same thing couple of weeks ago. BIG job...
Hint : Don't assume the upper tank is empty... MAKE SURE. I can still smell the gasoline in my house and on my boots ...
...
Just did the same thing couple of weeks ago. BIG job...
Hint : Don't assume the upper tank is empty... MAKE SURE. I can still smell the gasoline in my house and on my boots
...sirbike
Site Supporter
Good job.
At how many miles did it fail?
At how many miles did it fail?
- Joined
- Feb 11, 2006
- Messages
- 9,685
- Location
- Jacksonville
- Bike
- GL1800 R1200RT NC700
- 2024 Miles
- 008131
- STOC #
- 6651
Congratulations, that is an involved job.
My alternator suffered a similar failure at 106,000 miles but there was no way I was spending 10 hours labor replacing just the rotor and putting it back together with used bearings and brushes. The new OEM alternator was $509.00 at that time. While I had the alternator and throttle bodies out I also replaced all the coolant hoses.
My alternator suffered a similar failure at 106,000 miles but there was no way I was spending 10 hours labor replacing just the rotor and putting it back together with used bearings and brushes. The new OEM alternator was $509.00 at that time. While I had the alternator and throttle bodies out I also replaced all the coolant hoses.
- Joined
- Nov 20, 2005
- Messages
- 9,521
- Location
- Cedar City, Utah
- Bike
- 12/04 ST 1300s
- 2024 Miles
- 000420
- STOC #
- 5901
My alternator died on my '05 one month into my extended warranty. So I let the dealer swap it out.
Since then I have been collecting parts off ebay when I see them at give-away prices. I currently have 3 alternators in my parts bin. The only thing is I need to have them tested to make sure they work before I go using one.
And yes, I'll be doing my own work. I've removed plenty of throttlebodies and the alternator is right below that. I will admit the only alternator I have removed was in an engine already out of a bike.
Getting ready to do mine this winter. Santa left money under the tree for a new alternator. Mine has around 140,000 miles and seems to be working great but I have had alternators fail in my vehicles with less miles and no warning.
While the bike is torn down I already have new clutch plates in the tool box, and need to replace a sub harness that the knock sensor coupler broke on due to being brittle.
Wonder if I should replace the starter also? I am not looking forward to removing the throttle bodies. can it be done with out removing them?
I figure the bike is not worth much so want to keep it going until Honda comes out with the next ST.
you tube video on alternator removal. ST1300 pan european
Sorry it took a long time to respond.Good job.
At how many miles did it fail?
It happened at 61,000 miles.
it failed at 41000
- Joined
- Nov 10, 2007
- Messages
- 1,610
- Age
- 61
- Location
- Vancouver, British Columbia, Canada
- Bike
- 1&2&3-2005 ST1300ABS
- 2024 Miles
- 001862
- STOC #
- 8562
Great video on getting into the cavity of the ST Bowels.you tube video on alternator removal. ST1300 pan european
I love it when you talk dirty!Great video on getting into the cavity of the ST Bowels.

CYYJ
Michael
Very few of us have ever seen the alternator on a ST 1300. That's probably a good thing, because as Dave D. and SupraSabre noted above, getting at the alternator requires an extraordinary amount of disassembly of the bike... probably more disassembly than any task other than removing the engine from the motorcycle.
If you live up in the snow belt, are retired and have time on your hands, you have a nice warm garage and a full set of tools, and it's January and you are seeking an interesting maintenance task that will keep you occupied for a few weeks... well, in that case, getting at the alternator is the perfect answer to your mid-winter boredom. On the other hand, if it is Friday afternoon before a long weekend in summer, you are just about to leave on a long-planned cross-country tour and your alternator dies, you can kiss those plans for your long-awaited tour goodbye, you ain't going anywhere this summer.
My guess is that it would take a highly skilled technician who has done the job before about one-and-a half to two full working days to re & re the alternator. The process goes more or less like this:
1) Remove most of the front Tupperware, remove the gas tank and air box. Have a new fuel elbow hose on hand for reassembly later ($17).
2) Remove the throttle bodies, in the process, disconnect just about every hose, cable, and electrical connector you see. Remove the rubber mat (heat shield).
3) Remove the front fender and wheel (optional, perhaps, but it sure does make the job a lot easier), remove the radiator and the thermostat.
4) Remove the alternator.
Now, at this point, your motorcycle is seriously disassembled. If you are doing this in January with two feet of snow outside, there are a whole bunch of other preventative maintenance tasks that it makes great sense to carry out at this time, including:
5) Clean out all the crud that has accumulated in the V between the cylinders, and make sure the drain path from the V down to the 'square hole' is unobstructed.
6) At a minimum, tighten all the clamps on the coolant hoses in the V. For greater peace of mind, replace the 2 larger-size hoses on the thermostat (about $30) and the thermostat itself and accompanying O-ring (another $30). Might as well order a new air filter at the same time, since you have it out ($35).
7) Wash out all the bugs & dirt from the radiator, now that it is removed from the moto.
8) Lubricate the throttle cables & front moving parts on the throttle body.
9) Check the valve clearances, because at this level of disassembly, it is really easy to get the valve covers off, and really easy to get access to the right side cam chain tensioner.
10) Remove the galley oil plug (the 'mystery plug') and re-install it, this time with a little bit of gasket sealer around the top flange of the plug.
11) Since the front wheel is off... how are the front brake pads?
Once you have dealt with the alternator (replaced it or repaired it, as the case may be) and begin to re-assemble everything, plan to do a throttle body synchronization before you put the airbox back on the motorcycle. You'll need a manometer to do this.
To successfully complete a major project like this with minimal frustration and maximum satisfaction, there are a few things you will need to have on hand before you start work:
a) a Honda Service Manual for the ST 1300, updated with the latest revisions (see here for the revisions: Revisions (Error Corrections) to ST 1300 Service Manual). This is essential, if for no other reason than access to the torque values & re-assembly instructions.
b) a torque wrench (essential for this level of disassembly)
c) easy access to your favourite internet parts provider's web diagrams (for example, Partzilla or similar) - this to enable you to see all the various O-rings, gaskets, and crush washers you will need to order ahead of time.
d) a full jug of replacement coolant (available from any Honda automobile dealer)
e) a full bottle of low-strength Loctite for use when reassembling everything.
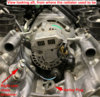
Below are a couple of pictures that show the alternator in the V of the engine, after all disassembly has been done except for removing the alternator itself.
Michael
Alternator from above
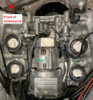
Alternator, viewed from the front looking aft
If you live up in the snow belt, are retired and have time on your hands, you have a nice warm garage and a full set of tools, and it's January and you are seeking an interesting maintenance task that will keep you occupied for a few weeks... well, in that case, getting at the alternator is the perfect answer to your mid-winter boredom. On the other hand, if it is Friday afternoon before a long weekend in summer, you are just about to leave on a long-planned cross-country tour and your alternator dies, you can kiss those plans for your long-awaited tour goodbye, you ain't going anywhere this summer.
My guess is that it would take a highly skilled technician who has done the job before about one-and-a half to two full working days to re & re the alternator. The process goes more or less like this:
1) Remove most of the front Tupperware, remove the gas tank and air box. Have a new fuel elbow hose on hand for reassembly later ($17).
2) Remove the throttle bodies, in the process, disconnect just about every hose, cable, and electrical connector you see. Remove the rubber mat (heat shield).
3) Remove the front fender and wheel (optional, perhaps, but it sure does make the job a lot easier), remove the radiator and the thermostat.
4) Remove the alternator.
Now, at this point, your motorcycle is seriously disassembled. If you are doing this in January with two feet of snow outside, there are a whole bunch of other preventative maintenance tasks that it makes great sense to carry out at this time, including:
5) Clean out all the crud that has accumulated in the V between the cylinders, and make sure the drain path from the V down to the 'square hole' is unobstructed.
6) At a minimum, tighten all the clamps on the coolant hoses in the V. For greater peace of mind, replace the 2 larger-size hoses on the thermostat (about $30) and the thermostat itself and accompanying O-ring (another $30). Might as well order a new air filter at the same time, since you have it out ($35).
7) Wash out all the bugs & dirt from the radiator, now that it is removed from the moto.
8) Lubricate the throttle cables & front moving parts on the throttle body.
9) Check the valve clearances, because at this level of disassembly, it is really easy to get the valve covers off, and really easy to get access to the right side cam chain tensioner.
10) Remove the galley oil plug (the 'mystery plug') and re-install it, this time with a little bit of gasket sealer around the top flange of the plug.
11) Since the front wheel is off... how are the front brake pads?
Once you have dealt with the alternator (replaced it or repaired it, as the case may be) and begin to re-assemble everything, plan to do a throttle body synchronization before you put the airbox back on the motorcycle. You'll need a manometer to do this.
To successfully complete a major project like this with minimal frustration and maximum satisfaction, there are a few things you will need to have on hand before you start work:
a) a Honda Service Manual for the ST 1300, updated with the latest revisions (see here for the revisions: Revisions (Error Corrections) to ST 1300 Service Manual). This is essential, if for no other reason than access to the torque values & re-assembly instructions.
b) a torque wrench (essential for this level of disassembly)
c) easy access to your favourite internet parts provider's web diagrams (for example, Partzilla or similar) - this to enable you to see all the various O-rings, gaskets, and crush washers you will need to order ahead of time.
d) a full jug of replacement coolant (available from any Honda automobile dealer)
e) a full bottle of low-strength Loctite for use when reassembling everything.
Below are a couple of pictures that show the alternator in the V of the engine, after all disassembly has been done except for removing the alternator itself.
Michael
Alternator from above
Alternator, viewed from the front looking aft
Nice write up and good pictures, Michael. BTW... it was good meeting you this past summer!
CYYJ
Michael
It was great meeting you too Vinny, and equally great to see Larry again.
As you can see from the pictures above, I learned a lot at your tech get-together, and am presently in the process of doing heavy maintenance on my ST 1300 - what we would call in my old industry a "D check".
Once I get this done, I'm going to ship the 1300 over to Europe and bring the 1100 back. The 1100 has been there for quite a while and probably is in greater need of heavy maintenance than the 1300.
Michael
Excellent article with clear pics, thank you.
OMG...I could not watch more than about 10 minutes of the video, then I started looking for puppets, and a therapist to call
Did anyone else notice the fender had the wrong bolt...the 3 way tee was missing on the coolant line, and was jury rigged with a smaller hose pushed into a bigger hose, that was split?
Or the hose was the wrong one, and the spring clamp was missing, and replaced by a hose clamp? The mat was not connected up front, all the coolant stains on the right side of the engine? that they removed the radiator mounting bracket, rather than simply removing the (3) bolts and slipping it off the dowel? The bar end was missing, the grip was damaged, the tank grommets were missing to keep the tank off the frame, etc. And don't even get me started about the prying, pulling, poking, tearing, ripping, tugging, and trying to drain the fuel tank out of the wrong hose
Oh the horror
- Joined
- Nov 20, 2005
- Messages
- 9,521
- Location
- Cedar City, Utah
- Bike
- 12/04 ST 1300s
- 2024 Miles
- 000420
- STOC #
- 5901
The parts were probably very expensive there (have you checked out the three-way tee lately?OMG...I could not watch more than about 10 minutes of the video, then I started looking for puppets, and a therapist to call
Did anyone else notice the fender had the wrong bolt...the 3 way tee was missing on the coolant line, and was jury rigged with a smaller hose pushed into a bigger hose, that was split?
Or the hose was the wrong one, and the spring clamp was missing, and replaced by a hose clamp? The mat was not connected up front, all the coolant stains on the right side of the engine? that they removed the radiator mounting bracket, rather than simply removing the (3) bolts and slipping it off the dowel? The bar end was missing, the grip was damaged, the tank grommets were missing to keep the tank off the frame, etc. And don't even get me started about the prying, pulling, poking, tearing, ripping, tugging, and trying to drain the fuel tank out of the wrong hose
Oh the horror
Partzilla - JOINT, FUEL TUBE 16961-MK7-000 (List $17.64) $13.76
Probably three to four times more...so they were improvising!
Which is one reason I have bought a few sets of nuts, bolts and fasteners off ebay over the years so I would have extras on hand.
I almost forgot... I would move the "water joints" from both sides, instead of taking the hoses off, unless you are replacing them too, but I would still remove them.
I have ordered the new alternator, along with new thermostat, sub harness, battery, upper and lower radiator hoses, crush washers ( for fuel rail nut). All should be here Friday. I have the necessary elbow hose and new clamps for the upper fuel tank removal on hand. Already have new clutch plates / springs in the tool box along with all the gaskets / sealants/ etc to remove the clutch cover. I am sure I will see some misc. items while I am in the V of the engine. I am investing in this venture because I really like my ST and want to keep it running with a bit of peace of mind for when I am so far from home. The bike has around 140,000 miles and I am planning on getting another 140,000 miles if possible with these new parts. I know it is impossible to replace all the parts that may fail but the parts in the V are the most technical to get at. I will be investing around a $1000.00 into the ST this winter-but it is still cheaper than a new bike.Very few of us have ever seen the alternator on a ST 1300. That's probably a good thing, because as Dave D. and SupraSabre noted above, getting at the alternator requires an extraordinary amount of disassembly of the bike... probably more disassembly than any task other than removing the engine from the motorcycle.
If you live up in the snow belt, are retired and have time on your hands, you have a nice warm garage and a full set of tools, and it's January and you are seeking an interesting maintenance task that will keep you occupied for a few weeks... well, in that case, getting at the alternator is the perfect answer to your mid-winter boredom. On the other hand, if it is Friday afternoon before a long weekend in summer, you are just about to leave on a long-planned cross-country tour and your alternator dies, you can kiss those plans for your long-awaited tour goodbye, you ain't going anywhere this summer.
My guess is that it would take a highly skilled technician who has done the job before about one-and-a half to two full working days to re & re the alternator. The process goes more or less like this:
1) Remove most of the front Tupperware, remove the gas tank and air box. Have a new fuel elbow hose on hand for reassembly later ($17).
2) Remove the throttle bodies, in the process, disconnect just about every hose, cable, and electrical connector you see. Remove the rubber mat (heat shield).
3) Remove the front fender and wheel (optional, perhaps, but it sure does make the job a lot easier), remove the radiator and the thermostat.
4) Remove the alternator.
Now, at this point, your motorcycle is seriously disassembled. If you are doing this in January with two feet of snow outside, there are a whole bunch of other preventative maintenance tasks that it makes great sense to carry out at this time, including:
5) Clean out all the crud that has accumulated in the V between the cylinders, and make sure the drain path from the V down to the 'square hole' is unobstructed.
6) At a minimum, tighten all the clamps on the coolant hoses in the V. For greater peace of mind, replace the 2 larger-size hoses on the thermostat (about $30) and the thermostat itself and accompanying O-ring (another $30). Might as well order a new air filter at the same time, since you have it out ($35).
7) Wash out all the bugs & dirt from the radiator, now that it is removed from the moto.
8) Lubricate the throttle cables & front moving parts on the throttle body.
9) Check the valve clearances, because at this level of disassembly, it is really easy to get the valve covers off, and really easy to get access to the right side cam chain tensioner.
10) Remove the galley oil plug (the 'mystery plug') and re-install it, this time with a little bit of gasket sealer around the top flange of the plug.
11) Since the front wheel is off... how are the front brake pads?
Once you have dealt with the alternator (replaced it or repaired it, as the case may be) and begin to re-assemble everything, plan to do a throttle body synchronization before you put the airbox back on the motorcycle. You'll need a manometer to do this.
To successfully complete a major project like this with minimal frustration and maximum satisfaction, there are a few things you will need to have on hand before you start work:
a) a Honda Service Manual for the ST 1300, updated with the latest revisions (see here for the revisions: Revisions (Error Corrections) to ST 1300 Service Manual). This is essential, if for no other reason than access to the torque values & re-assembly instructions.
b) a torque wrench (essential for this level of disassembly)
c) easy access to your favourite internet parts provider's web diagrams (for example, Partzilla or similar) - this to enable you to see all the various O-rings, gaskets, and crush washers you will need to order ahead of time.
d) a full jug of replacement coolant (available from any Honda automobile dealer)
e) a full bottle of low-strength Loctite for use when reassembling everything.
Below are a couple of pictures that show the alternator in the V of the engine, after all disassembly has been done except for removing the alternator itself.
Michael
Alternator from above
Alternator, viewed from the front looking aft
Excellent investment in your ST. I agree. It's worth it to keep your ST running like a top for another 140K.I have ordered the new alternator, along with new thermostat, sub harness, battery, upper and lower radiator hoses, crush washers ( for fuel rail nut). All should be here Friday. I have the necessary elbow hose and new clamps for the upper fuel tank removal on hand. Already have new clutch plates / springs in the tool box along with all the gaskets / sealants/ etc to remove the clutch cover. I am sure I will see some misc. items while I am in the V of the engine. I am investing in this venture because I really like my ST and want to keep it running with a bit of peace of mind for when I am so far from home. The bike has around 140,000 miles and I am planning on getting another 140,000 miles if possible with these new parts. I know it is impossible to replace all the parts that may fail but the parts in the V are the most technical to get at. I will be investing around a $1000.00 into the ST this winter-but it is still cheaper than a new bike.
I'll keep an eye out for updates on the work ahead.
CYYJ
Michael
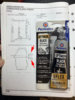
About that clutch cover... it is MURDER to remove the remains of the old clutch cover gasket from the front face of the engine. Absolute murder....Already have ... all the gaskets / sealants/ etc to remove the clutch cover.
I researched the topic carefully here in the forum, and found all sorts of warnings to not use razor blades, only use plastic scrapers, perhaps use a wooden dowel, etc., but none of those 'gentle' tools would make any progress towards getting the old gasket (and the underlying adhesive that the factory applied all around the perimeter of the front face of the engine, under the gasket). That gasket is stuck on there like sh*t on a blanket.
Finally, I purchased a can of Permatex Gasket Remover and a thick, non-flexible Richards plaster knife. The Permatex Gasket remover is powerful stuff, it will strip the chrome off a trailer hitch. I sprayed a little bit of it into a stainless steel bowl, then used a small acid paintbrush to apply it to the front face of the engine. I then used the .065 inch thick, non-flexible plaster knife to scrape the softened gasket off. The thick steel knife tapers to a point at the very end, but it is not sharp enough to scratch the aluminum engine case, and because it does not flex, there is no risk of it 'digging in' to the aluminum. It took about 4 cycles of apply the chemical, scrape, and repeat to get everything off. When I was done, I did a final clean-up with "Goof-Off" (a xylene - MEK mixture), then a gentle burnish with 400 grit sandpaper to get rid of the last microscopic particles. The result was a perfectly clean, undamaged surface.
It's easier to clean gasket residue off the removable clutch cover, because Honda didn't use any adhesive on that part, and the clutch cover can be taken inside and soaked in a solution of hot water and Simple Green to soften the gasket.
Be aware that the Service Manual calls for an application of high temperature gasket sealer within half an inch either side of the seam in the engine case. It's hard to see the seam looking in from the front, but if you look just inside the engine case, you can see the sealant used where the seam runs back on either side of the engine case.
I couldn't find the '3Bond 1207B' that the Service Manual calls for, but I did find a Permatex sealant with equivalent performance characteristics.
Don't bother putting on those latex mechanic's gloves when you are working with the Gasket Remover - they will instantly dissolve in front of your eyes when the gasket remover touches them.
While you have the clutch cover off, you have an excellent opportunity to repaint it, not so much for beauty but for corrosion protection. I found that 400 grit sandpaper, used wet, worked perfectly to get the corrosion off and smooth the surface for painting. Be sure to get an aluminum-coloured paint that can withstand high temperatures.
Pictures are below.
Michael
The plaster knife - be sure to get the non-flexible one

The Gasket Remover

Page 1-20 of the Service Manual, showing where gasket sealer needs to be placed