
- Joined
- Feb 5, 2020
- Messages
- 871
- Age
- 59
- Location
- Deux-Montagnes, Quebec, Canada
- Bike
- 2000 ST1100Y
- STOC #
- 9063
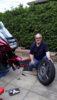
I am posting this just to show that with almost no special tool, it is relatively easy to change a tire.
My colleagues at works, those who have motorcycles, are telling me to go to the dealer for that.
Heck, they even go to the dealer for their oil change, or brake fluid, so... I understand why they don't understand me.
They don't seem to understand that there is a real satisfaction in doing that yourself.
Not only you're learning about how motorcycles works, but you can also see what is the condition, inspect the parts, clean them, etc.
There is a learning curve. This is only my second tire in life, that I change. And it was really easy this time, compare to my first, two years ago.
I really waited a little too long before replacing this one. I know. Not that smart from me.
But, with my injury to my back, I was waiting to feel better. Geeeee.... I was lucky nothing happend.
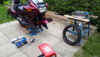
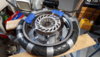
To break the bead, I use big C-Clamps, for now.
Once both beads are broke, I use two motion-pro "spoons" (my only specialized tools) and also those hard poly-something rim protectors (I have to admit they are a real pain to use, they slip, and then when you want to move them a few inches, they get stuck between the rim and the tire).
So, I now also use my bare hands. Once the tire is half off the rim, I hold the rim with one hand and pull the tire out with the other hand. Grrrrrrr..... It works !
oh-oh !
To put the new tire on the rim, it could really be a tiring and exausting job. It really was, two years ago. It took me many attempts, spent on a few days before I finally had it.
Now, I used a tip given last year by @Igofar : duct tape. And it was so easy like this.
The idea is to close both sides of the tire, toward the inside. By doing this at many places (ten different spot in my case) you increasing the inside diameter of the tire.
With this method, both sides of the tire get into the rim at once.
I remember, last year, Larry was saying something like : if you are strugling, forcing and having trouble... you don't have the good technique. It made me think a lot.
So, I decided to use my weight. 260 pounds, my both hands, pushing the side of this tire, and watching it slowly going in, little by little.
It really went like a charm. A few minutes and it was done. Wow ! Thanks Larry. I owe you one.
In fact, it went so well, that once the new tire was fit inside the rim, I realised that I had forgot to put any tire lube.
Concerning the use of duct tape : one thing that worried me a bit, before I tried this method, is how do you remove your duct tape after ?
It turns out that it is really easy to take them off. I took the tip of an exacto knife, following the center thread, to cut the tape, then I could peel or pull and unroll both sides, so all that is left is the part inside the rim, and with a good pull, it was easy to take them entirely out.
So, with the duct tape off, I was ready to seat the bead, to be able to inflate the tire.
But for that, I really needed to apply tire lube.
So, I took an old paintbrush, dipped the tip in the tire lube, and apply plenty between the tire and the rim. I was very generous for once.
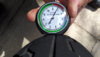
I temporarly remove the core of the valve, took the air compressor, blew some air into the valve and... Pop ! ... Pop !
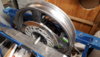
Now, to balance my wheel, I have a rather simplistic setup for static balancing. Simple, not perfect, but it works.
The axle supporting the wheel rests between two benches.
Here I was just checking the balance of the rim with the new aluminum valve.
I am also doing the balancing with the tire.
The idea to balance the rim and then the rim and the tire, is that you can align the yellow dot on the tire (lightest spot) with the heaviest spot of the rim.
I couldn't find my strip of small sticking weigths.
The original weight from Honda was too heavy.
So, I used a piece of duct tape again, holding a nickel ( 5 cents) on the rim.
In a few days I'll get a real weigth. Just for a more professional look.
I'm also thinking about the other method of balancing a wheel, with beads inside the wheel, that autobalance themself ?
Not too sure how it works, but it might worth a try, to have a perfect balancing.
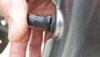
New wheel now in place, with new inclined aluminum valve from curvy girls.
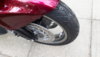
Ready to roll.

My colleagues at works, those who have motorcycles, are telling me to go to the dealer for that.
Heck, they even go to the dealer for their oil change, or brake fluid, so... I understand why they don't understand me.
They don't seem to understand that there is a real satisfaction in doing that yourself.
Not only you're learning about how motorcycles works, but you can also see what is the condition, inspect the parts, clean them, etc.
There is a learning curve. This is only my second tire in life, that I change. And it was really easy this time, compare to my first, two years ago.
I really waited a little too long before replacing this one. I know. Not that smart from me.
But, with my injury to my back, I was waiting to feel better. Geeeee.... I was lucky nothing happend.
To break the bead, I use big C-Clamps, for now.
Once both beads are broke, I use two motion-pro "spoons" (my only specialized tools) and also those hard poly-something rim protectors (I have to admit they are a real pain to use, they slip, and then when you want to move them a few inches, they get stuck between the rim and the tire).
So, I now also use my bare hands. Once the tire is half off the rim, I hold the rim with one hand and pull the tire out with the other hand. Grrrrrrr..... It works !
oh-oh !
To put the new tire on the rim, it could really be a tiring and exausting job. It really was, two years ago. It took me many attempts, spent on a few days before I finally had it.
Now, I used a tip given last year by @Igofar : duct tape. And it was so easy like this.
The idea is to close both sides of the tire, toward the inside. By doing this at many places (ten different spot in my case) you increasing the inside diameter of the tire.
With this method, both sides of the tire get into the rim at once.
I remember, last year, Larry was saying something like : if you are strugling, forcing and having trouble... you don't have the good technique. It made me think a lot.
So, I decided to use my weight. 260 pounds, my both hands, pushing the side of this tire, and watching it slowly going in, little by little.
It really went like a charm. A few minutes and it was done. Wow ! Thanks Larry. I owe you one.
In fact, it went so well, that once the new tire was fit inside the rim, I realised that I had forgot to put any tire lube.
Concerning the use of duct tape : one thing that worried me a bit, before I tried this method, is how do you remove your duct tape after ?
It turns out that it is really easy to take them off. I took the tip of an exacto knife, following the center thread, to cut the tape, then I could peel or pull and unroll both sides, so all that is left is the part inside the rim, and with a good pull, it was easy to take them entirely out.
So, with the duct tape off, I was ready to seat the bead, to be able to inflate the tire.
But for that, I really needed to apply tire lube.
So, I took an old paintbrush, dipped the tip in the tire lube, and apply plenty between the tire and the rim. I was very generous for once.
I temporarly remove the core of the valve, took the air compressor, blew some air into the valve and... Pop ! ... Pop !
Now, to balance my wheel, I have a rather simplistic setup for static balancing. Simple, not perfect, but it works.
The axle supporting the wheel rests between two benches.
Here I was just checking the balance of the rim with the new aluminum valve.
I am also doing the balancing with the tire.
The idea to balance the rim and then the rim and the tire, is that you can align the yellow dot on the tire (lightest spot) with the heaviest spot of the rim.
I couldn't find my strip of small sticking weigths.
The original weight from Honda was too heavy.
So, I used a piece of duct tape again, holding a nickel ( 5 cents) on the rim.
In a few days I'll get a real weigth. Just for a more professional look.
I'm also thinking about the other method of balancing a wheel, with beads inside the wheel, that autobalance themself ?
Not too sure how it works, but it might worth a try, to have a perfect balancing.
New wheel now in place, with new inclined aluminum valve from curvy girls.
Ready to roll.
Last edited:


