changing the bulbs is a pita and changing the brake bulbs even more so. I installed a luggage shelf below my number plate mounted like a tow bar but instead of two supports i took the tail off and put a brace bar from the subframe down through the mudguard. i never liked removing the mudguard to change the brake bulbs so i modded the back allowing me more space for storage and bulb changing and allowing me to change all the bulbs under the seat. to copy this you would need to look under your seat and check you have a big ecu and small abs unit like my 2008 does. these are the parts you need.
Tape to wrap the loom. reuseable cable tie. sharp knife or electric cutting tool. small hand saw. a piece of plastic or corex. a bit of cardboard. marker
Optional: sealant. self tapping screws
steps:
1. remove top box and rack
2. with a marker mark the mudguard following the line of the under seat part of the grab rail ignore the seat catch bit just mark either side
3. remove grab rail
4. undo screws on the side holding the tail light in plate and the bolts holding the tail fairing.
5. lift off the tail fairing and light carefully and unplug the bulbs
6. with a sharp knife or cutting tool cut out the following. the holder plastic that held the ecu and the angled shelf. the posts at the front should be cut as low as possible.
7. using the cardboard cut a shape to fill the area where the posts were back to where the mudguard curve starts
8. place the cardboard on the plastic or corex and draw round then cut the plastic to match the shape.
9. insert the plastic in place and if required seal with sealant.
10. if you used plastic and not corex you can screw the corners down into the mudguard below but its not required
11. carefully cut the loom tape off all the way down to where the grab rail and catch was.
12. retape the abs leads together. retape the ecu leads together. retape the bulb leads together.
13. using the marks on the mudguard run the abs lead across and down the right side to lay flat on the right next to the grab rail
14. run the ecu and bulb leads along he left side to the back
15. reinstall the tail and light and plug in the bulb cables.
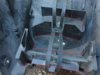
16. the ecu will now sit across the back of the tail light
17. cable tie the abs to the sub frame on the right.
18. reinstall the grab rail the abs cable should sit under the seat catch. reinstall everything else.
go on amazon and buy a pack of zippered canvas tool bag with hanging loop..
The bag will hold ratchet and socket strip and alan key strip some extension bars etc. it will sit nicely against the ecu
i also get a aa mini compressor multi tool 27mm socket and plug kit in the space
if you goto youtube i have a video that shows the shelf and mod called st1300 mods including luggage shelf