Hi All,
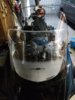
I decided to try this modification as an alternative to the Laminar Lip. It cost half the price of the lip and is adjustable on the go. There are others who have done this. A good reference is:http://www.nc700.co.uk/index.php?/t...givi-airflow-and-painted-the-belly-pan-black/
For my modification:
1. Used an old OEM screen cut to 305 mm long which is the straight bit
2. Bought GIVI parts z1997R and z1963R (partnumbers fixed)
3. Did a trial fit using the OEM screen part I removed. Two 20 mm holes, four 4mm holes. It is important to get all the measurements worked out prior as you only get one chance with a screen and you want a tight fit.
4. Installed the OEM screen on the bike and did the drilling in situ.
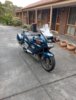
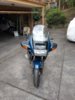
I have just come back from an 80 km ride in humid conditions with wind and light rain (Melbourne Australia).
1. I love the ability to make height changes on the fly or at the next traffic stop.
2. This mod gives me three screens. A summer screen at 305mm without the airflow. A medium screen at 430mm with the airflow providing some laminar flow. And then adjusting up to a high screen at 550mm for bad weather.
Yes I know it is ugly but it works.
Regards
Garry
I decided to try this modification as an alternative to the Laminar Lip. It cost half the price of the lip and is adjustable on the go. There are others who have done this. A good reference is:http://www.nc700.co.uk/index.php?/t...givi-airflow-and-painted-the-belly-pan-black/
For my modification:
1. Used an old OEM screen cut to 305 mm long which is the straight bit
2. Bought GIVI parts z1997R and z1963R (partnumbers fixed)
3. Did a trial fit using the OEM screen part I removed. Two 20 mm holes, four 4mm holes. It is important to get all the measurements worked out prior as you only get one chance with a screen and you want a tight fit.
4. Installed the OEM screen on the bike and did the drilling in situ.
I have just come back from an 80 km ride in humid conditions with wind and light rain (Melbourne Australia).
1. I love the ability to make height changes on the fly or at the next traffic stop.
2. This mod gives me three screens. A summer screen at 305mm without the airflow. A medium screen at 430mm with the airflow providing some laminar flow. And then adjusting up to a high screen at 550mm for bad weather.
Yes I know it is ugly but it works.
Regards
Garry
Attachments
Last edited:


")