HEL brake lines - USA models install complications? (answered - check your brake hoses fiche vs Pan)

OP
OP
billo
Joined
Nov 3, 2008
Messages
291
Location
san diego, ca
Bike
'07 ST1300
Some helpful install pics:
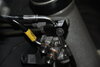
The right side of the headset:
HEADSETRIGHT.jpeg
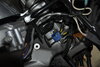
That's marked for parts fiche line 7 and master cylinder line.

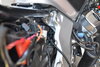
The left side of the headset:
HEADSETLEFT.jpeg
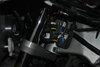
Marked for parts fiche lines 5 and 1. Note the steel tab on 5 (8 mm hex head below the 5). The HEL does not have this tab. I
fabricated a tab out of 1/8 aluminum stock.

TABMOD.jpeg
That's a 1/4-20 carriage bolt and nylon insert lock nut.

HOSESFRONT.jpeg
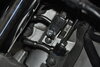
Marked for lines 7, 1, and 5

PIPEBOLT.jpeg
The (right fork) pipe mounting bolt was pushed to the right four or so mm so could not be inserted. I tried a different approach. With the pipe unattached to the forks I tightened the connectors. I mounted the nylon block to just the right fork by 4 or 5 threads. With the pipe pulled away from the forks I inserted the mounting bolt for the left fork. With some thumb pressure I got the left mounting bolt started about 4 or 5 turns also.
Tightening each side a few turns at a time brought the pipe evenly to the forks.


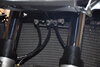
There are two pipe connections forward of the shock. Here's what it looks like up there:
SHOCKPIPES.jpegSHOCKPIPES2.jpeg
This is looking in through the battery location. Lifting the HEL connectors will expose more of the 13mm hex. The connection can then be tightened and pushed back down. The mounting nut for the HEL blocks can just be seen on the left, next to the line. The mounting bolt is welded in place.

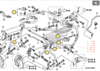
A cheat sheet for the front. The measurements in red correspond to the length of the HEL lines and help ID them.

hoses.png
 
Last edited:
OP
OP
billo
Joined
Nov 3, 2008
Messages
291
Location
san diego, ca
Bike
'07 ST1300
The bike passed the low speed reliability test. I had already put the plastic on as I woke up early this morning (3:00) and couldn’t wait. After ten minutes freeway I pulled in for gas and noticed a half dozen flecks of brake fluid randomly scattered, tank, compartment cover etc - less than a half drop in total. I wiped them up with washer fluid and a towel and went another ten. No problem, it was just fluid in a crevice or two blowing out. Scary though. I should have washed the bike first. Lesson learned. During another half hour through some light canyon at an easy pace the brakes really performed. Very little pull brings on quick powerful braking. I wish I could say ”It’s the lines!” But I know I had air in the old lines, so.. It’s nice to be back on the road.
p.s.
The front discs were just above ambient when I got back. The rear was luke warm, it would’ve been hot before the new smc. I can spin the tire by hand for about 1 1/4 turn with a good tug (I’m 70).
p.p.s.
I’ve gone well over 100 miles now and it’s rock solid. Honestly, I’m amazed with myself.. I’ve worked on minor mods for my bikes, riding since ‘66 but this is my biggest undertaking of the unknown and I had my doubts. Sirbike‘s advice to go slow and one step at a time is dead on. If something wasn’t just right, I tore it back down and did what needed it, no matter the difficulty - and at times I really didn’t want to. It was a learning experience. Determination, patience and thought required. If you’ve got grit, you can do it. It’s not that bad.
 
Last edited:

jfheath

John Heath
Site Supporter
Joined
Mar 18, 2006
Messages
2,832
Age
70
Location
Ilkley, W Yorkshire, UK
Bike
2013 ST1300 A9
2024 Miles
000679
STOC #
2570
Wow. That is really useful @billo . Its winter and nearly 10 years since I bought my current A9 in Jan 2014, brand new off the production line mid September 2013.

I keep an eye onmy brake lines but somewhere, sometime I read 5 years. I was thinking that I was pushing my luck so went hunting. Goodridge don't do a kit. Came across the HEL. name.

I've not looked for a brake line replacement thread before, but I had visions of double stacking banjo bolts eg for that line from front centre caliper to feed the SMC. I had visions of hoses leaving the banjo at a straight angle, rather than at the correct one. I was unsure about the hose guide clamps coping with the much thinner braided lines. I was unsure about the long pieces that have pipework in the middle.

So you posted this at exactly the right time for me. Thank you. Especially for the photos. It looks really neat.

Some questions if I may.

Are the nylon blocks just securing pieces ? I cant imagine that they are subject to fluid pressure ?

Are parts 3, 8 and 6 on the diagram ie the metal pipework - replaced with new lines ?

Not entirely sure how that joint on the right fork leg for the front caliper top banjo works, but I guess it must be obvious or you would have mentioned it. This would be the HEL line 7 and the metal pipe 8. I've spotted the joint in a very clear photo in your post #21 - and I think that is the original pipe#8 attached (answered my earlier question ? - but can't work out how they are linked.

The end result looks very smart and neat. Much better than I was thinking it would be for a replacement kit.

Final question. How do you judge the torque setting for those gland nut fastenings. Ive done it on existing pipework and they were fine. Tight enough, but not too tight. But it was a lucky 'educated' guesstimate'.

Many thanks again.
 
Last edited:
OP
OP
billo
Joined
Nov 3, 2008
Messages
291
Location
san diego, ca
Bike
'07 ST1300
@jfheath
A nylon block holds the joint in place and secures it to the frame. The block is separate from the line so no pressure. All block mounting holes are tight
so plan on drilling them out a bit.
No pipes were replaced. I tightened them down pretty good with my calibrated elbow and no leaks.
Pipe 8 is screwed into a "T" on line 7. The "T" is visible in the photo where the top of the nylon block is slotted. The block can be pulled off and the joint tightened with wrenches, then attached to the fork.
I found it impossible to torque the pipes (gland nuts?) especially the ones in front of the shock. Those were not fun to tighten but manageable.
My lines were 16 years old and my concerns on longevity and new installation mirrored yours exactly. My old rubber lines were stiff and had "memory".
I'm sure you've researched and found no other reference material on HEL install as did I. Very surprised at that.
 
Last edited:

jfheath

John Heath
Site Supporter
Joined
Mar 18, 2006
Messages
2,832
Age
70
Location
Ilkley, W Yorkshire, UK
Bike
2013 ST1300 A9
2024 Miles
000679
STOC #
2570
Brilliant @billo. Thank you.

I'm wondering about my next step. I cannot find a different model bike that fits both me and pillion. It is getting to 70,000 miles and usually at this stage I think - shall I replace, or find a newish low mileage version (there are some around in the 10,000 mile bracket). I think I'd keep both and start breaking one for spares. I'm heading towards 70 and I wonder how many miles we both have left in us - but if I wonder about that for too long, the answer will present itself anyway.

But if I keep this - I think that new brake lines are on the cards - I dreaded to think about it, and could find no details about what the kits included. Your post has made that a very real possibility.
I can see no sign of damage in the lines - but balloons usually look perfectly Ok until they burst. I have to assume that they are getting worn out. It would be folly to take the opposite view.

The HEL kit looks affordable, and having just replaced disc rotors. I think it may be time to give the rest of the brake system a complete overhaul.

I need a new rear wheel. Corrosion on the inside (due to using puncture proof slime) means that the rear tyre does not seal 100%. It loses a couple of pounds of pressure over a few weeks, and it has to be cleaned up and re-coated with some special sealing paint every time I have the rear tyre changed.
 
Joined
Mar 1, 2021
Messages
61
Age
43
Location
germany
Bike
ST1300A8
For a HEL set with 15 brake lines for the ST1300 year 08, the demand in Germany 600 euros, about 600 American dollars.
greeting holm
 
Top Bottom