- Joined
- Oct 26, 2020
- Messages
- 1,764
- Location
- Makefield Highlands PA
- Bike
- 2016 ST1300P
- 2024 Miles
- 002771
Thats what im looking for. Riding in boston can be tricky! How are yours mounted?

Thats what im looking for. Riding in boston can be tricky! How are yours mounted?
Yea, thats what i was thinking. Thru the fender screw. Thanks!
I like these, how tough are they to install?
Really easy to install. Hardest part is running the wires and putting in a switch (or two) and relay (or two). (those items are not included with the lights.)I like these, how tough are they to install?
")
This is the wiring harness I used for my Zmoons.Amazon also sells a wiring system for these but I've not used it. https://www.amazon.ca/Wiring-harness-Waterproof-Harness-Fuse-2lead/dp/B07T8HX8ZZ/ref=pd_bxgy_img_sccl_1/144-6240086-0482211?pd_rd_w=HilzL&content-id=amzn1.sym.93ae3f3f-3555-4971-a952-df8053b1d375&pf_rd_p=93ae3f3f-3555-4971-a952-df8053b1d375&pf_rd_r=Q4K1XDNR2Z2PRESP6561&pd_rd_wg=g2LPs&pd_rd_r=e244f770-57eb-4b3a-a11d-54d57e82b809&pd_rd_i=B07T8HX8ZZ&psc=1
It seems to include switches, wiring and 2 relays. Likely your best bet unless you have these items at home already.
 youtube.com
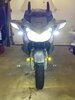
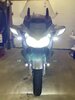
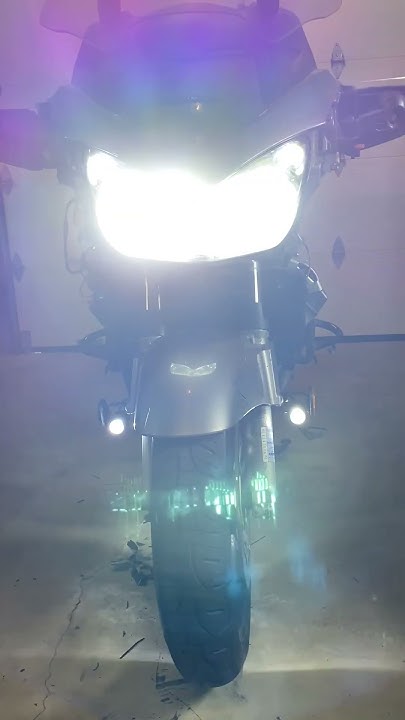
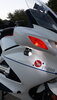
Your looking sharp. I relocated them with a stand-off.Mine are also tied into the low and high beams, as well as tied to my horn circuit.
Low is yellow, white is high, yellows switch to white with the horn.
I have an override switch on the right side Tupperware if I need to turn them off.
horn flasher
ST1300 set to flash passenger high beam and dual color driving lights with the new dual horn setup.
I've since also added under mirror lights.
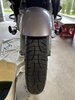
I oriented mine opposite to yours with the wire from the top.I have the same lights mounted to the crash bars on my Versys.... note, must be oriented correctly, wire should exit the bottom so the amber is a low beam and the white a high beam. At minimum if wire exiting the top, I'd silicone it.
There r signals?So how do you expect anyone to see your signals?
Thanks, that looks like a very neat jobReally easy to install. Hardest part is running the wires and putting in a switch (or two) and relay (or two). (those items are not included with the lights.)
Difficulty lies with how handy you are at doing that and how you want them wired up.
As they have 2 colors you could do 2 switches (1 per color) OR you could do a 2 position switch to select between one color or another.
Amazon also sells a wiring system for these but I've not used it. https://www.amazon.ca/Wiring-harness-Waterproof-Harness-Fuse-2lead/dp/B07T8HX8ZZ/ref=pd_bxgy_img_sccl_1/144-6240086-0482211?pd_rd_w=HilzL&content-id=amzn1.sym.93ae3f3f-3555-4971-a952-df8053b1d375&pf_rd_p=93ae3f3f-3555-4971-a952-df8053b1d375&pf_rd_r=Q4K1XDNR2Z2PRESP6561&pd_rd_wg=g2LPs&pd_rd_r=e244f770-57eb-4b3a-a11d-54d57e82b809&pd_rd_i=B07T8HX8ZZ&psc=1
It seems to include switches, wiring and 2 relays. Likely your best bet unless you have these items at home already.
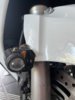
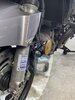
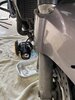
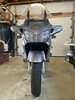
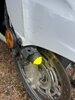
Installing the lights is as easy as removing the OEM reflectors, bolting the light brackets in, attaching the reflector to the other side of the bracket.
Zip tie the wires gently to the brake lines up under the fairing.
@Willsmotorcycle installed his lights on the fender bolts. I did mine on the reflector brackets. Those ultimately go to the fender bolts and forks
This is how I'd want them wired. Could you run down a quick overview of your wiring? I'm thinking no switches are necessary but add a level of control if some to run the lights independently of the beam switch position. I don't see that being my use case. Three wires? Two relays no relays?I wanted the yellow to show further for conspicuity with my low beam and the white to fill the closer in area when my high beams were on.
https://www.st-owners.com/forums/threads/relay-schottky-diode-bridge-rectifier-or-mosfet.183690/ This is a bit of overkill for a simple setup, but it was what I wanted. The way I wired them only needed a single 2 way relay as I only wanted one color at a time.This is how I'd want them wired. Could you run down a quick overview of your wiring? I'm thinking no switches are necessary but add a level of control if some to run the lights independently of the beam switch position. I don't see that being my use case. Three wires? Two relays no relays?
Thanks for the detailed schematics, I'm putting mine on in a couple of hours. Using the Amazon wiring harness. Do you know any good spot to mount the switchhttps://www.st-owners.com/forums/threads/relay-schottky-diode-bridge-rectifier-or-mosfet.183690/ This is a bit of overkill for a simple setup, but it was what I wanted. The way I wired them only needed a single 2 way relay as I only wanted one color at a time.
As for other ways (there are many)...
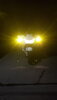
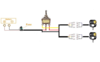
The simplest way to wire would be a 2 way switch running to the lights. That would allow you to pick between yellow, white or off. As for throw distance the light goes that's determined by 2 factors: how high you aim the lamps and how you orient them. If the wire goes out the top the yellow will go further. If the wire goes out the bottom the white will go further.
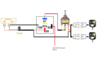
Downside to this is if the lights are switched on when the bike is off you'll drain the battery! That's why most folks use a relay for switched power.
Here it is with a relay.
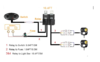
Next up for easy would be to buy the dual relay kit for the lights from Amazon.
None of these allow for "auto" switching with your high beam. It's all manual.
Ideally put it on the left side handlebars so it's a quick easy reach with your non-throttle hand. I didn't use the Amazon switch but here's where I put mine for my under mirror driving lights.Thanks for the detailed schematics, I'm putting mine on in a couple of hours. Using the Amazon wiring harness. Do you know any good spot to mount the switch
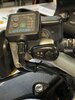
Nice clean install, your switch looks identical to the Amazon switch, did you secure it with a clamp, or Velcro?Ideally put it on the left side handlebars so it's a quick easy reach with your non-throttle hand. I didn't use the Amazon switch but here's where I put mine for my under mirror driving lights.
(my Zmoons are tied direct into my low and high headlights with just a master ON/OFF switch located below the right fairing pocket. (Below the left fairing lockable pocket is my 12v plug)