Installing Rostra Cruise Control on ST1100

Joined
Aug 21, 2018
Messages
6,778
Location
Richmond, VA
Bike
'01 & '96 ST1100s
STOC #
9007
Thanks, Larry the PN helps a lot.
You're welcome. I already have one on my Nighthawk, and one ready to go on my ST1100.

I started installing car stereo and cruise controls back in the days of 8-tracks (and 4-tracks).

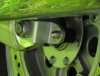
The big decisions are throttle-cable attachment, controller choice, and road-speed reading.
 
Last edited:
Joined
Jun 21, 2011
Messages
1,117
Age
71
Location
Ada ( Grand Rapids ) Michigan
Bike
'07 ST 1300 & '91 GW
STOC #
8421
I bought my C.C from Dakota Digital , years ago . I later noticed It seemed like an identical unit to Rostra . On the rear wheel , left side , I made an aluminum disc with 8 magnets glued & thin wired on & used the pickup coil to sense the magnets , for road speed .
( I did not want to get into the ST's electronics deeply , to avoid screwing up ECM or whatever , making the ST less reliable .)

The silver "switch housing" was made out of a hogged out chunk of nylon .
 

Attachments

Last edited:
Joined
Sep 24, 2020
Messages
98
Age
76
Location
Shelton, WA
Bike
Moto Guzzi V7 850 Sp
Check your download files. It's a PDF and readable in Adobe.
Sorry for the confusion, I wasn't talking about the doc, I got that just fine. I was referring to the URL for the Rosta unit in the bill of materials. Very nice write-up. My riding partner just got his ST1300PA so I sent him a copy as well. Our spring farkle party is already being planned with steaks and ale when the work is done!
 
Joined
Aug 21, 2018
Messages
6,778
Location
Richmond, VA
Bike
'01 & '96 ST1100s
STOC #
9007
On my Nighthawk, I attached the four little magnets that came with the CC to the cylindrical side of the rear wheel hub with a longer nylon wire-tie. I attached the coil and bracket kit (250-4165) to the swing-arm, bent so the head of the coil bolt points forward.

I used a TrailTech 8500-RS handle-bar switch pod as the controller, with the center button wired as a cancel switch. I wired the kick-stand-down light through a resistor as the 'engaged' light. Bright enough to see in the sun, dim enough to be tolerable at night.
 
Joined
Sep 24, 2020
Messages
98
Age
76
Location
Shelton, WA
Bike
Moto Guzzi V7 850 Sp
Check out the installations for the 1300, I believe you can get the speed via the ECM and do away with the wheel sensor. You may need a pulse divider if you go that route.

here's a link that might be helpful to you.
Thanks for the tip on the speed sensor. I'm poring over the wiring diagrams and I believe there are a couple of places where I can pull signal - same circuit, just different places to tap in.
 
Joined
Sep 24, 2020
Messages
98
Age
76
Location
Shelton, WA
Bike
Moto Guzzi V7 850 Sp
On my Nighthawk, I attached the four little magnets that came with the CC to the cylindrical side of the rear wheel with a longer nylon wire-tie. I attached the coil and bracket kit (250-4165) to the swing-arm, bent so the head of the coil bolt points forward.

I used a TrailTech 8500-RS handle-bar switch pod as the controller, with the center button wired as a cancel switch. I wired the kick-stand-down light through a resistor as the 'engaged' light. Bright enough to see in the sun, dim enough to be okay at night.
I've got a non-lighted st1800 right-side switch and was pondering the system active light situation. Thanks for the tip about the side-stand down warning light. Any particular ohm value on the resistor? I've got a bunch of old electronics lying around waiting to go to the recyclers, I'd like to clip one out before I get rid of the stuff.
 
Joined
Aug 21, 2018
Messages
6,778
Location
Richmond, VA
Bike
'01 & '96 ST1100s
STOC #
9007
I happened to have a 50-ohm power resistor handy, which worked out well.

I figured: 3w @ 12v = 1/4a. Then, 1/4a @ 12v = 48 ohms.

Twice the resistance = half the current = 1/4 the wattage.

So the bulb glows at approximately 1/4 brightness (presuming power = lumens)
 
Top Bottom