My ST1300 GPS Mount

Joined
Jun 15, 2021
Messages
6
Age
54
Location
Washington
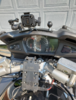
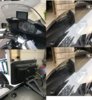
For my GPS mount, I wanted to avoid RAM ball mounts and go for a simple, permanently installed mount for my Garmin 396. I chose Traxxion Dynamics Goldwing GPS mount, but had to modify it slightly to fit my ST1300. It's made of aluminum, so it was fairly easy to bend it to fit, and it had just enough predrilled holes for the Garmin cradle mount (it did not have unsightly universal mounting holes). I loose the adjustability that RAM ball mounts provides, but I gain the simplicity and clean install that I don't have to worry about on my daily commute.
 

Attachments

STRider

Site Supporter
Joined
Mar 17, 2020
Messages
1,114
Age
64
Location
Oregon
Bike
2012 ST1300A
STOC #
50
Coming from a fan of RAM mounts... I like it! Nicely adapted to your scoot and quite attractive.
 
OP
OP
Jance
Joined
Jun 15, 2021
Messages
6
Age
54
Location
Washington
Thanks! I'm also pretty proud of the gear indicator I installed inside the panel meter. I know it's been done before, but after having one on my R1150RT, I feel the need to have one.
 
Joined
Sep 16, 2018
Messages
414
Location
Northern Baltimore suburbs
Bike
ST-1300A '09/'12
2024 Miles
000298
Thanks! I'm also pretty proud of the gear indicator I installed inside the panel meter. I know it's been done before, but after having one on my R1150RT, I feel the need to have one.
Which gear indicator did you go with? Was it difficult to connect? I'm thinking of this mod and was considering a GiPro but, as I understand it, there are buttons on it that you need to press to calibrate it. That would be difficult, to say the least, if it was inside the panel.
 

STRider

Site Supporter
Joined
Mar 17, 2020
Messages
1,114
Age
64
Location
Oregon
Bike
2012 ST1300A
STOC #
50
Thanks! I'm also pretty proud of the gear indicator I installed inside the panel meter. I know it's been done before, but after having one on my R1150RT, I feel the need to have one.
Which gear indicator did you go with? Was it difficult to connect? I'm thinking of this mod and was considering a GiPro but, as I understand it, there are buttons on it that you need to press to calibrate it. That would be difficult, to say the least, if it was inside the panel.
Nice job @Jance ! I didn't notice your gear indicator at first. Looks just like my install from earlier this spring. How did you manage the wiring and what year is your 1300? I ran my wire out through a hole drilled in the instrument case sealed with a grommet. Then I placed a connector in the wire behind the headlight to ease servicing of the upper cowling area. I then ran additional wire back the the ECM diagnostic port under the passenger seat. See this link to my installation thread. YAI/GIT (Yet another instrument/gear indicator thread)

@Nexus - check out both my thread linked above and this thread for more info about gear indicator options. honda st1300 gear indicator

Based on the instructions on the GIPro site, I think you can program it to learn gear positions before sealing it inside the instrument pod. The one I bought is simply a display with no touch controls or ambient light sensor. I'm pretty happy with mine in red. You should consider this when you decide what color you buy. At night the red display isn't distracting or intrusive to me. I'm not so sure I could say the same about a blue or green display.
 
Last edited:

Sadlsor

Site Supporter
Joined
Jan 15, 2020
Messages
4,284
Age
66
Location
Birmingham, Alabama
Bike
2008 ST1300A
STOC #
9065
Ditto the other comments; I particularly admire the clean fitting of the power cable. I try to use those edge protectors / grommets in similar fashion, really dresses it up and gives a factory install appearance.
In my case, I may try to see what the cord looks like coming out of the speaker grill or the seam at the front of the black "dashboard."
Which model GPS is that, by the way?
 
Joined
Sep 16, 2018
Messages
414
Location
Northern Baltimore suburbs
Bike
ST-1300A '09/'12
2024 Miles
000298
@Nexus - check out both my thread linked above and this thread for more info about gear indicator options.
Nice! Great write-up!
The link to the indicator doesn't seem to work, but I'm guessing it's this one:

For some reason, the forum seems to mash the link up so Amazon has no idea what you're looking for. I had to shrink the link with bitly to get it to work.

It looks like the red version now only comes with the "Whole-set" which includes a handlebar mount. I'm not gonna need that but it's still cheaper than the GiPro.

But, now after seeing your gauges, I think I want to do that too!
 
OP
OP
Jance
Joined
Jun 15, 2021
Messages
6
Age
54
Location
Washington
More about the Gear Indicator: My ST1300 is a 2010 model, with the newer ECU. I took a risk and bought my Gear indicator from Amazon. It has no buttons and is Red, but I preprogrammed it before I installed it. The instructions weren't 100% clear when you only have 5 gears, so I had to search around on what to do when programming only for 5 gears (basically, turn off power right after programming gear 5). I didn't take advantage of the other features such as shift indication, and whatnot. I also didn't put in a connector for serviceability as the meter panel is rarely removed (I did put one for the GPS power since I needed to also route it into the grommet), although I do worry that it wasn't fused in anyway. Since I work on aircraft monitors, I used techniques and materials to reduce and eliminate dust within the instrument panel. When splitting the meter panel, there are also tiny little black rubber bumpers that fit in pegs that are easily lost if you aren't careful. And yeah, drilling the holes to route the wire was a pain- I have an "exploratory" hole on the outside panel (it's hidden and does not show in driver view) that didn't quite line up on the first try! I did have to extend the three wire cable to reach the red plug in the back though.
 

Attachments

Last edited:
OP
OP
Jance
Joined
Jun 15, 2021
Messages
6
Age
54
Location
Washington
Which model GPS is that, by the way?
The GPS is a Garmin Zumo 396 LMT-S I bought on Craigslist for $150. I've been impressed with it's features such as tight smartphone notification integration (weather\traffic data, phone notifications, etc) but I kind of wanted a TPMS system that the older Zumo 395 had. I removed the Release button from the cradle by taking it apart and saving the button+spring, and I applied RTV around the power connector to reduce corrosion. Like I mentioned before, I used a Deans micro connector for the power cable (wrapped in heat shrink) to ease the removal of that dash top since windshield motor maintenance in the future is likely.

When I got the bike, I also installed a dashcam and USB plug in the left side cubby. I just wanna show off my wiring diagram (Attached)!
 

Attachments

Last edited:

STRider

Site Supporter
Joined
Mar 17, 2020
Messages
1,114
Age
64
Location
Oregon
Bike
2012 ST1300A
STOC #
50
More about the Gear Indicator: My ST1300 is a 2010 model, with the newer ECU. I took a risk and bought my Gear indicator from Amazon. It has no buttons and is Red, but I preprogrammed it before I installed it.
...
And yeah, drilling the holes to route the wire was a pain- I have an "exploratory" hole on the outside panel (it's hidden and does not show in driver view) that didn't quite line up on the first try! I did have to extend the three wire cable to reach the red plug in the back though.
Sounds very similar to my setup @Jance Once again, nicely done.

In my case, I may try to see what the cord looks like coming out of the speaker grill or the seam at the front of the black "dashboard."
@Sadlsor, I routed the cable for my zumo XT between the meter panel and the windscreen inner cowl. The cable passes through the pre-existing gap in the panels without cutting or otherwise modifying the plastic. Its powered through a switched line in the quartet harness. Works and looks great.

Oh, I recently addressed a thorn in my side. The RBIS (RAM ball instrument shelf) was attached to the bike with 1/4-20 bolts and T-nuts. I recently replaced those fractional abominations with M6 versions. Now the only fractional fastener on my bike is that stud and female threaded RAM ball in the middle of the RBIS. I'll allow it since in practice I'll never separate those two pieces. :)

1628031783626.png
 
Last edited:

Sadlsor

Site Supporter
Joined
Jan 15, 2020
Messages
4,284
Age
66
Location
Birmingham, Alabama
Bike
2008 ST1300A
STOC #
9065
Sounds very similar to my setup @Jance Once again, nicely done.

@Sadlsor, I routed the cable for my zumo XT between the meter panel and the windscreen inner cowl. The cable passes through the pre-existing gap in the panels without cutting or otherwise modifying the plastic. Its powered through a switched line in the quartet harness. Works and looks great.
Yeah, that is actually my preference, but wasn't available to go look at that seam on the bike when I posted.
I have the QH, not installed yet.
 

STRider

Site Supporter
Joined
Mar 17, 2020
Messages
1,114
Age
64
Location
Oregon
Bike
2012 ST1300A
STOC #
50
@Sadlsor as you can guess, this wire routing is really restrictive, meaning it effectively represents a permanent installation (actually, pretty much any of these are; as is @Jance 's installation). The power connector for the zumo XT is captured within its mount, so when the RAM bracket is released the mount remains attached to the bike solely by that cable. The bracket @Jance used doesn't share this *feature*. Something to keep in mind while washing the bike or during extreme weather conditions. I'm more worried about some miscreant destroying my wiring by trying to rip the mount off the dash however. Perhaps next up will be the ZumoLock and cover. Garmin provides only a small cover that protects just the electrical terminals of the XT mount whereas earlier zumo models have a cover which protects the entire mount. The ZumoLock offers a cover for the entire mount in its product line.

You're probably already doing this, but I squirted a dollop of dielectric grease into the quartet harness connector when I assembled it. In fact I do that on pretty much all my non-sealed, non-waterproof connectors.
 

Sadlsor

Site Supporter
Joined
Jan 15, 2020
Messages
4,284
Age
66
Location
Birmingham, Alabama
Bike
2008 ST1300A
STOC #
9065
I have the 595, so the wiring stays attached to the Garmin mount bracket, which is in turn mounted to a Migsel dash mount via RAM mount. This allows me to remove only the GPS, which I can stow in a jacket pocket, or lock in the saddlebags or trunk.
THAT is one of the handful of things I do like about this model.
I doubt anyone but some vandal would be interested in stealing a mounting bracket for a GPS that they don't have.
 
Joined
Sep 20, 2021
Messages
7
Age
54
Location
Maryland
Sounds very similar to my setup @Jance Once again, nicely done.


@Sadlsor, I routed the cable for my zumo XT between the meter panel and the windscreen inner cowl. The cable passes through the pre-existing gap in the panels without cutting or otherwise modifying the plastic. Its powered through a switched line in the quartet harness. Works and looks great.

Oh, I recently addressed a thorn in my side. The RBIS (RAM ball instrument shelf) was attached to the bike with 1/4-20 bolts and T-nuts. I recently replaced those fractional abominations with M6 versions. Now the only fractional fastener on my bike is that stud and female threaded RAM ball in the middle of the RBIS. I'll allow it since in practice I'll never separate those two pieces. :)

1628031783626.png
STRider, what is the RAM p/n for the RBIS? I cannot find the RBIS on the RAM site or Google search. Thx
 

STRider

Site Supporter
Joined
Mar 17, 2020
Messages
1,114
Age
64
Location
Oregon
Bike
2012 ST1300A
STOC #
50
STRider, what is the RAM p/n for the RBIS? I cannot find the RBIS on the RAM site or Google search. Thx
Hi @wldct2 .

The RBIS isn't a RAM product but used their hardware in its construction. The commercial version was sold by http://www.sporttouringgear.com/ but that site is dead. Here's a link to it from the Wayback Machine. https://web.archive.org/web/20150818164600/http://shop.sporttouringgear.com/RBIS-Triple-Ball-System-for-ST1300-HST13-RBIS-3.htm

In this thread I detail the parts and construction of a RBIS imitation I would build myself if I hadn't found one listed for sale by another member earlier in the year.

They do come up for sale on occasion and go fast. If you're comfortable with metal fabrication and have access to tools that can form a curve in a piece of aluminum bar stock this mount is 'easily' replicated.

In this thread @TXRoadRash details his construction which @RealST later critiques and then points to the spottouringgear.com site where they RBIS was sold. Long time members of this site are better able to explain the genesis of the RBIS, which I believe was first conceived for the Honda NT700.

The only unique part requiring fabrication is that bar of metal (aluminum recommended). The rest are readily sourced from RAM and other suppliers of quality fasteners.

Good luck!
 
Top Bottom