
Well I wasn't sure if this was the right place but figured that changing tires was part of maintenace so I'll start here.
I wanted to be able to change my own tires so I shopped around for a machine and decided on the No-Mar JrPro model.

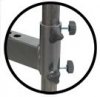
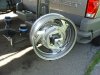
One of the reasons I went with this version over the standard was that it did have nuts welded to the attachment points but instead the tubing is drilled and taped. I also like the swing of the top bar instead of having to pivot up on the standard. It came with what you see in the picture which is a base that is anchored to the ground with 1/2" lag bolts and concret anchors, the dis-mount bar, the machine itself and 3 Xtra Hands.

I also picked up their receiver hitch mount which allows it to be used where ever I care to take it.

NO-Mar Spoon Bar 4-Pack and their tire lube.

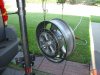
Since they do such a good job describing the process in the video's on their site, which they also include with the machine on CD, I won't go into the process itself. I will say that the process itself was easy with this machine. I haven't decided on a mounting location yet so I simply used the receiver adapter and mounted it on my Avalanche.
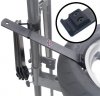
The Xtra Hands came in handy more on the rear wheel than the front. I did use the spoons to finish the mount of both tires though. The ST rims don't really have much of a valley in them so I just used the Xtra hands to space the bead down for about half the last bead and then spooned the rest.
Not a single mark on either rim! The only thing that touches the wheels is whatever type of nylon or delrin material they use.
Once the wheels were disassembled I washed them off and used the compressor to blow dry them before balancing.
I decided to make my own hanging static balancer. Basically, 2 bearings (size 608 - inline skate bearings) mounted between U-shaped aluminum plate with 1-1/2" hole cut to allow axle to pass through. 8-32 screw with bushing used to attach 550 cord (parachute cord) to suspend them. The bearings I bought have non-contact dust shields on both sides of the bearings. A bearing sandwich, a size 8 bolt, aluminum plate, washer, bearing, washer, aluminum plate, nylock nut.
Being a hanging balancer I just hung the wheel from the top bar of the tire machine. I used an inclinameter against the disc to ensure the wheel was upright.
Some closing notes:
The tires I mounted are Avon AV45/46's. They are not marked for the light spot on the tire. The process I followed was to find the heavy spot of the wheel itself, which was not the valve stem. I then balanced the wheel by itself and then mounted the tire. I found the heavy spot of the tire. I then took off one side so I could rotate the tire, as I was unable to do it with both beads mounted, and positioned the heavy spots opposite each other. After remounting the bead I balanced the tire.
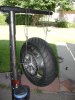
Do not use much tire lube during the mounting process. I didn't think that I did but as you can see in the last attached photo, the tires actually slipped on the rim on my ride to Gonzo's when I was done. Since mounting the new tires I have put 200 miles on them and the slight amount the tire moved doesn't seem to have affected the balance that I can tell. Now I have to decide if I want to pull them off the bike and recheck the balance as they are running smooth up to 80 right now.
The weights I used were a combination of what came off the wheels and the BMW stick-on's. Be advised they are about $2.75 EACH. I bought a small assortment of 5's, 10's and 15 gm's. I pulled off a 20 gm and 30 gm. The front had the 30 but balanced with 20, the back had 20 and balanced with 35.
If you decide to make your own static balancer make sure the aluminum you buy is one of the softer versions. Mine was not and presented problems when I went to bend them.
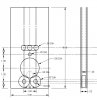
The drawing with measurements does not show the holes in the top of the piece which is just a mirror of the bottom. The reason I did it this way was to help stiffen the assembly.
I almost forgot, would I recommend this tire machine YES! Although I haven't used any other it is well built, easy to assemble and use and does not damage your wheels. If I had to replace it for any reason I would buy another. Besides it's no more expensive than some of the farkles we add to our bikes and you can do it on your schedule and not some dealers or shops schedule.
I wanted to be able to change my own tires so I shopped around for a machine and decided on the No-Mar JrPro model.
One of the reasons I went with this version over the standard was that it did have nuts welded to the attachment points but instead the tubing is drilled and taped. I also like the swing of the top bar instead of having to pivot up on the standard. It came with what you see in the picture which is a base that is anchored to the ground with 1/2" lag bolts and concret anchors, the dis-mount bar, the machine itself and 3 Xtra Hands.
I also picked up their receiver hitch mount which allows it to be used where ever I care to take it.
NO-Mar Spoon Bar 4-Pack and their tire lube.
Since they do such a good job describing the process in the video's on their site, which they also include with the machine on CD, I won't go into the process itself. I will say that the process itself was easy with this machine. I haven't decided on a mounting location yet so I simply used the receiver adapter and mounted it on my Avalanche.
The Xtra Hands came in handy more on the rear wheel than the front. I did use the spoons to finish the mount of both tires though. The ST rims don't really have much of a valley in them so I just used the Xtra hands to space the bead down for about half the last bead and then spooned the rest.
Not a single mark on either rim! The only thing that touches the wheels is whatever type of nylon or delrin material they use.
Once the wheels were disassembled I washed them off and used the compressor to blow dry them before balancing.
I decided to make my own hanging static balancer. Basically, 2 bearings (size 608 - inline skate bearings) mounted between U-shaped aluminum plate with 1-1/2" hole cut to allow axle to pass through. 8-32 screw with bushing used to attach 550 cord (parachute cord) to suspend them. The bearings I bought have non-contact dust shields on both sides of the bearings. A bearing sandwich, a size 8 bolt, aluminum plate, washer, bearing, washer, aluminum plate, nylock nut.
Being a hanging balancer I just hung the wheel from the top bar of the tire machine. I used an inclinameter against the disc to ensure the wheel was upright.
Some closing notes:
The tires I mounted are Avon AV45/46's. They are not marked for the light spot on the tire. The process I followed was to find the heavy spot of the wheel itself, which was not the valve stem. I then balanced the wheel by itself and then mounted the tire. I found the heavy spot of the tire. I then took off one side so I could rotate the tire, as I was unable to do it with both beads mounted, and positioned the heavy spots opposite each other. After remounting the bead I balanced the tire.
Do not use much tire lube during the mounting process. I didn't think that I did but as you can see in the last attached photo, the tires actually slipped on the rim on my ride to Gonzo's when I was done. Since mounting the new tires I have put 200 miles on them and the slight amount the tire moved doesn't seem to have affected the balance that I can tell. Now I have to decide if I want to pull them off the bike and recheck the balance as they are running smooth up to 80 right now.
The weights I used were a combination of what came off the wheels and the BMW stick-on's. Be advised they are about $2.75 EACH. I bought a small assortment of 5's, 10's and 15 gm's. I pulled off a 20 gm and 30 gm. The front had the 30 but balanced with 20, the back had 20 and balanced with 35.
If you decide to make your own static balancer make sure the aluminum you buy is one of the softer versions. Mine was not and presented problems when I went to bend them.
The drawing with measurements does not show the holes in the top of the piece which is just a mirror of the bottom. The reason I did it this way was to help stiffen the assembly.
I almost forgot, would I recommend this tire machine YES! Although I haven't used any other it is well built, easy to assemble and use and does not damage your wheels. If I had to replace it for any reason I would buy another. Besides it's no more expensive than some of the farkles we add to our bikes and you can do it on your schedule and not some dealers or shops schedule.
Attachments
-
 46.4 KB Views: 32
 -
 4.2 KB Views: 80
 -
 39.8 KB Views: 58
 -
 110.4 KB Views: 15
 -
 100 KB Views: 17
 -
 138.1 KB Views: 16
 -
 100.1 KB Views: 15
Last edited:

") .
.