
Now I have something "new" to me... and a new project
- Thread starter rjs987
- Start date
OP
OP
- Joined
- Sep 25, 2009
- Messages
- 3,056
- Age
- 68
- Location
- West Des Moines, IA
- Bike
- 2022 Kymco AK 550
- 2024 Miles
- 001059
- STOC #
- 8058
Those of you who do much welding know that any weld joint will shrink as it cools. We checked and checked and checked the alignment to the angle on the template I made to ensure it was right BEFORE the welding was done and also JUST after the initial tack weld was made. Later in the evening when I was home I was rechecking the 2 tubes and noted that the angles on one were off from the other one. So I checked on the template again (finally) and found that both tubes angles were off by a few degrees. All angles were too sharp and needed to be opened up a few degrees. I calculated and determined that the lower angles on both tubes were within a half degree of each other but the upper angle bends were off by 3-4 degrees or more. So the next day I went back and the welder cut both tubes at the bend and we opened up the angles over compensating for shrinkage and drawing in the angle. This time we clamped each tube directly on the template with one leg offset by a few degrees. We did not clamp on tube to the other tube to line them up since that didn't work the first time. This time both tubes were exactly inline with each other and the last leg was 1 deg more than I originally wanted. Close enough.
After some thought I found that since the plate is angled back 1 deg that is easily corrected by the thickness of a single washer at the bottom bolts for the plate. So I'll likely put a washer between the hitch tube ends and the plate for the bottom bolts to bring the plate to true vertical OR put the washer between the plate and the receiver on the bottom pair of bolts for the same result.
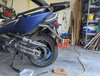
Today I bolted both tubes on the bike, as tight as my fingers could get the nuts. I had cut off the end legs as long as they needed to be (4.25 inches from the top of the lower bend) and both tubes lined up perfectly. With the tubes on the bike the ends of the tubes were inline and level with the bike straight up. I clamped the end plate on the last leg to see if I needed to cut off any from the length and the plate was 1/8" wider than the outside of the tubes so I decided to leave it alone. 11-3/4" for the outside width from one tube to the other and the plate is 12" wide. I lined up the bottom of the plate flush with the bottom of the tubes and put a level on the plate. It is perfectly level. I estimated the height from the floor to be close to 1" lower than the previous owner of the trailer had the receiver on his Gold Wing. I marked and drilled the holes in the plate. 4 holes, 2 on each side, 1" from top and bottom and 7/8" in from the outer edge. Then I marked where to drill the holes for bolts in the lower leg of each tube.
While I have the tubes bolted on the bike I started working on the cross bar for the hanger. I am bending the cross bar to account for clearing the suspension travel of the tire. The rear fender has an angle that the tire will never reach and that is where the cross bar will arch into. That will put the cross bar about 3" down from the top bend in the tubes. I am heating the bend points on the cross bar with my Propane torch. It does get the steel red and easy to bend with a big pipe wrench I have but it does take a little time to heat it up. I'm not finished shaping the cross bar yet but will go back out later tonight to work on it some more... maybe.
Here is what the end plate looks like on the hitch frame. It is wide but that's OK with me. The perspective of the picture makes it look wider than it really is compared to the bike.

After some thought I found that since the plate is angled back 1 deg that is easily corrected by the thickness of a single washer at the bottom bolts for the plate. So I'll likely put a washer between the hitch tube ends and the plate for the bottom bolts to bring the plate to true vertical OR put the washer between the plate and the receiver on the bottom pair of bolts for the same result.
Today I bolted both tubes on the bike, as tight as my fingers could get the nuts. I had cut off the end legs as long as they needed to be (4.25 inches from the top of the lower bend) and both tubes lined up perfectly. With the tubes on the bike the ends of the tubes were inline and level with the bike straight up. I clamped the end plate on the last leg to see if I needed to cut off any from the length and the plate was 1/8" wider than the outside of the tubes so I decided to leave it alone. 11-3/4" for the outside width from one tube to the other and the plate is 12" wide. I lined up the bottom of the plate flush with the bottom of the tubes and put a level on the plate. It is perfectly level. I estimated the height from the floor to be close to 1" lower than the previous owner of the trailer had the receiver on his Gold Wing. I marked and drilled the holes in the plate. 4 holes, 2 on each side, 1" from top and bottom and 7/8" in from the outer edge. Then I marked where to drill the holes for bolts in the lower leg of each tube.
While I have the tubes bolted on the bike I started working on the cross bar for the hanger. I am bending the cross bar to account for clearing the suspension travel of the tire. The rear fender has an angle that the tire will never reach and that is where the cross bar will arch into. That will put the cross bar about 3" down from the top bend in the tubes. I am heating the bend points on the cross bar with my Propane torch. It does get the steel red and easy to bend with a big pipe wrench I have but it does take a little time to heat it up. I'm not finished shaping the cross bar yet but will go back out later tonight to work on it some more... maybe.
Here is what the end plate looks like on the hitch frame. It is wide but that's OK with me. The perspective of the picture makes it look wider than it really is compared to the bike.
Last edited:
OP
OP
- Joined
- Sep 25, 2009
- Messages
- 3,056
- Age
- 68
- Location
- West Des Moines, IA
- Bike
- 2022 Kymco AK 550
- 2024 Miles
- 001059
- STOC #
- 8058
Back home from visiting in Lafayette so back at this project. Doing daycare for our granddaughter today and tomorrow so not much time to work on the bike. But I did get a little done late afternoon. Connected the trailer harness wires and drilled the holes for the end plate in one of the square tubes. Hope to drill the other square tube tomorrow.
I did a lot of rethinking about the hanger bar. I am not able to bend the bolt plate that would sit on top of the bike end frame just under the seat hinge enough to clear the seat hinge as I was wanting to so I need to think of something else. I might be able to mount the top end of the hanger bar a little farther forward without going into the tail. Or maybe I won't need it at all. I am close enough to see how strong the hitch will be without it so will decide after a test pull of the trailer. That test pull will happen after I drill the other square tube, drill the hitch end plate for the Uni-Go receiver, and mount all the hitch frame parts to the bike. Then I can go for a ride with the trailer to see how it pulls.
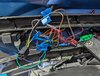
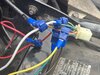
Here is a picture of the wire mess behind the rear right side body of the bike. I will be tying the wire bundle to make it a lot neater before I close it all up. In the lower left of the photo can be seen the square 5 pin connector I added to make it easier to disconnect the trailer wire harness. I may yet rethink that as well since I am using mainly Posi-Tap connectors which are easy to disconnect wires from. I just happened to have that square connector in my electrical parts box.
I did a lot of rethinking about the hanger bar. I am not able to bend the bolt plate that would sit on top of the bike end frame just under the seat hinge enough to clear the seat hinge as I was wanting to so I need to think of something else. I might be able to mount the top end of the hanger bar a little farther forward without going into the tail. Or maybe I won't need it at all. I am close enough to see how strong the hitch will be without it so will decide after a test pull of the trailer. That test pull will happen after I drill the other square tube, drill the hitch end plate for the Uni-Go receiver, and mount all the hitch frame parts to the bike. Then I can go for a ride with the trailer to see how it pulls.
Here is a picture of the wire mess behind the rear right side body of the bike. I will be tying the wire bundle to make it a lot neater before I close it all up. In the lower left of the photo can be seen the square 5 pin connector I added to make it easier to disconnect the trailer wire harness. I may yet rethink that as well since I am using mainly Posi-Tap connectors which are easy to disconnect wires from. I just happened to have that square connector in my electrical parts box.
OP
OP
- Joined
- Sep 25, 2009
- Messages
- 3,056
- Age
- 68
- Location
- West Des Moines, IA
- Bike
- 2022 Kymco AK 550
- 2024 Miles
- 001059
- STOC #
- 8058
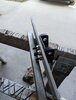
Yesterday afternoon I drilled the holes in the hitch end plate for the Uni-Go receiver and also drilled the holes in the square tubing where that plate will attach. I then bolted the receiver to the end plate for a test fit using regular stainless M8 nuts on the factory bolts. The Uni-Go factory sent me a new bolt kit but didn't yet contact me about paying for it! That's on them. They have 2 bolt kit sizes, a long and short. They sent me the long bolts. Although I think the short bolts would have worked fine. I may cut the bolts shorter. The factory bolt kit comes with 4 flat head bolts, washers, and nylon insert lock nuts. I am waiting to use the nylon insert nuts until the final install. All parts in the bolt kit are stainless the same as the receiver and also the end plate.
Here are a few pics of the receiver bolted on.
Here are a few pics of the receiver bolted on.
OP
OP
- Joined
- Sep 25, 2009
- Messages
- 3,056
- Age
- 68
- Location
- West Des Moines, IA
- Bike
- 2022 Kymco AK 550
- 2024 Miles
- 001059
- STOC #
- 8058
I do hope those crimp connections are ONLY to provide triggers for the relays that actually power your trailer harness connections. (that's why I have a few extra wires in the mix). The factory wires are a lot thinner than the wires you added there. Factory wires are generally only sized for the power the factory intended to run through them and maybe a very little more... such as drawn by the trigger coil in a relay.My ST1100 trailer wiring pics:
No, but every light on the trailer is an LED, so the additional current is minimal.I do hope those crimp connections are ONLY to provide triggers for the relays that actually power your trailer harness connections.
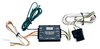
There is also a car-type brake-light/turn-signal combiner module for the trailer.
OP
OP
- Joined
- Sep 25, 2009
- Messages
- 3,056
- Age
- 68
- Location
- West Des Moines, IA
- Bike
- 2022 Kymco AK 550
- 2024 Miles
- 001059
- STOC #
- 8058
You must have one of those USA type trailer lighting systems rather than the simpler Everywhere-else types that keep the turn signals separate from the brakes. ") Ever notice that about cars? Most of the ones designed by USA companies have combined brake/turn lights but cars designed by all other countries keep them separate. It took me a while but when I started pulling trailers with bikes I noticed that. Why does the USA have to make things so complicated. Even HD keeps them separate. (I'm sure there are exceptions though).
Ever notice that about cars? Most of the ones designed by USA companies have combined brake/turn lights but cars designed by all other countries keep them separate. It took me a while but when I started pulling trailers with bikes I noticed that. Why does the USA have to make things so complicated. Even HD keeps them separate. (I'm sure there are exceptions though).
I keep all my electrical farkles separate or isolated from factory electrics as much as possible. It's not only for the amp draw but also if something goes bad with what I added it won't significantly impact the factory systems and I can remove or unplug it without effecting the factory stuff. I had to deal directly with that issue with my Gold Wing 20+ years ago. I had to repair the factory electrical systems/wiring and replace a few major system factory relays due to the PO directly connecting extra lighting and a trailer harness before I could continue riding it. Admittedly there were no LED lights involved back then, but LED lights still draw significantly more current than the trigger coils of relays (depending on the relay used). And lighting was noticeably brighter getting power directly from the battery rather than through other factory circuits. At least that's been my experience, even when I did start using LED lights.
Ever notice that about cars? Most of the ones designed by USA companies have combined brake/turn lights but cars designed by all other countries keep them separate. It took me a while but when I started pulling trailers with bikes I noticed that. Why does the USA have to make things so complicated. Even HD keeps them separate. (I'm sure there are exceptions though).I keep all my electrical farkles separate or isolated from factory electrics as much as possible. It's not only for the amp draw but also if something goes bad with what I added it won't significantly impact the factory systems and I can remove or unplug it without effecting the factory stuff. I had to deal directly with that issue with my Gold Wing 20+ years ago. I had to repair the factory electrical systems/wiring and replace a few major system factory relays due to the PO directly connecting extra lighting and a trailer harness before I could continue riding it. Admittedly there were no LED lights involved back then, but LED lights still draw significantly more current than the trigger coils of relays (depending on the relay used). And lighting was noticeably brighter getting power directly from the battery rather than through other factory circuits. At least that's been my experience, even when I did start using LED lights.
The trailer, which I bought, not built, has combo tail/signal/brake lights.You must have one of those USA type trailer lighting systems rather than the simpler Everywhere-else types that keep the turn signals separate from the brakes.

Pretty simple to get trailer lights with separate winkers (5-wire type).
Greatly simplifies wiring. Or you can combine separate signals from bike/auto to 4-wire trailer with some solid-state relays for AND/OR circuit.
Greatly simplifies wiring. Or you can combine separate signals from bike/auto to 4-wire trailer with some solid-state relays for AND/OR circuit.
I used one of these. I also have on on my Accord.
OP
OP
- Joined
- Sep 25, 2009
- Messages
- 3,056
- Age
- 68
- Location
- West Des Moines, IA
- Bike
- 2022 Kymco AK 550
- 2024 Miles
- 001059
- STOC #
- 8058
I added a module like that to my Toyota Corolla to handle pulling a U-Haul trailer once. When I returned the trailer the U-Haul people tried to pull the attached cable out of the car thinking it was theirs. They practically tore up the liner in the trunk. I also made another 5 pin flat plug tapped into the wires on the input side of that module to handle most other trailers I pulled. I saved all of it when I sold the car and am now using the flat 5 pin harness for this project. Since the Uni-Go is originally a New Zealand company the trailer is designed with separate turn and brake lights. My previous Mini-Mate and Time Out campers were USA designed but being made specifically for motorcycles had separate turn and brake lights. Been a long time since I've seen a mc trailer with combined turn and brake lights.I used one of these. I also have on on my Accord.
That reminded me; the converter in the Accord has plug'n'play connectors that match the Honda ones.
I was basically going for standard 4-wire compatibility. I brought the above trailer home with my car.
I was basically going for standard 4-wire compatibility. I brought the above trailer home with my car.
OP
OP
- Joined
- Sep 25, 2009
- Messages
- 3,056
- Age
- 68
- Location
- West Des Moines, IA
- Bike
- 2022 Kymco AK 550
- 2024 Miles
- 001059
- STOC #
- 8058
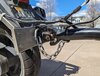
Decided to not use the square trailer harness plug. Those square plugs are hard to connect and disconnect and the only reason I'd need it is to do as I did with my ST1100 trailer harness. On my ST I pulled out the trailer harness cable when I wasn't pulling the trailer. On the ST that was easy to so since the cable just slipped out through the bottom from under the seat. This time, on my AK I'd have to remove the left side hitch frame tube if I used that square plug. I'd also have to pull the storage box out to get to the plug inside. So I just connected the end of the trailer harness cable to the wires/Posi-Tap connections. I made a notch in the hole for the left square tube to allow the trailer harness cable to pass out of the body along the top of the tube. When I'm not pulling the trailer I have a cover/cap for the flat 5 pin connector and will just tie it to the receiver.
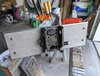
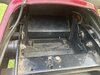
I connected the trailer cable and tied up the wire mess. In this picture I have the harness cable zip tied on the rear cross bar. The 2 threaded bolt holes just outside where the zip ties are seen is where the rear bolts go for the storage box. There are nubs on the storage box that hold it off the cross bar giving plenty of space for the ties.
I connected the trailer cable and tied up the wire mess. In this picture I have the harness cable zip tied on the rear cross bar. The 2 threaded bolt holes just outside where the zip ties are seen is where the rear bolts go for the storage box. There are nubs on the storage box that hold it off the cross bar giving plenty of space for the ties.
OP
OP
- Joined
- Sep 25, 2009
- Messages
- 3,056
- Age
- 68
- Location
- West Des Moines, IA
- Bike
- 2022 Kymco AK 550
- 2024 Miles
- 001059
- STOC #
- 8058
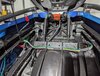
Put it all together today. Temps in the garage were just barely 50F but I put on an extra sweatshirt and went to work. I torqued the bolts on the receiver to a tight 3 finger mechanics tightness... actually 4 fingers tight with my hand close to the ratchet head. Then I installed the square tubes on each side. There was a bit more adjusting to do with the flat bar on the ends of the square tubes to be tight and flush with the spacers AND the bike frame. The bolts to the bike frame were also torqued same as the receiver bolts. Since these nuts and bolts are a metric 10.9 grade hardness I could tighten them even just a little more without worry of them being over torqued.
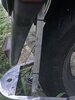
Then came time to mount the end plate on the ends of the square tubes. The holes at the ends of the tubes were not perfectly aligned so I inserted my round file in my drill and filed them a bit to enable the bolts to be pushed in without too much pulling in on the tubing ends. There is still barely a little stress on the tubing ends pulling them inward just slightly. Since the end angles of the tubing was about 1 to 1.5 deg off I added a washer to the bottom bolts between the end plate and the square tube ends. When all the bolts were tightened I put a vertical level on the end plate and found it was less than 1 deg forward at the top. This is where I wanted it to be since that will level out with a little extra sag on the rear of the bike when loaded in the storage box and in the trailer. I will leave the extra length of the bolts alone for now since the long receiver bolts are behind the mud flap. The end plate bolts are well outside the rear tire so no worries there.
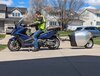
In the picture where the trailer is hitched to the bike I put a board under the rear wheel same as is under the front wheel of the bike to level it. That shows close to how the trailer will sit behind the bike. I'm sure a little more sag in the rear suspension will have the front of the trailer down just a little but it looks like I might not have to adjust the trailer tongue down any. I have the receiver 2 inches lower than the original owner had it. Will see when I have a test load in it. Also in that picture the single safety chain (all that is needed for this type of trailer) is just hanging. I am waiting for a special threaded quick link that will be used to hook the safety chain to the receiver. While the trailer was hooked up and the electrical harness plugged in I tested all the lights and everything works as expected.
With all the bolts tight I grabbed the end plate of the hitch and wiggled it up and down, left and right, forward and back as hard as I dared. This hitch as it is so far, without the hanger bar, is the strongest stiffest sturdiest hitch I've had on any bike... maybe my old Gold Wing hitch was about the same but that one was bolted directly to the frame under the saddle bags. Other hitches, like on the ST1100, had more wiggle than the hitch I just installed on the AK. I could wiggle the entire bike but the hitch itself did not wiggle at all separately from the entire bike. The bike and hitch frames are one unit. I really don't think any way of adding a hanger bar will make any difference in the sturdiness of this hitch.
The next thing I plan to do is to put some load in the trailer and in the storage box on the bike and go for a few test rides so check how it tracks behind the bike. Once that is done, if all goes well, I will be removing the hitch parts again and cover all the parts with a rubberized coating. Then I'll install the hitch frame permanently.


Then came time to mount the end plate on the ends of the square tubes. The holes at the ends of the tubes were not perfectly aligned so I inserted my round file in my drill and filed them a bit to enable the bolts to be pushed in without too much pulling in on the tubing ends. There is still barely a little stress on the tubing ends pulling them inward just slightly. Since the end angles of the tubing was about 1 to 1.5 deg off I added a washer to the bottom bolts between the end plate and the square tube ends. When all the bolts were tightened I put a vertical level on the end plate and found it was less than 1 deg forward at the top. This is where I wanted it to be since that will level out with a little extra sag on the rear of the bike when loaded in the storage box and in the trailer. I will leave the extra length of the bolts alone for now since the long receiver bolts are behind the mud flap. The end plate bolts are well outside the rear tire so no worries there.
In the picture where the trailer is hitched to the bike I put a board under the rear wheel same as is under the front wheel of the bike to level it. That shows close to how the trailer will sit behind the bike. I'm sure a little more sag in the rear suspension will have the front of the trailer down just a little but it looks like I might not have to adjust the trailer tongue down any. I have the receiver 2 inches lower than the original owner had it. Will see when I have a test load in it. Also in that picture the single safety chain (all that is needed for this type of trailer) is just hanging. I am waiting for a special threaded quick link that will be used to hook the safety chain to the receiver. While the trailer was hooked up and the electrical harness plugged in I tested all the lights and everything works as expected.
With all the bolts tight I grabbed the end plate of the hitch and wiggled it up and down, left and right, forward and back as hard as I dared. This hitch as it is so far, without the hanger bar, is the strongest stiffest sturdiest hitch I've had on any bike... maybe my old Gold Wing hitch was about the same but that one was bolted directly to the frame under the saddle bags. Other hitches, like on the ST1100, had more wiggle than the hitch I just installed on the AK. I could wiggle the entire bike but the hitch itself did not wiggle at all separately from the entire bike. The bike and hitch frames are one unit. I really don't think any way of adding a hanger bar will make any difference in the sturdiness of this hitch.
The next thing I plan to do is to put some load in the trailer and in the storage box on the bike and go for a few test rides so check how it tracks behind the bike. Once that is done, if all goes well, I will be removing the hitch parts again and cover all the parts with a rubberized coating. Then I'll install the hitch frame permanently.
Sadlsor
Site Supporter
- Joined
- Jan 15, 2020
- Messages
- 4,284
- Age
- 66
- Location
- Birmingham, Alabama
- Bike
- 2008 ST1300A
- STOC #
- 9065
Cool!
If you have a GoPro or action can, you could mount it on the hitch bar to record what the trailer is doing, allowing you to focus your attention on the road ahead.
Reviewing the video will add to your confidence that nothing is amiss on your test ride.
If you have a GoPro or action can, you could mount it on the hitch bar to record what the trailer is doing, allowing you to focus your attention on the road ahead.
Reviewing the video will add to your confidence that nothing is amiss on your test ride.
- Joined
- Oct 26, 2020
- Messages
- 1,764
- Location
- Makefield Highlands PA
- Bike
- 2016 ST1300P
- 2024 Miles
- 002771
Good Stuff Robert! Congratulations, it was an exciting project to watch. Would the wife go with you to a parking lot and take a video, assuming of course your riding straight to a parking lot?
OP
OP
- Joined
- Sep 25, 2009
- Messages
- 3,056
- Age
- 68
- Location
- West Des Moines, IA
- Bike
- 2022 Kymco AK 550
- 2024 Miles
- 001059
- STOC #
- 8058
I'll start out just riding around the neighborhood. I think I'll be able to see the trailer in my mirrors easily enough to see what's happening back there. If it gets bad I'll definitely feel it.
After the neighborhood I'll venture out to some of the main roads around here with speed limits of 40-45 mph. Then, if all is good there, I'll find a low traffic road nearby at 55 mph and eventually maybe get out on the Interstate for a short run where there are some 65 and 70 mph speed limits. Although traffic is much faster than that as is typical I intend to try a time when there is less of it to deal with. All will depend how the trailer tracks at a lower speed before attempting a faster speed. I will do this testing with very little weight in the trailer at first and then maybe 30-40 lbs in the trailer. I do want to have my wife follow me around during some of this so I don't have to divert too much attention to it.
After the neighborhood I'll venture out to some of the main roads around here with speed limits of 40-45 mph. Then, if all is good there, I'll find a low traffic road nearby at 55 mph and eventually maybe get out on the Interstate for a short run where there are some 65 and 70 mph speed limits. Although traffic is much faster than that as is typical I intend to try a time when there is less of it to deal with. All will depend how the trailer tracks at a lower speed before attempting a faster speed. I will do this testing with very little weight in the trailer at first and then maybe 30-40 lbs in the trailer. I do want to have my wife follow me around during some of this so I don't have to divert too much attention to it.
OP
OP
- Joined
- Sep 25, 2009
- Messages
- 3,056
- Age
- 68
- Location
- West Des Moines, IA
- Bike
- 2022 Kymco AK 550
- 2024 Miles
- 001059
- STOC #
- 8058
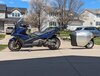
My wife took our granddaughter for an outing so I took some time to load up and hook up the trailer and put a load on the bike to see how it sits. I put a big bag of mulch inside the trailer along with my tent and a few other camping things and also put a 20+ lb bag of rubber mulch on the pillion to simulate a full storage box under the seat. The result being a VERY full load. The front bottom of the trailer needs to be level... or better just higher than level than the rear bottom of the trailer in front of the wheel. I also wanted to see if the end plate was still vertical with a load on the bike and in the trailer.
Both criteria were met today. I was holding the bike VERY CAREFULLY right at the balance to check the end plate vertical alignment and on all 3 wheels it was same as I measured earlier with the board under the front wheel and the bike on the center stand. The pictures here show that the front bottom "feet" of the trailer are just a bit higher than the flat rear bottom of the trailer. While I was sitting on the bike to check how level the trailer was with weight on everything I tried to balance the bike with my toes just barely on the ground. Perfect. I a bit of backing up to enable me room to pull forward into the garage (behind the camera) so was reminded how that works from when I did the same with my previous bike/trailer experiences.
Later tonight or maybe tomorrow I'll get out for some test riding with the trailer. Here are photos from this afternoon.