Right Cylinder Cam Chain tensioner...

RCS

Joined
Jul 3, 2008
Messages
1,401
Location
Stamford, CT
I get to change one shim on my right bank #2 (exhaust) cylinder. Yea me. For this task, I ordered the Hot Cams shim kit, micrometer, Ron Ayers cam chain tensioner "Stopper Tool", airbox tube washers, moly lube, and new cam washers.

In reading the manual and the posts in this section I still have four questions. First, can I do this alone with two hands? Second, where is the Cam Chain tensioner access shaft located on the engine for the right cylinder bank? Third, how much bike disassembly do I need to do to get to the cam chain tensioner access shaft? Lastly, can I use the Ron Ayers special "Stopper Tool" or do I need something else to release (and hold) cam chain tension?
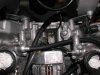
 

wjbertrand

Ventura Highway
Joined
Feb 8, 2005
Messages
4,420
Location
Ventura, CA
The manual says you have to pull the throttle bodies to get at the tensioner. Unfortunately, unlike the left side the tensioner is toward the inside. A couple of folks have figured out how to get at it without pulling the T-bodies, but I'm not sure what they did. For my part, knock wood, I haven't had to mess with the right side yet.

What is a cam washer? I've made adjustments on the left side but never replaced any washers.
 
OP
OP
RCS

RCS

Joined
Jul 3, 2008
Messages
1,401
Location
Stamford, CT
The manual says you have to pull the throttle bodies to get at the tensioner. Unfortunately, unlike the left side the tensioner is toward the inside. A couple of folks have figured out how to get at it without pulling the T-bodies, but I'm not sure what they did. For my part, knock wood, I haven't had to mess with the right side yet.

What is a cam washer? I've made adjustments on the left side but never replaced any washers.
A cam washer is item #16 in the diagram/link below. The manual instructs to replace them when changing shims.

http://www.hdlparts.com/fiche_section_detail.asp?section=159755&category=MOTORCYCLES&make=HONDA&year=2004&fveh=3697

On what page of the manual does it reference pulling the throttle bodies? Maybe I have an abbreviated manual.
 
Joined
Nov 9, 2008
Messages
353
Location
pa
This is just a thought and it has been used and does work. You can make a tool out of wood, cut it so it slips down and holds the cam chain against the guides and tensioner. Attach apiece of wire to it so it can be pulled out when finished. This will hold the chain and keep the auto-tensioner from extending. You will have to remove the cam gear(s) from the cam(s) to remove the camshaft for shim replacement but it should save a lot of time. Worth a thought anyway.
 
OP
OP
RCS

RCS

Joined
Jul 3, 2008
Messages
1,401
Location
Stamford, CT
This is just a thought and it has been used and does work. You can make a tool out of wood, cut it so it slips down and holds the cam chain against the guides and tensioner. Attach apiece of wire to it so it can be pulled out when finished. This will hold the chain and keep the auto-tensioner from extending. You will have to remove the cam gear(s) from the cam(s) to remove the camshaft for shim replacement but it should save a lot of time. Worth a thought anyway.
I like this idea!

I did purchase the $45 Ron Ayers special cam tension tool so if I can use it without too much trouble, I'd like to. Just don't know where it fits into the engine. Anybody have a naked picture of the ST1300 engine so I can see this cam chain tension access point for the right cylinder bank?

BTW, below is a link to an article with very good background (Oh, and I purchased the special long screwdriver too per Curt's recommendation - so I got that going for me)...

https://www.st-owners.com/forums/showthread.php?t=19514
 
Joined
Nov 9, 2008
Messages
353
Location
pa
I like this idea!

I did purchase the $45 Ron Ayers special cam tension tool so if I can use it without too much trouble, I'd like to. Just don't know where it fits into the engine. Anybody have a naked picture of the ST1300 engine so I can see this cam chain tension access point for the right cylinder bank?

BTW, below is a link to an article with very good background...

https://www.st-owners.com/forums/showthread.php?t=19514
If you were to take the left bank and rotate it to the right bank that's where the tensioner is located. In the valley.
 

Byron

Moderator
Joined
Mar 3, 2006
Messages
2,311
Location
KY
STOC #
6091
I have done valves on the right head several times. It is easier with two people but can be managed by yourself but a little tricky. I made the tool that is listed in the service manual and it works well on the left but no good on the right unless you remove the throttle bodies. A small pocket screwdriver or better a long shank driver that is small enough to fit.

I'm doing this from memory so be warned. :) The right tensioner is under the throttle-bodies in the front. Look at the left head and think about rotating it over to the right and that is where you will find the right. Once the heat shield is pulled out of the way you can see it with a flash light. There is a crush washer under the bolt that seals it so when taking out the bolt get it loose and then use your fingers at the last trying to make sure you trap the washer. If it falls off don't sweat it you just need to put a new one in when you put things back together.

Take the front girdle off first. When you're ready to remove the main girdle the cam chain tension will want to lift the ends of the cams, be ready to hold them down with one hand. With the other turn the screwdriver to relax the tensioner. Once the tension is released you can turn loose the cams and remove the chain from the sprockets. Make sure to run a safety string/wire through the chain so in case it slips in. Once the chain is off the sprockets you can let the tensioner unwind.

Putting things back together is simply reverse process. Two people is really easier.
 
OP
OP
RCS

RCS

Joined
Jul 3, 2008
Messages
1,401
Location
Stamford, CT
I have done valves on the right head several times. It is easier with two people but can be managed by yourself but a little tricky. I made the tool that is listed in the service manual and it works well on the left but no good on the right unless you remove the throttle bodies. A small pocket screwdriver or better a long shank driver that is small enough to fit.

I'm doing this from memory so be warned. :) The right tensioner is under the throttle-bodies in the front. Look at the left head and think about rotating it over to the right and that is where you will find the right. Once the heat shield is pulled out of the way you can see it with a flash light. There is a crush washer under the bolt that seals it so when taking out the bolt get it loose and then use your fingers at the last trying to make sure you trap the washer. If it falls off don't sweat it you just need to put a new one in when you put things back together.

Take the front girdle off first. When you're ready to remove the main girdle the cam chain tension will want to lift the ends of the cams, be ready to hold them down with one hand. With the other turn the screwdriver to relax the tensioner. Once the tension is released you can turn loose the cams and remove the chain from the sprockets. Make sure to run a safety string/wire through the chain so in case it slips in. Once the chain is off the sprockets you can let the tensioner unwind.

Putting things back together is simply reverse process. Two people is really easier.

Thank you. This explanation makes sense. I cancelled the RonAyers.com $45 stopper tool order. Instead, I'll use those funds to buy my wife dinner for helping me with the long shaft screwdriver 2X.
 

okotokssteve

Steve Crowe
Joined
Mar 16, 2008
Messages
35
Location
High River, Alberta, Canada
Bike
2004 ST1300
I found a used metric micrometer on Ebay. It came from a manufacturing plant in Ontario. It is a very good quality Starrett and I only paid about 30cdn. It will make your life a lot easier. I checked a few shims in my kit and it is spot on. My cheap imperial instrument, after I do the math, always seems to have a slight error.

Byron,
I was wondering if you could release the tensioners after you have the cams off. I'm glad you have that in your write up. I plan to adjust mine in the spring.
 
Joined
Mar 16, 2005
Messages
15
Age
67
Location
Swiftwater PA
STOC #
6791
I just used a small screwdriver, and after twisting it placed a small vice-grip on to hold it from turning till I was done.
 

Scooter

This space for rent...
Joined
Oct 12, 2005
Messages
1,779
Location
Germantown, WI
Bike
2019 BMW R1250RT
STOC #
5929
I just used a small screwdriver, and after twisting it placed a small vice-grip on to hold it from turning till I was done.
+1. This has worked for me also. This is what I used...

screwdriver.jpg

Before you remove the bolt to access the tensioner, place a sheet of paper towel or a shop rag underneath it to soak up the little bit of oil that will come out of the hole once the bolt is removed.
 
OP
OP
RCS

RCS

Joined
Jul 3, 2008
Messages
1,401
Location
Stamford, CT
All good advice. My plan is to do the work tomorrow. Since I only have to do the right side I am going to try to perform the task with only stripping the right side plastic. Think that will allow the right amount of access?
 
OP
OP
RCS

RCS

Joined
Jul 3, 2008
Messages
1,401
Location
Stamford, CT
I may be going nuts or the Service Manual has some mis-prints. On my 03-05 Service Manual Pg 8-30 it says:

"IF THE RIGHT CYLINDER CAMSHAFT ONLY IS REMOVED:

Remove the left cylinder head cover (pg. 8-7).

Turn the crankshaft counterclockwise and align the "T1" mark on the CKP sensor rotor with the index mark on the front crankcase cover."

My question. Is that correct?

*********************

The reason I ask is because on pg. 8-12 it says:

RIGHT CYLINDER CAMSHAFT REMOVAL

Turn the crankshaft clockwise, align the "T2" mark on the CKP sensor rotor with the index mark on the front crankcase cover.
 

Scooter

This space for rent...
Joined
Oct 12, 2005
Messages
1,779
Location
Germantown, WI
Bike
2019 BMW R1250RT
STOC #
5929
I may be going nuts or the Service Manual has some mis-prints. On my 03-05 Service Manual Pg 8-30 it says:

"IF THE RIGHT CYLINDER CAMSHAFT ONLY IS REMOVED:

Remove the left cylinder head cover (pg. 8-7).

Turn the crankshaft counterclockwise and align the "T1" mark on the CKP sensor rotor with the index mark on the front crankcase cover."

My question. Is that correct?

*********************

The reason I ask is because on pg. 8-12 it says:

RIGHT CYLINDER CAMSHAFT REMOVAL

Turn the crankshaft clockwise, align the "T2" mark on the CKP sensor rotor with the index mark on the front crankcase cover.

Where are you in the process? I just ignored all of that nonsense. Simply align the timing marks up on the camshafts first on the bank that you're working on. I only take apart one side at a time, that way I can't screw up the timing (as easily).
 
OP
OP
RCS

RCS

Joined
Jul 3, 2008
Messages
1,401
Location
Stamford, CT
I'm starting the process Saturday at 7am. Prepping tonight.

I'll do the alignment of the timing marks facing outward and make sure the #2 cylinder is at TDC on the compression stroke by checking the valve clearances of that cylinder.

Sound good?
 

Tor

Making Life A Ride
Site Supporter
Joined
Apr 6, 2005
Messages
1,899
Age
64
Location
Out in the sticks of NE SC
Bike
R1200 GSA / S1000XR
Sounds like a winner. When loooening the cam shaft holder bolts, the cam shaft holders A and B might be a little stubborn to get off, due to the fact they are doweled. Be patient. Don't use any screw drivers or anything else to try to pry these things off. A little rubber or plastic mallet knocking carefully on the corners will do. When you take the cam(s) out, use something to keep the cam chain tight. Don't use force on the feelers when measuring. When putting the holders back on the cams, a couple of careful knocks with a plastic/rubber mallet is enough to get the dowels seated. The torquing will take care of the rest. Use oil on the bearing surfaces before assembly.

When you install the valve cover, make sure you check on the inside of the cover making sure the rubber mat under the fuel rail / injector assy is not caught between the cover and the head.

Good luck and have fun...
 

Scooter

This space for rent...
Joined
Oct 12, 2005
Messages
1,779
Location
Germantown, WI
Bike
2019 BMW R1250RT
STOC #
5929
I'll do the alignment of the timing marks facing outward and make sure the #2 cylinder is at TDC on the compression stroke by checking the valve clearances of that cylinder.

Sound good?
I'm assuming that you already made your measurements. Once you have the R-EX and R-IN marks aligned outward and the T2 mark is aligned with the index mark on the front crankcase cover you will be where you need to be. No need to measure again at this point.

Just a reminder since you seem to be reading the manual real thoroughly, you don't need to remove the cam sprocket bolts like they describe in the manual since you are not replacing the sprocket nor the camshaft itself. Sometimes its easy to miss the notes on the sides of the page.

Once you get things back together you should verify your clearances again just to make sure that you got the right shim installed. Before you make the measurement, I would rotate the crankshaft a couple of times first.

Have fun tomorrow.
 
OP
OP
RCS

RCS

Joined
Jul 3, 2008
Messages
1,401
Location
Stamford, CT
Done.

Thanks for all the advice. Changing the shim on the #2 cylinder was very easy. The process did take time but nothing difficult.

One learning. To turn the camchain tension screw I needed a 1/8th inch by 8" long slotted screwdriver that I picked up at the local hardware store. I used a small vice grip to hold it in place. Did the whole job by myself with two hands. No problem.

The 3/16ths inch by 12" long driver I picked up months ago was too wide.
 
Top Bottom